Reimplementation of DreamerV2 model-based RL algorithm in PyTorch.
The official DreamerV2 implementation can be found here.
This is a research project with no guarantees of stability and support. Breaking changes to be expected!


50-step long "dream" sequences generated by the model from an initial state.
PyDreamer implements most of the features of DreamerV2, but is not an exact copy and there are some subtle differences. Here is a summary of features and differences.
| DreamerV2 | PyDreamer | |
|---|---|---|
| Env - Discrete actions | ✅ | ✅ |
| Env - Continuous actions | ✅ | ✅ |
| Env - Multiple workers | ❌ | ✅ |
| Model - Categorical latents | ✅ | ✅ |
| Model - Policy entropy | ✅ | ✅ |
| Model - Layer normalization | ✅ | ✅ |
| Training - KL balancing | ✅ | ✅ |
| Training - Reinforce policy gradients | ✅ | ✅ |
| Training - Dynamics policy gradients | ✅ | ✅ |
| Training - Multistep value target | TD-λ | GAE |
| Training - State persistence (TBTT) | ❌ | ✅ |
| Training - Mixed precision | ✅ | ✅ |
| Training - Offline RL | ❌ | ✅ |
| Exploration - Plan2Explore | ✅ | ❌ |
| Data - Replay buffer | In-memory | Disk or cloud |
| Data - Batch sampling | Random | Full episodes |
| Metrics - Format | Tensorboard | Mlflow |
PyDreamer also has some experimental features
| PyDreamer | |
|---|---|
| Multi-sample variational bound (IWAE) | ✅ |
| Categorical reward decoder | ✅ |
| Probe head for global map prediction | ✅ |
PyDreamer is set up to run out-of-the-box with the following environments.
You should use the Dockerfile, which has all the dependencies set up, and then --configs defaults {env} to select one of the predefined configurations inside config/defaults.yaml.
Here is a comparison between PyDreamer and the official DreamerV2 scores on a few Atari environments:
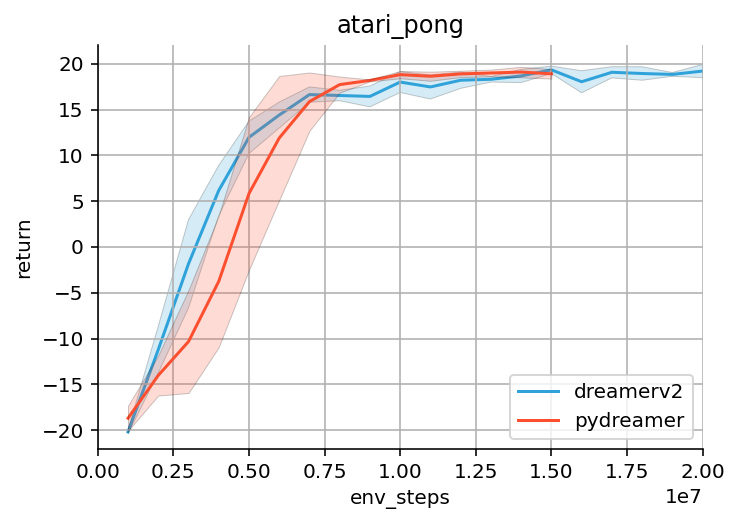

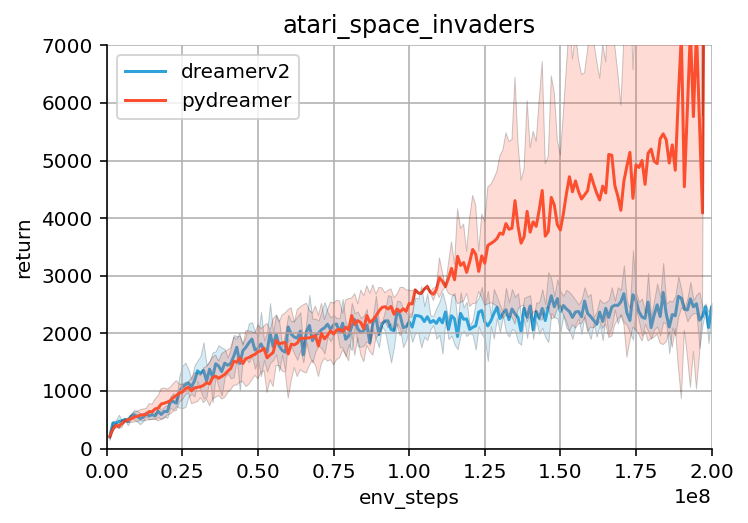

The results seem comparable, though there are some important differences. These are most likely due to different default hyperparameters, and the different buffer sampling (random vs whole episodes)
| DreamerV2 | PyDreamer | |
|---|---|---|
gamma |
0.999 | 0.99 |
train_every |
16 | ~42 (1 worker) |
lr (model,actor,critic) |
(2e-4, 4e-5, 1e-4) | (3e-4, 1e-4, 1e-4) |
grayscale |
true | false |
buffer_size |
2e6 | 10e6 |
PyDreamer uses separate processes for environment workers, so the trainer and workers do not block each other, and the trainer can utilize GPU fully, while workers are running on CPU. That means, however, that there is no train_every parameter, and the ratio of gradient updates to environment steps will depend on the hardware used.
To give a rough idea, here is what I'm getting on NVIDIA T4 machine:
- 1.4 gradient steps / sec
- 60 agent steps / sec (single worker)
- 240 env steps / sec (x4 action repeat)
- 42 train_every (= agent steps / gradient steps)
On V100 you should be seeing ~3 gradient steps/sec, so effective train_every would be ~20. In that case it is probably best to increase number of workers (generator_workers) to accelerate training, unless you are aiming for maximal sample efficiency.
Install dependencies
pip install -r requirements.txtIf you want to use Atari environment, you need to get Atari ROMs
pip install atari-py==0.2.9
wget -L -nv http://www.atarimania.com/roms/Roms.rar
apt-get install unrar                                   # brew install unar (Mac)
unrar x Roms.rar                                        # unar -D Roms.rar  (Mac)
unzip ROMS.zip
python -m atari_py.import_roms ROMS
rm -rf Roms.rar *ROMS.zip ROMS
Run training (debug CPU mode)
python launch.py --configs defaults atari debug --env_id Atari-PongRun training (full GPU mode)
python launch.py --configs defaults atari atari_pongdocker build . -f Dockerfile -t pydreamer
docker run -it pydreamer --configs defaults atari atari_pongSee scripts/kubernetes/run_pydreamer.sh
All of the configuration is done via YAML files stored in config/*.yaml. PyDreamer automatically loads all YAML files it finds there, and when you specify --configs {section1} {section2} ... it takes a union of the sections with given names.
The typical usage is to specify --configs defaults {env_config} {experiment}, where
defaultsloads the default settings from config/defaults.yaml{env_config}(e.g.atari) overrides the environment-specific settings from config/defaults.yaml{experiment}(e.g.atari_pong) loads the experiment parameters from config/experiments.yaml
You can also override individual parameters with command line arguments, e.g.
python launch.py --configs defaults atari --env_id Atari-Pong --gamma 0.995PyDreamer relies quite heavily on Mlflow tracking to log metrics, images, store model checkpoints and even replay buffer.
That does NOT mean you need to have a Mlflow tracking server installed. By default, mlflow is just a pip package, which stores all metrics and files locally under ./mlruns directory.
That said, if you are running experiments on the cloud, it is very convenient to set up a persistent Mlflow tracking server. In that case just set the MLFLOW_TRACKING_URI env variable, and all the metrics will be sent to the server instead of written to the local dir.
Note that the replay buffer is just a directory with mlflow artifacts in *.npz format, so if you set up an S3 or GCS mlflow artifact store, the replay buffer will be actually stored on the cloud and replayed from there! This makes it easy to persist data across container restarts, but be careful to store data in the same cloud region as the training containers, to avoid data transfer charges.