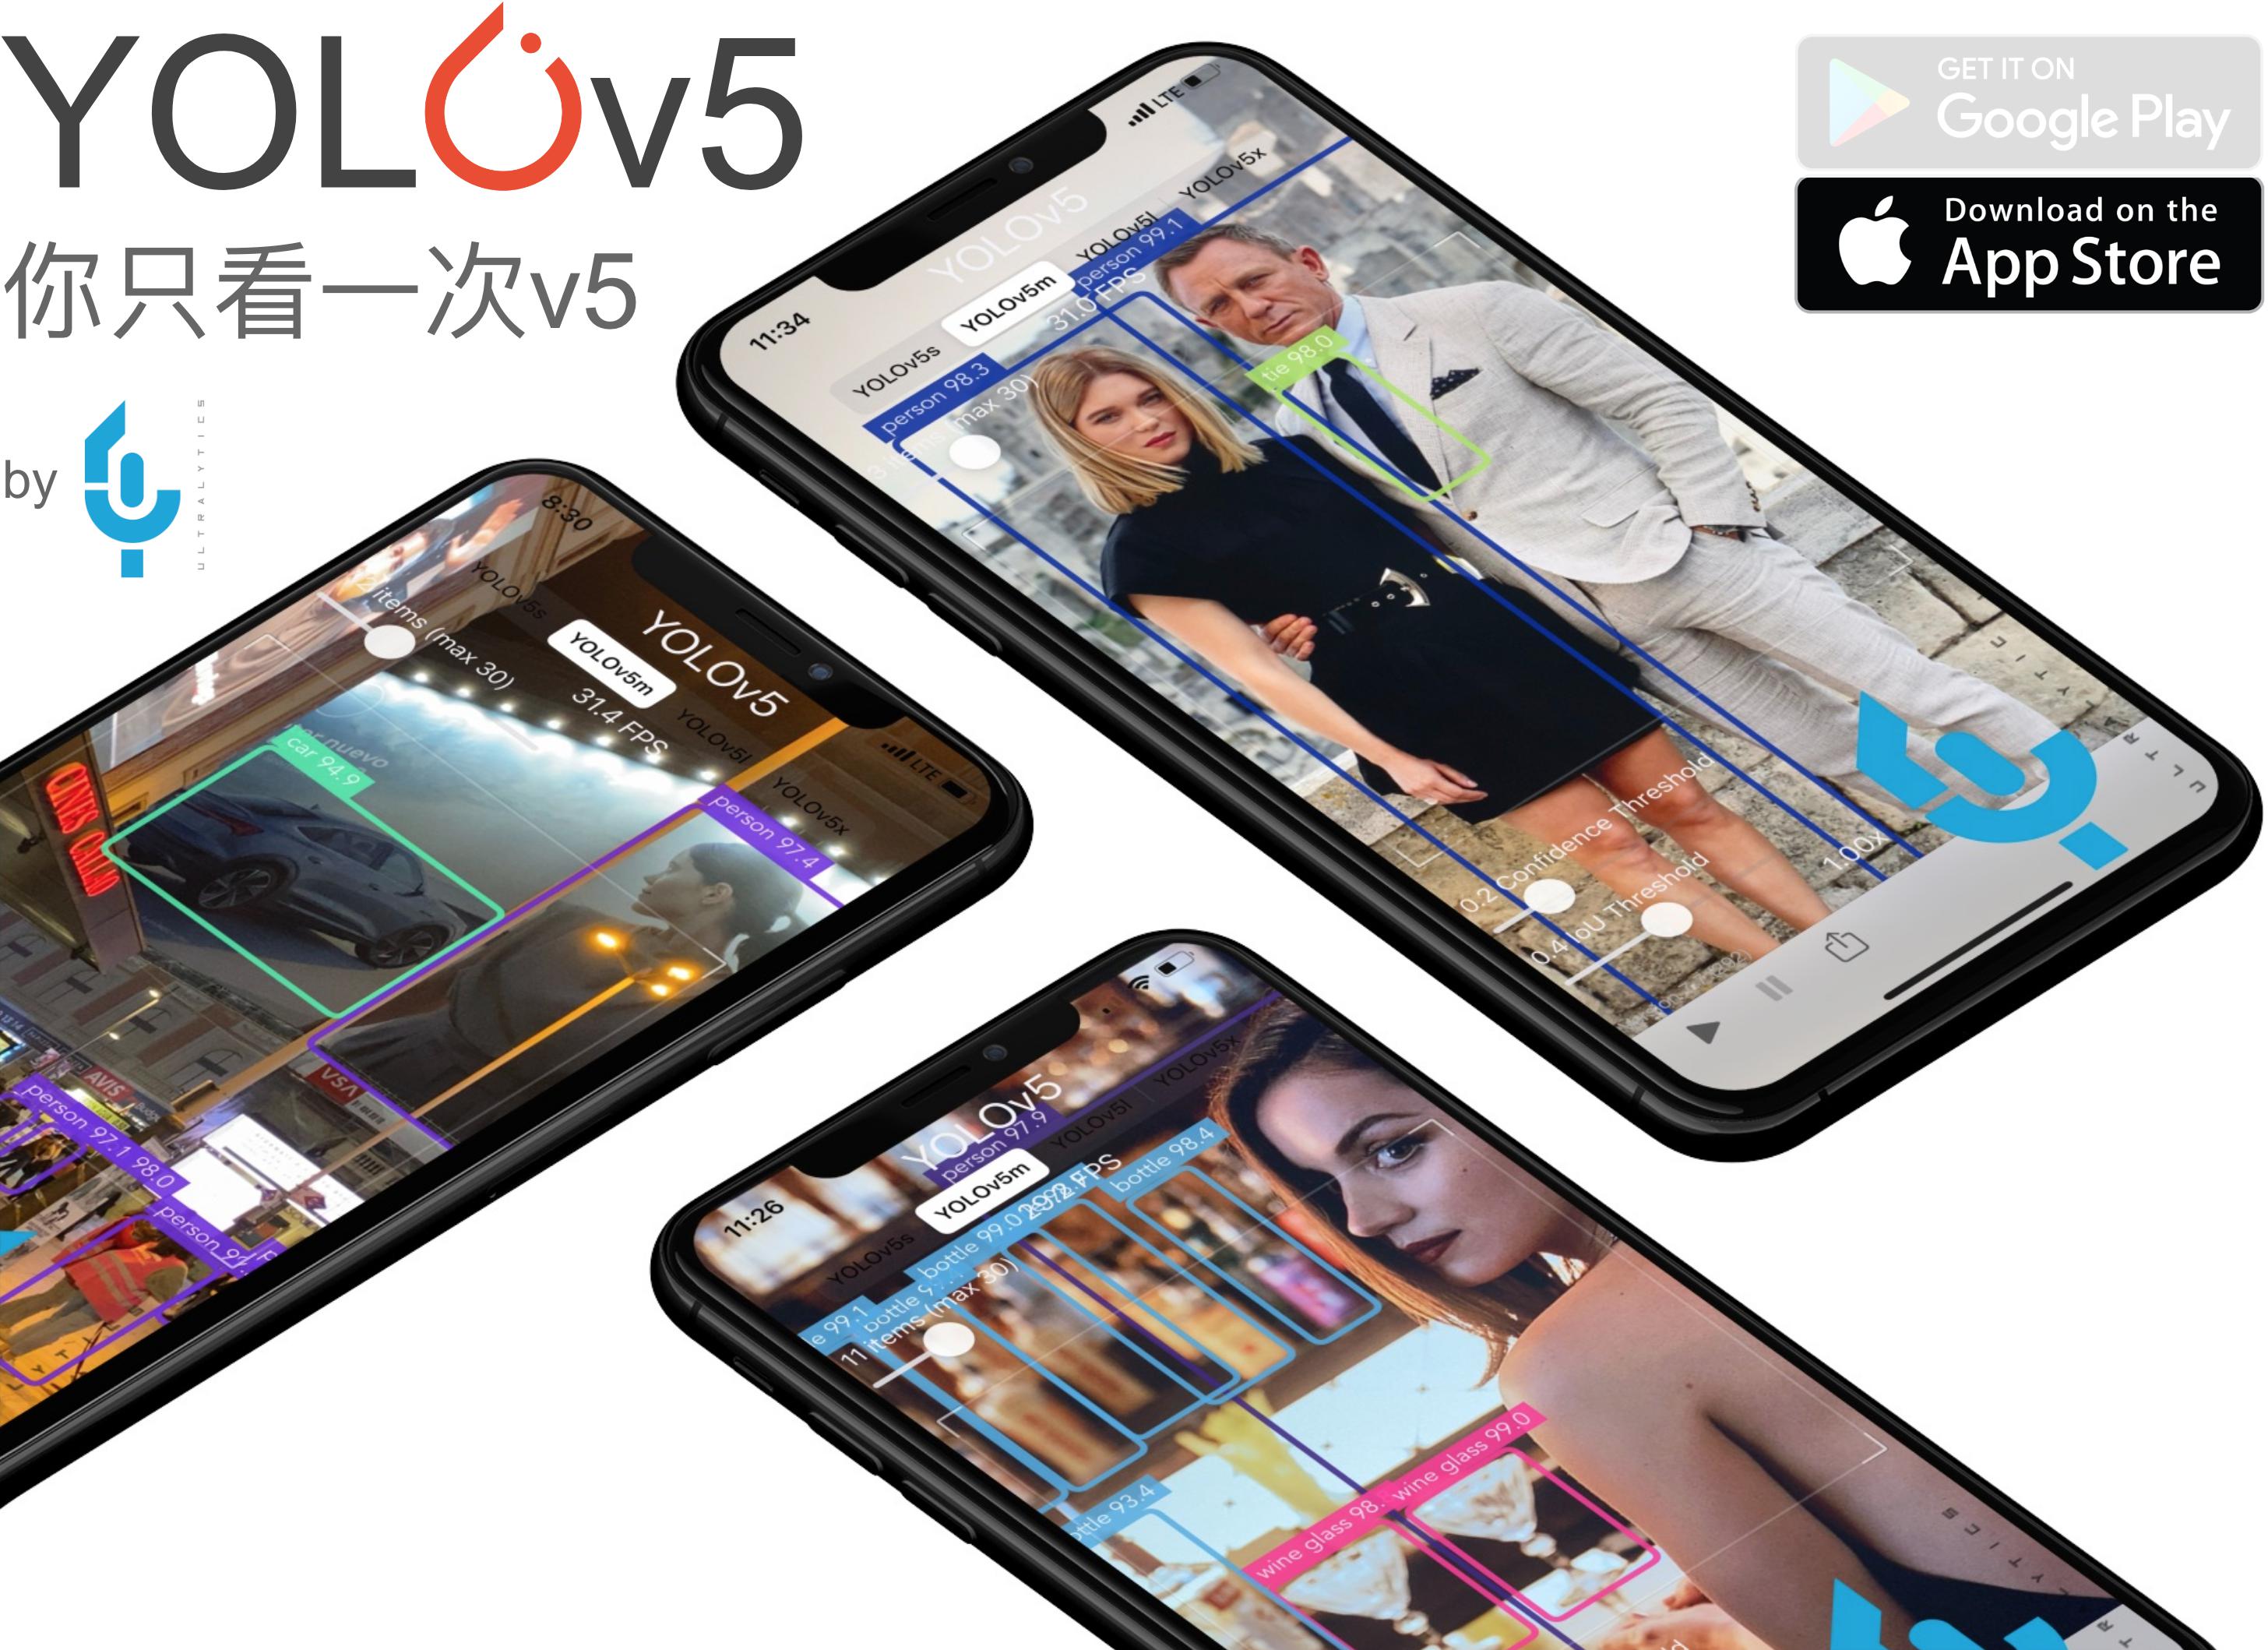
Multi YOLO V5——Detection and Semantic Segmentation
Overeview
This is my undergraduate graduation project which based on ultralytics YOLO V5 tag v5.0.
This multi-task model adds only a small amount of computation and inferential GPU memory (about 350MB) and is able to accomplish both object detection and semantic segmentation. Object detection metrics are slightly improved (compared to single-task YOLO) on my dataset (transfer from Cityscapes Instance Segmentation labels) and Cityscapes semantic segmentation metrics are shown below. This repository will not be updated in the near future(after tag TomMao-2.0 realse) and future version will probably be released to MANA AI. To save my time and facilitate handover, please forgive me for the following document will be written in Chinese.
Demo Video

In the semantic segmentation section, I refer to the following code:
- zhanghang1989/PyTorch-Encoding: A CV toolkit for my papers. (github.com)
- CoinCheung/BiSeNet: Add bisenetv2. My implementation of BiSeNet (github.com)
- ycszen/TorchSeg: Fast, modular reference implementation and easy training of Semantic Segmentation algorithms in PyTorch. (github.com)
- YudeWang/semantic-segmentation-codebase: Codebase for semantic segmentation experiments (github.com)
这是我的本科毕设,基于ultralytics/yolov5多任务模型。以增加少量计算和显存为代价,同时完成目标检测和语义分割(1024×512输入约增加350MB,同尺寸增加一个bisenet需要约1.3GB,两个单任务模型独立输入还有额外的延时)。模型在Cityscapes语义分割数据集和由Cityscapes实例分割标签转换来的目标检测数据集上同时训练,检测结果略好于原版单任务的YOLOV5(仅限于此实验数据集),分割指标s模型验证集mIoU 0.73,测试集0.715;m模型验证集mIoU 0.75测试集0.735。由于将继续考研,tag 2.0发布后仓库近期不会再频繁更新,issue大概率不会回复(问题请参考以下Doc,震荡爆炸请尝试砍学习率。若后续考上研应该会在本仓库跟进yolov5的更新并尝试新分割结构、增加更多任务、多卡训练和部署的支持),未来版本可能由其他人整理/重构发布在MANA AI。模型测试集指标和速度对比如上图(对比不完全公平,我用了yolo官方的COCO检测预训练模型,训练中使用了检测数据,但推理时会比以上模型多跑一个检测头),可视化如下图:
效果视频见bilibili demo video


Doc
0. Before Start 环境配置和数据集准备
(a) Environment
目前建议直接用主分支BS2021,近期不会再更新功能和结构,但如果issue提出BUG空闲时候会尽力在主分支修复
$ python -m pip install -r requirements.txt
$ python -m pip uninstall wandb
注意!当前代码未做多卡训练和wandb支持, 不卸载训练大概率有bug
(b) Dataset Prepare 数据集准备
本模型检测和分割数据集独立加载,不要求类别相同。当前支持Cityscapes语义分割数据集和实例分割标签生成的目标检测数据集(新增BDD100k混合Cityscapes训练支持,把BDD100k当做一个cityscapes的一个城市组织数据集格式),扩展语义分割数据集需要增改代码,继承BaseDataset类。目标检测数据集可以同原版yolo自行替换,参考原版YOLOV5文档和./data/cityscapes_det.yaml文件
下载数据:自行到官网下载Cityscapes数据集,把leftImg8bit和gtFine放入./data/citys文件夹中,也可使用citys中的bash脚本下载,需要先把脚本中的帐号密码改成你自己的
数据预处理:进到citys文件夹下运行citys文件夹的2yolo_filter.py生成目标检测标签.在citys文件夹中新建一个detdata文件夹,把生成的images和labels文件夹剪切到detdata中
注:比较费空间,只做Cityscapes实验的话可以考虑删除复制的图像,把leftImg8bit的图软链接到detdata中(但不要移动leftImg8bit和gtFine文件夹,分割要用)
$ cd ./data/citys
$ python 2yolo_filter.py
$ mkdir detdata
$ mv ./images ./detdata
$ mv ./labels ./detdata
2.0版本准备了4种分割Head的预训练模型。从可视化上更推荐psp和lab(感受野更大),速度上没有太大差别,base最快,psp第二,lab和bise接近:
推荐指数:Lab和PSP > Base和BiSe
base.pt 基础版本的分割head。16层(PAN1/8)输入,配置文件通道512。C3,通道略拓宽版本的C3SPP,dropout(0.1),1×1卷积到类别。速度精度综合效果不错,但是SPP配1/8图感受野其实不够大,s模型够好了,但m模型加深加宽后提高量不让人满意。
bise.pt 模仿BiSeNetV1的分割头,精度略大速度与base相似。16,19,22(PAN的1/8,1/16,1/32)输入,配置文件通道无效。ARM改成RFB2增强非线性BiSeNet每个Upsample后有一个3×3卷积refine,这里省计算放在Upsample前。BiSeNet的辅助损失系数是1,这里辅助损失太大结果不好。
lab.pt 模仿DeepLabV3+的分割头,验证集精度与psp和bise接近,速度略慢于psp和base,与bise相仿。4(或3),19(浅层1/8,PAN的1/16)输入,配置文件通道256。1/8图1×1卷积到48通道,1/16图过RFB1(ASPP类似的替代)。DeepLabV3+解码器部分用了浅层1/4和深层1/16,这里是1/8和1/16因为YOLO 1/4图通道数太少且太浅,并联后不3×3refine会比较破碎,refine则计算量太大。论文提到浅层大分辨率图通道少更利于训练,同论文到48。论文提到VOC用了ASPP全局更好,Cityscapes用了全局更差,这里未使用全局(实验中用了全局边缘会比较破碎,psp却是用了全局更好)。相比DeepLab解码器部分这里多了FFM注意力融合结构,为了用3×3砍了一点隐层减少计算量。
psp.pt 模仿PSPNet的分割头,目前精度最高,速度仅次于base。16,19,22三层融合输入,未找到合适的地方放辅助损失,放弃辅助损失
Pretrained Model百度网盘 提取码cjxg
pspv5s.pt表示psp头的yolov5s模型,pspv5m.pt表示yolov5m其他几个命名同理,预训练模型多是用上述cityscapes分割数据和实例分割生成的检测数据训练的,19个分割类,10个检测类。pspv5m_citybdd_conewaterbarrier.pt这个模型的分割部分使用了bdd100k和cityscapes两个数据集混合,检测部分数据不开放,各种车辆均归为vehicle,pedestrain和rider均归为person,bike和motorcycle均归为cycle,另有三角锥cone和水马waterbarrier类别。
1. Inference 推理图片、视频,用连续帧制作视频,向Cityscapes提交,测速
(a) 普通图片推理
$ python detect.py --weights ./pspv5s.pt或其他模型 --source data/images --conf 0.25 --img-size 1024
data/images里几张图片来自cityscapes测试集、bdd100k、apollo scape和yolo。此外data/test_imgs放了一些apollo的图,可以看看cityscapes训练后在apollo上的效果(使用了bdd100k训练的效果会再好一点)
结果图片在runs/detect文件夹中,也可以推理同时显示。
$ python detect.py --weights ./pspv5s.pt或其他模型 --source data/images --conf 0.25 --img-size 1024 --view-img
同原版YOLOV5,--weights写你的pt文件,--source写图片文件夹或者视频文件的路径,--conf检测阈值,--img-size为resize到模型的目标长边尺寸
(b) 同尺寸连续帧图片制作视频
$ python detect.py --weights ./pspv5s.pt或其他模型 --source 图片文件夹 --conf 0.25 --img-size 1024 --save-as-video
我只写了同尺寸图片制作视频的支持(例如Cityscapes提供的三段连续帧测试图片,bilibili的demo视频就是这些图),把你的图片放入同一文件夹内,注意若存在不同尺寸图片则结果视频会保存失败,若开了--no-save视频保存的图不会画结果(别开)
(c) 向Cityscapes提交测试集结果
$ python detect.py --weights ./pspv5s.pt或其他模型 --source 图片文件夹 --conf 0.25 --img-size 1024 --submit --no-save
开了--no-save不保存结果会快很多并省空间,把测试集6个文件夹的图片合并在一个文件夹进行推理,结束后会在此次的runs/detect/此次exp里找到一个results文件夹,里面是将trainid转换为id的结果,压缩上传官网即可
也可以分别推理6个文件夹,结果合并压缩上传
(d) 测速
测速就用(c)提交的参数来在同尺寸图片上测,或推理视频测。(a)图片推理没有开cudnn.benchmark,推理视频文件时候或是开了--submit或是开了--save-as-video时候会开启cudnn.benchmark,此时是真正的运行速度
注:cudnn.benchmark开启后第一帧图片会测试各种cudnn算子并记录,之后同尺寸的每帧图像都会使用最快的算子。cudnn.benchmark仅在同尺寸图像推理时候开启,否则每输入新尺寸图就会测一遍
yolov5默认使用float16推理,在20和30系列显卡差别不会很大,但在10和16系列显卡上不开cudnn.benchmark会慢非常多,因此建议测速在cudnn.benchmark开启时候测
2. Test 训练后测试模型
$ python test.py --data cityscapes_det.yaml --segdata ./data/citys --weights ./pspv5s.pt --img-size 1024 --base-size 1024
对比原版多两个参数: --segdata后写Cityscapes数据集的文件夹地址(现在只支持这个,可以参考SegmentationDataset.py自行扩展)
检测长边和分割长边参数分离,--img-size是检测长边 --base-size是分割长边,我的配置是把Cityscapes放在1024*512尺寸下推理,比较能兼顾速度精度,训练也是以此为目的调参的.
如果训练后测试你自己的数据集,用test_custom.py(训练中train_custom.py会测)
$ python test_custom.py --data 你的.yaml --segdata 你的分割数据路径 --weights ./pspv5s.pt --img-size 1024 --base-size 1024
3. Train 如何复现我的结果
训练前先下载对应的原版(注意我是在tag V5.0代码上改的)COCO预训练模型做初始化,见原版readme和weights/download_weights.sh脚本
$ python train.py --data cityscapes_det.yaml --cfg yolov5s_city_seg.yaml --batch-size 18 --epochs 200 --weights ./yolov5s.pt --workers 8 --label-smoothing 0.1 --img-size 832 --noautoanchor
不一定如示例训200轮(这是我训上述预训练模型为了让其尽量收敛的参数),建议最少训80轮,我一般训150到180轮
以上提到我的目标长边是1024,但这里是832,这个版本的代码为了节省显存增大batchsize和方便尝试加aux loss决定在832上训练调参,1024上推理.训练中输出的检测指标是832的,分割指标是1024的,建议训完再用test.py测试1024的结果
用--noautoanchor是因为COCO的anchor正好适合cityscapes1024的输入(832的autoanchor偏小了),能缓解anchor上的问题。即使如此832上训1024推理虽然指标高了,但可视化会看到一些anchor的问题。若你的显卡有11G,可以适当调小batchsize直接用1024来训
注意:为了加快训练我设置每10轮测试一次分割精度,最后40轮每轮测试分割精度
务必保证warmup期间(即我打印的accumulate达到目标值前)损失不发生过大震荡(现象:出现Nan,损失跑飞,严重影响到检测cls损失。一轮到两轮分割检测损失走高马上回落属正常现象),出现以上现象考虑砍学习率,当前学习率理论上各种batchsize应该都不会跑飞。
训你自己的数据集请看这里
4. Code Guide 我修改了什么,调参/改进指南
-
梯度积累
学习率和检测分割损失比(后者在train.py内未暴露出来)是一组非常重要的参数.必须清楚YOLOV5使用了梯度积累,不管你的batchsize是多少,“名义batchsize”都是作者预设的64。这意味着当你设置batchsize为16时,将会每4个batch才更新一次参数(具体积累几次看训练时候我打印的accumulate,第一次是目标值,后续是当前值),即实际的batchsize是你输入的batchsize的倍数中最接近64的那个(此处我将原代码修改为严格不超过64)。因此你输入的batchsize 17(实际51)要比16(实际64)小很多,调整学习率时候应注意到这点。过小的batchsize影响BN层也可能导致震荡,当前参数是在11G的显卡上设置的batchsize为18,弱修改了batchsize注意观察warmup期间的损失变化,accumulate达到目标值前发生较大震荡应考虑减小学习率。 -
common.py
此代码是YOLOV5中的常用基础操作类,我在其中增加了BiSeNet的ARM、FFM,RFB1、2(非RFBNet,魔改版本见代码注释),ASPP(接口上增加了用于砍通道的参数),ASPPs(先用1*1减少输入通道从而可以少砍一些中间通道),Attention(通道注意力,相当于不带3×3卷积的ARM,基础SE),DAPPM(见哈工大论文,这里效果不明显),PyramidPooling(PSPNet) -
yolo.py
yolov5的模型主架构代码,包括Model类和检测要用的Detect类,我把新加的四种分割头类放在这个代码中(可能放common.py会更清爽些)。所有新加的模块要放入模型都必须要经过Model类,以下部分请重点关注:
(1) Model的初始化函数中,我在save中手动添加了24层(分割层号,检测是25)。原代码forward_onece采用了for循环前向推理,将后续会用到的层结果保存在列表中(会用到哪些层由parse函数对yaml配置文件解析得到,在初始化函数中调用了parse,需要保存的中间层号在save列表,forward时候按照save序号将对应层中间结果存入y列表),目前的方法中由于我手动加入24层,检测层运行结束后,会返回x(检测结果)和y [-2] (分割结果)。因此若修改了配置文件增加了新的层(例如给最新的P6模型增加分割层),务必修改Model的初始化函数把24换成新的分割层号(这确实不是个好接口,赶时间,另外别把24改成-2,看yolo原版代码就知道这么改不管用)。另外yolov5原作者在很多代码中默认了检测层是最后一层,务必在配置中把检测层放在最后一层。
(2) Model的解析函数parse_model从yaml文件解析配置,如果想增加新的模块首先在common.py或yolo.py中实现该类,在parse_model中仿照写出该类的解析方法,再在配置文件中写入配置。如果仿照我的分割头类接口设计新增分割头,仅需实现类,在parse_model的解析分割头的支持列表中加入该类名即可。 -
models/yolov5s_city_seg.yaml
模型配置文件,可以看到我在检测层前面加了分割层配置,并增加了分割类别(cityscapes是19)。推理不同head预训练模型不用修改,想训练不同head模型需要注释和解注释(psp、base和lab不用再改train.py但bise还要注释和解注释train.py的两个地方加入aux loss,后续会说明,接口设计缺陷,但暂时没时间改,实际上用psp、base、lab就够了,除非你想增加辅助损失)。s,m,l模型参照原版,区别仅在控制深度和宽度的depth_multiple, width_multiple数值(base,psp和lab的分割头也会随s,m,l自动放缩)。 -
data/cityscapes_det.yaml
检测数据集配置,同原版,新增了分割数据集地址,train.py读分割数据地址是按这里配置的 -
test.py
新增了分割测试函数 -
utils/loss.py
新增了带aux的分割CE损失(目前用这个),分割Focal loss(比较充分的实验说明效果不好,至少低1个点),OHEM(理论上应该好于CE,实际低了零点几个点,和学习率和损失比有一定关系,梯度积累机制上似乎也有点bug),总之多数情况建议用CE,类别极不平衡时候再考虑ohem和focal loss。 -
utils/metrics.py
新增了fitness2函数用于train时候选模型,包括P,R,[email protected],[email protected]:.95和mIoU的比例。新增了计算mIoU函数。 -
detect.py
新增了画分割和叠加图、同尺寸图保存视频以及用于提交的trainid转id功能(见上面推理部分),修改了开cudnn.benchmark的情况 -
SegmentationDataset.py
分割数据处理类。原始代码来自pytorch-ecoding项目,魔改了一番,增加了colorjittor,增加了resize长边非均匀采样,修改了crop方式,修改了testval mode的方式,废除了val mode(比testval mode快很多,但是测出的值不是准确精度.在训练图片尺寸不同时候可以用这个,也可以用testval把batchsize设为1),图片尺寸相同时训练中和后都用testval mode。目前问题在于处理繁杂加载效率不是很高,对CPU和磁盘要求比较高(colab和kaggle上很慢)。训练过程中可能会卡一段时间或出现only test a child process,程序并没有死,等待一小段时间就好了,属于bug的正常现象。训练其他分割数据例如BDD100k需要仿照cityscapes继承基础类(已实现cityscapes和bdd100k混合类,以及示例用的custom_data类),特别是标签转换部分,注意pad的像素为255和普通ignore类别加载时候一并转换成-1,有些数据集id需要转成trainid(目前的custom_data类是针对不用转id,ignore标记为255的数据,同bdd100k)。 -
train.py
训练流程是每个batch跑一组检测数据backward,然后跑一组分割数据backward,然后accumulate后统一更新参数。每10轮测一次分割精度,最后40轮每轮测,测分割时候才会更新best.pt。(之所以这么做是因为testval mode的loader有点问题导致部分子进程死亡,测分割很慢,我机器上1分钟多点)。另外目前还没写多卡训练的支持,暂时用不了多卡。
时间关系ohem和CE接口没保持一致,循环中CE接口aux不同个数输入求损失处没保持一致,替换带aux loss的分割头训练时候要注释解注释train.py这两个地方(用很长的-----注释标出)。 -
一些设计经验
- 分割头入口尽量多一点非线性会使分割和检测都比较好(例如加深一点,PSP和bise里用RFB2就是如此)。分割头过于简单时会变成检测的辅助,此时检测涨点可能比用较深的分割头时候还高,但分割点很难提上去。
- 建议用16,19,22层而不要用17,20,23层作为分割的输入。用后者对分割有好处,原因是C3本身起到了一个特征融合的作用,但是检测会掉2到3个点,因为检测头仅仅是在17,20,23后加个1*1。使用前者仅仅并联了通道不算是融合(至少还得来个1×1),需要引入额外的模块来融合,比起用后者会加计算量,但是把C3留给检测做变换,检测不掉反而会涨点(分割会优化特征),分割也可以做到用后者同样精度,当然同精度下速度会慢点。
- 融合时用cat后1×1包含了add加激活的效果,但并不总是比add好,相比这两者FFM是一个效果不错的融合方式。
- 深浅差距较大的层融合最好用3×3效果比较好,有时候宁可砍掉点通道用3×3
- DeepLabV3+的经验值得学习,语义层比细节层通道多更容易拟合数据,分割结果也不容易破碎。
- 用了浅层图的解码器要改深一点给足够的非线性让其融合(比如base可以直接256就分类,lab就得来)
- dropout多数情况作用不大(mmsegmentation和bisenet原作均未用dropout),与BN的冲突也没理论上那么大,输出层前加0.1的dropout可选,区别不大(pytorch-encoding等常用写法)
- 空洞卷积效果很给力但计算量也很大, ASPP等必须砍通道。
- 输入分辨率没那么高(1024×512,很多模型是2048×1024),1/32图处加aux head和loss效果似乎不太好,1/16加不错
- 同上,lab头的实验证明了1/16为主也是可行的,但我的其他实验证明使用1/32为主和1/8融合效果不好(推测原因是半尺寸的1/32太小)
- yolo的FPN和PAN用的是cat,19 cat包含了4,理论上可以学出来,然而实验表明当做细节层时候直接用第4层比用16层好,语义层融合(或单输入层)自然是用16,19,22比浅层好,用17,20,23会和检测冲突。
- 当前的backbone其实感受野本身也偏小,更合理的改进是不只在分割head扩大,backbone也应该适当扩大感受野
- yolov5新的P6模型可能很适合做这个(不用ASPP而仅使用多尺度层融合),我没来得及实验
-
一些调参和其他经验
- 输入长边尺寸是1024所以空洞卷积的膨胀率没必要那么大(deeplabv3+原文1/16处6,12,18),砍半或者比半略大就够了,太大速度降得多,精度还没收益。
- BiSeNet的经验表明分割模型通道没必要那么多,128就不错了,但是一些多尺度的中间通道提高有助于精度(SPP,ASPP,RFB等,当然有的速度代价也不小,特别是空洞卷积。
- batchsize太小对BN不好,震荡可能要砍学习率,但是crop太小或是小图训大图跑也不好,6G卡毫无疑问在832训832或者1024跑,11G卡考虑1024训1024跑(果然增加多卡支持和大图和syncbn才是正道,money is all you need!!!)
- 检测和分割的尺度不应该差异太大,否则两任务会冲突导致精度都下降。
- 训练和推理尺度不应该差异太大(不只指标的问题)。
- resize长边非均匀采样后目标尺寸的指标比均匀采样要好
- 尺度是个模型和数据两方面的问题,模型感受野要够大够灵活(多尺度融合),采样上也要在训练时让模型见过各种尺度样本(太小apollo天空图过不去,太大自身精度下降,非均匀采样在这里起到作用,更关注目标尺度样本,“见过”极端尺度样本,当然模型结构更重要)
- 原yolo的测试图片和一张apollo带桥(cityscapes没有,但是bdd100k有)且光线条件较差的图片被保留,展示模型何时不起作用(COCO尺度和Cityscapes很不一样)
5.自问自答,节省issue时间
1. 训练时候报only test a child process或者加载卡住是BUG,但是程序其实没有死,等待一会(若有谁解决了加载效率和这个问题,烦请issue戳一下)
2. testval mode加载器比较慢,但正常不应该达到2分钟以上
3. 没看过yolo源码可以魔改吗? -可以,直接在我的分割头和配置文件上改,可以不用去看解析函数等代码。涉及修改backbone,分割层不在24层,接口不同的分割头时候需要至少读过yolo.py相关代码特别是Model的初始化、parse和run_once三部分
4. 训这个前建议至少训过原版yolov5,很多流程和原版一样
5. 我把train_custom.py里的分割验证loader的batchsize改成1了,目的是兼顾有不同尺寸的数据集,同尺寸数据集嫌慢的可以手动改一下代码把分割验证batchsize调大。不同尺寸也嫌慢的可以去train_custom.py解注释val mode的loader然后把testval mode的loader注释
6. 训自己数据集看上面的教程链接,但还是建议读一下SegmentationDataset.py做了什么,必要时候自己实现类
7. 代码接口和命名风格问题。这个仓库的代码有的是我自己写的,有的是我原样搬过来用的,更多是我参考论文及对应源码后抄过来实验修改的,所以接口设计和命名风格不一致,请见谅。
8. 大量注释问题。在开始动手前我花了一个星期阅读yolov5的代码,为了节省时间和不产生歧义以及区分原版注释和我的记录,我在代码中写了大量中文注释。这些注释可能帮助初学者理解yolov5的一些函数,但未经过严格复查,如有错误注释或历史遗留注释请见谅。
9. 这个项目没有什么创新,代码也很乱很烂,但是受益于yolov5的工作速度精度性能很好,因此值得开源出来
原版readme分割线
![]()
This repository represents Ultralytics open-source research into future object detection methods, and incorporates lessons learned and best practices evolved over thousands of hours of training and evolution on anonymized client datasets. All code and models are under active development, and are subject to modification or deletion without notice. Use at your own risk.

YOLOv5-P5 640 Figure (click to expand)
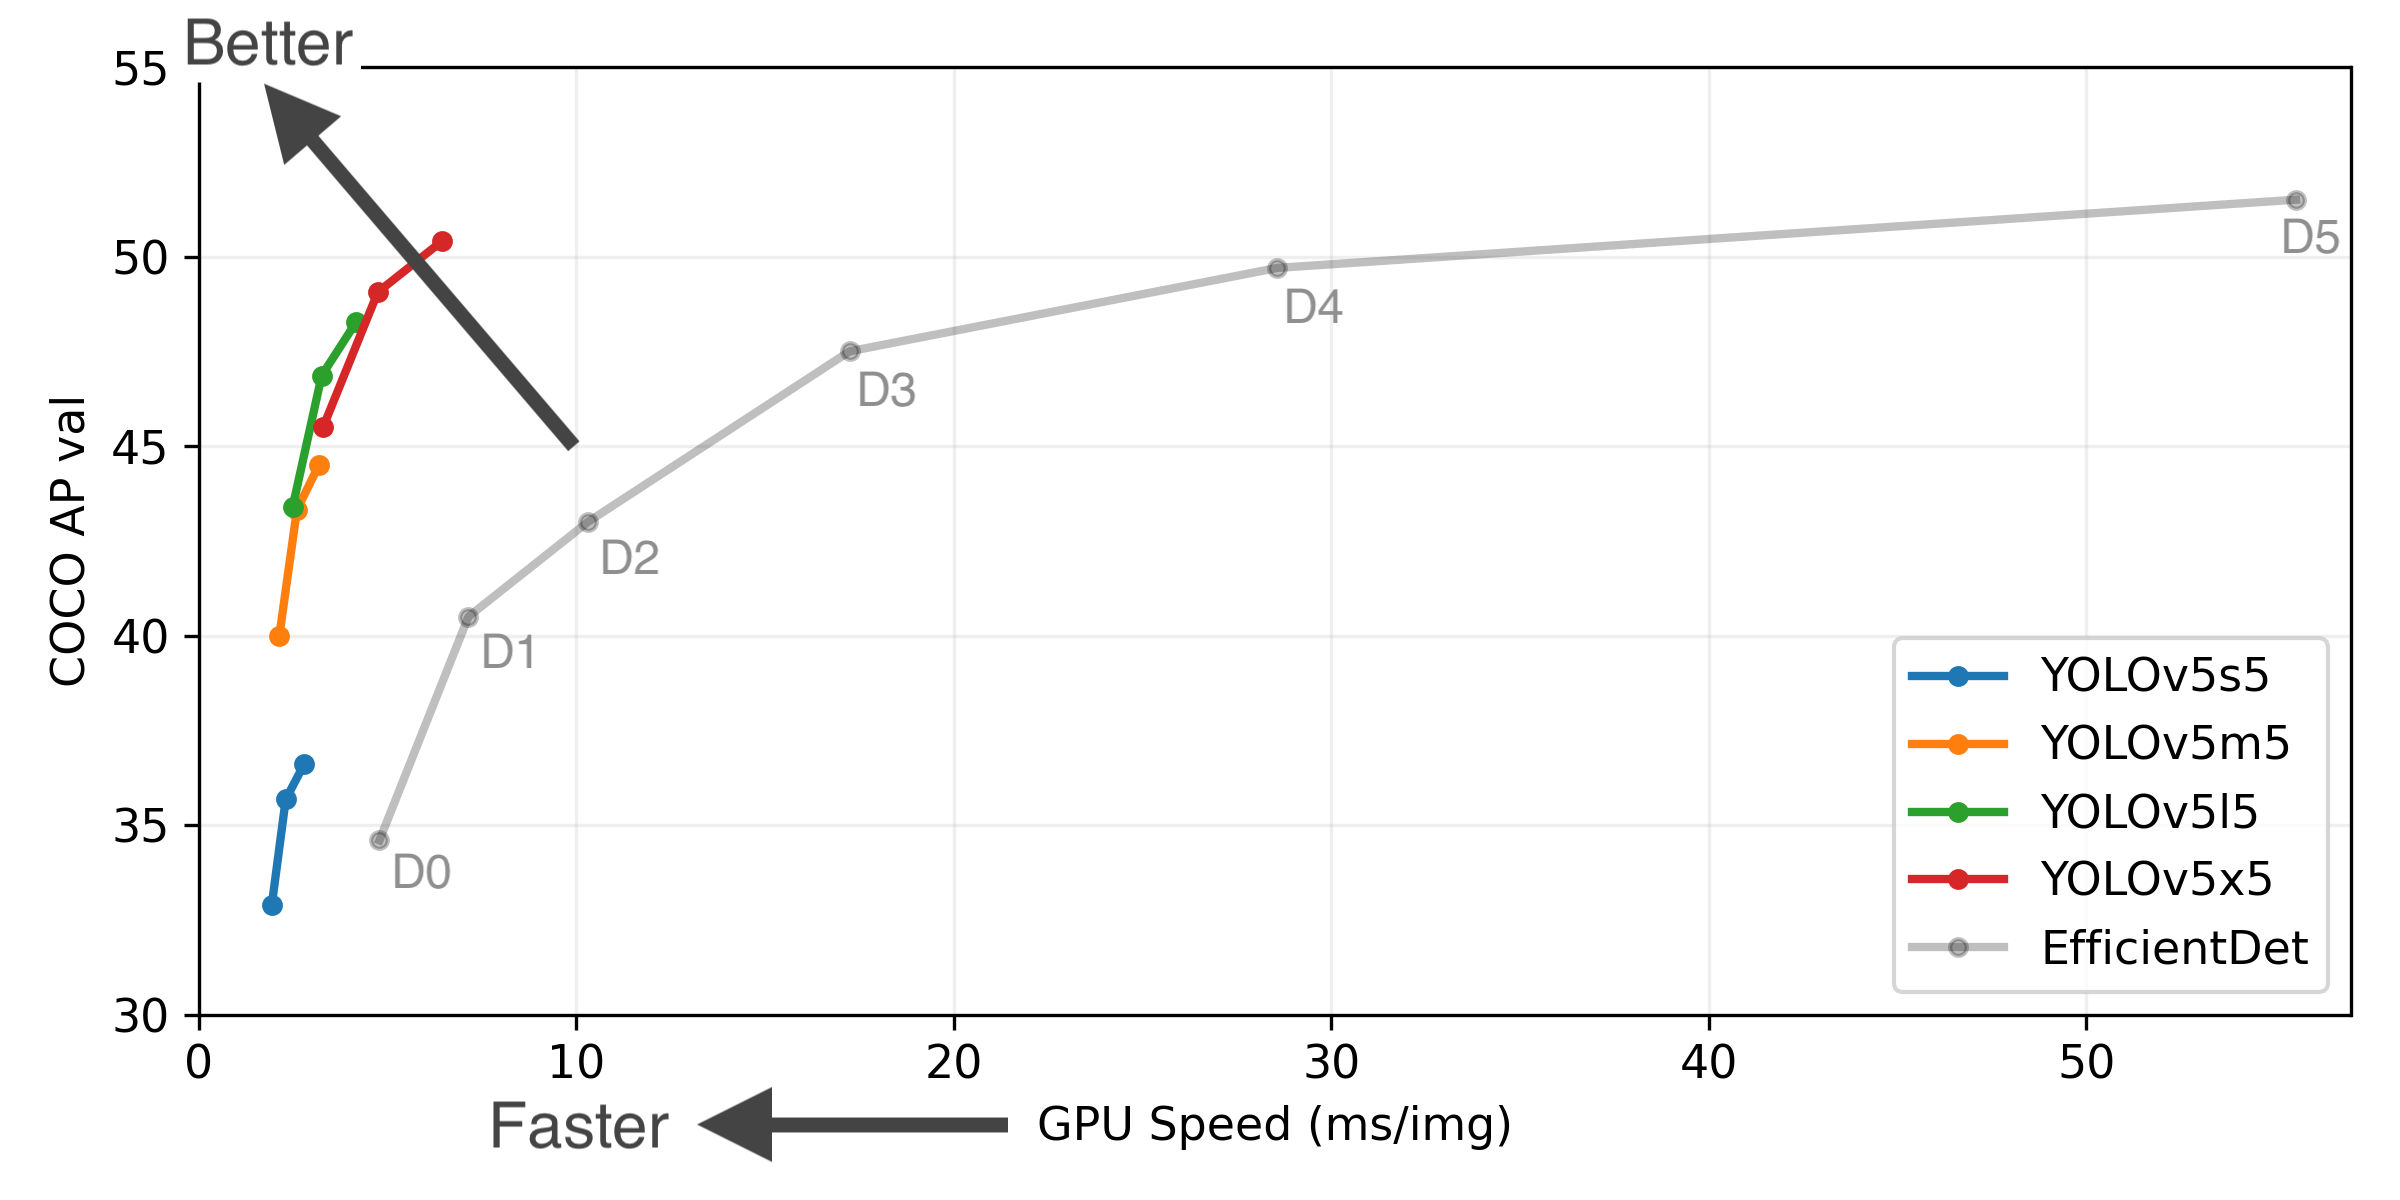
Figure Notes (click to expand)
- GPU Speed measures end-to-end time per image averaged over 5000 COCO val2017 images using a V100 GPU with batch size 32, and includes image preprocessing, PyTorch FP16 inference, postprocessing and NMS.
- EfficientDet data from google/automl at batch size 8.
- Reproduce by
python test.py --task study --data coco.yaml --iou 0.7 --weights yolov5s6.pt yolov5m6.pt yolov5l6.pt yolov5x6.pt
- April 11, 2021: v5.0 release: YOLOv5-P6 1280 models, AWS, Supervise.ly and YouTube integrations.
- January 5, 2021: v4.0 release: nn.SiLU() activations, Weights & Biases logging, PyTorch Hub integration.
- August 13, 2020: v3.0 release: nn.Hardswish() activations, data autodownload, native AMP.
- July 23, 2020: v2.0 release: improved model definition, training and mAP.
Pretrained Checkpoints
| Model | size (pixels) |
mAPval 0.5:0.95 |
mAPtest 0.5:0.95 |
mAPval 0.5 |
Speed V100 (ms) |
params (M) |
FLOPS 640 (B) |
|
|---|---|---|---|---|---|---|---|---|
| YOLOv5s | 640 | 36.7 | 36.7 | 55.4 | 2.0 | 7.3 | 17.0 | |
| YOLOv5m | 640 | 44.5 | 44.5 | 63.3 | 2.7 | 21.4 | 51.3 | |
| YOLOv5l | 640 | 48.2 | 48.2 | 66.9 | 3.8 | 47.0 | 115.4 | |
| YOLOv5x | 640 | 50.4 | 50.4 | 68.8 | 6.1 | 87.7 | 218.8 | |
| YOLOv5s6 | 1280 | 43.3 | 43.3 | 61.9 | 4.3 | 12.7 | 17.4 | |
| YOLOv5m6 | 1280 | 50.5 | 50.5 | 68.7 | 8.4 | 35.9 | 52.4 | |
| YOLOv5l6 | 1280 | 53.4 | 53.4 | 71.1 | 12.3 | 77.2 | 117.7 | |
| YOLOv5x6 | 1280 | 54.4 | 54.4 | 72.0 | 22.4 | 141.8 | 222.9 | |
| YOLOv5x6 TTA | 1280 | 55.0 | 55.0 | 72.0 | 70.8 | - | - |
Table Notes (click to expand)
- APtest denotes COCO test-dev2017 server results, all other AP results denote val2017 accuracy.
- AP values are for single-model single-scale unless otherwise noted. Reproduce mAP by
python test.py --data coco.yaml --img 640 --conf 0.001 --iou 0.65 - SpeedGPU averaged over 5000 COCO val2017 images using a GCP n1-standard-16 V100 instance, and includes FP16 inference, postprocessing and NMS. Reproduce speed by
python test.py --data coco.yaml --img 640 --conf 0.25 --iou 0.45 - All checkpoints are trained to 300 epochs with default settings and hyperparameters (no autoaugmentation).
- Test Time Augmentation (TTA) includes reflection and scale augmentation. Reproduce TTA by
python test.py --data coco.yaml --img 1536 --iou 0.7 --augment
Requirements
Python 3.8 or later with all requirements.txt dependencies installed, including torch>=1.7. To install run:
$ pip install -r requirements.txt
Tutorials
- Train Custom Data
🚀 RECOMMENDED - Tips for Best Training Results
☘️ RECOMMENDED - Weights & Biases Logging
🌟 NEW - Supervisely Ecosystem
🌟 NEW - Multi-GPU Training
- PyTorch Hub
⭐ NEW - ONNX and TorchScript Export
- Test-Time Augmentation (TTA)
- Model Ensembling
- Model Pruning/Sparsity
- Hyperparameter Evolution
- Transfer Learning with Frozen Layers
⭐ NEW - TensorRT Deployment
Environments
YOLOv5 may be run in any of the following up-to-date verified environments (with all dependencies including CUDA/CUDNN, Python and PyTorch preinstalled):
- Google Colab and Kaggle notebooks with free GPU:
- Google Cloud Deep Learning VM. See GCP Quickstart Guide
- Amazon Deep Learning AMI. See AWS Quickstart Guide
- Docker Image. See Docker Quickstart Guide


Inference
detect.py runs inference on a variety of sources, downloading models automatically from the latest YOLOv5 release and saving results to runs/detect.
$ python detect.py --source 0  # webcam
                            file.jpg  # image
                            file.mp4  # video
                            path/  # directory
                            path/*.jpg  # glob
                            'https://youtu.be/NUsoVlDFqZg'  # YouTube video
                            'rtsp://example.com/media.mp4'  # RTSP, RTMP, HTTP stream
To run inference on example images in data/images:
$ python detect.py --source data/images --weights yolov5s.pt --conf 0.25

Namespace(agnostic_nms=False, augment=False, classes=None, conf_thres=0.25, device='', exist_ok=False, img_size=640, iou_thres=0.45, name='exp', project='runs/detect', save_conf=False, save_txt=False, source='data/images/', update=False, view_img=False, weights=['yolov5s.pt'])
YOLOv5 v4.0-96-g83dc1b4 torch 1.7.0+cu101 CUDA:0 (Tesla V100-SXM2-16GB, 16160.5MB)

Fusing layers...
Model Summary: 224 layers, 7266973 parameters, 0 gradients, 17.0 GFLOPS
image 1/2 /content/yolov5/data/images/bus.jpg: 640x480 4 persons, 1 bus, Done. (0.010s)
image 2/2 /content/yolov5/data/images/zidane.jpg: 384x640 2 persons, 1 tie, Done. (0.011s)
Results saved to runs/detect/exp2
Done. (0.103s)

PyTorch Hub
To run batched inference with YOLOv5 and PyTorch Hub:
import torch

# Model
model = torch.hub.load('ultralytics/yolov5', 'yolov5s')

# Images
dir = 'https://github.com/ultralytics/yolov5/raw/master/data/images/'
imgs = [dir + f for f in ('zidane.jpg', 'bus.jpg')]  # batch of images

# Inference
results = model(imgs)
results.print()  # or .show(), .save()
Training
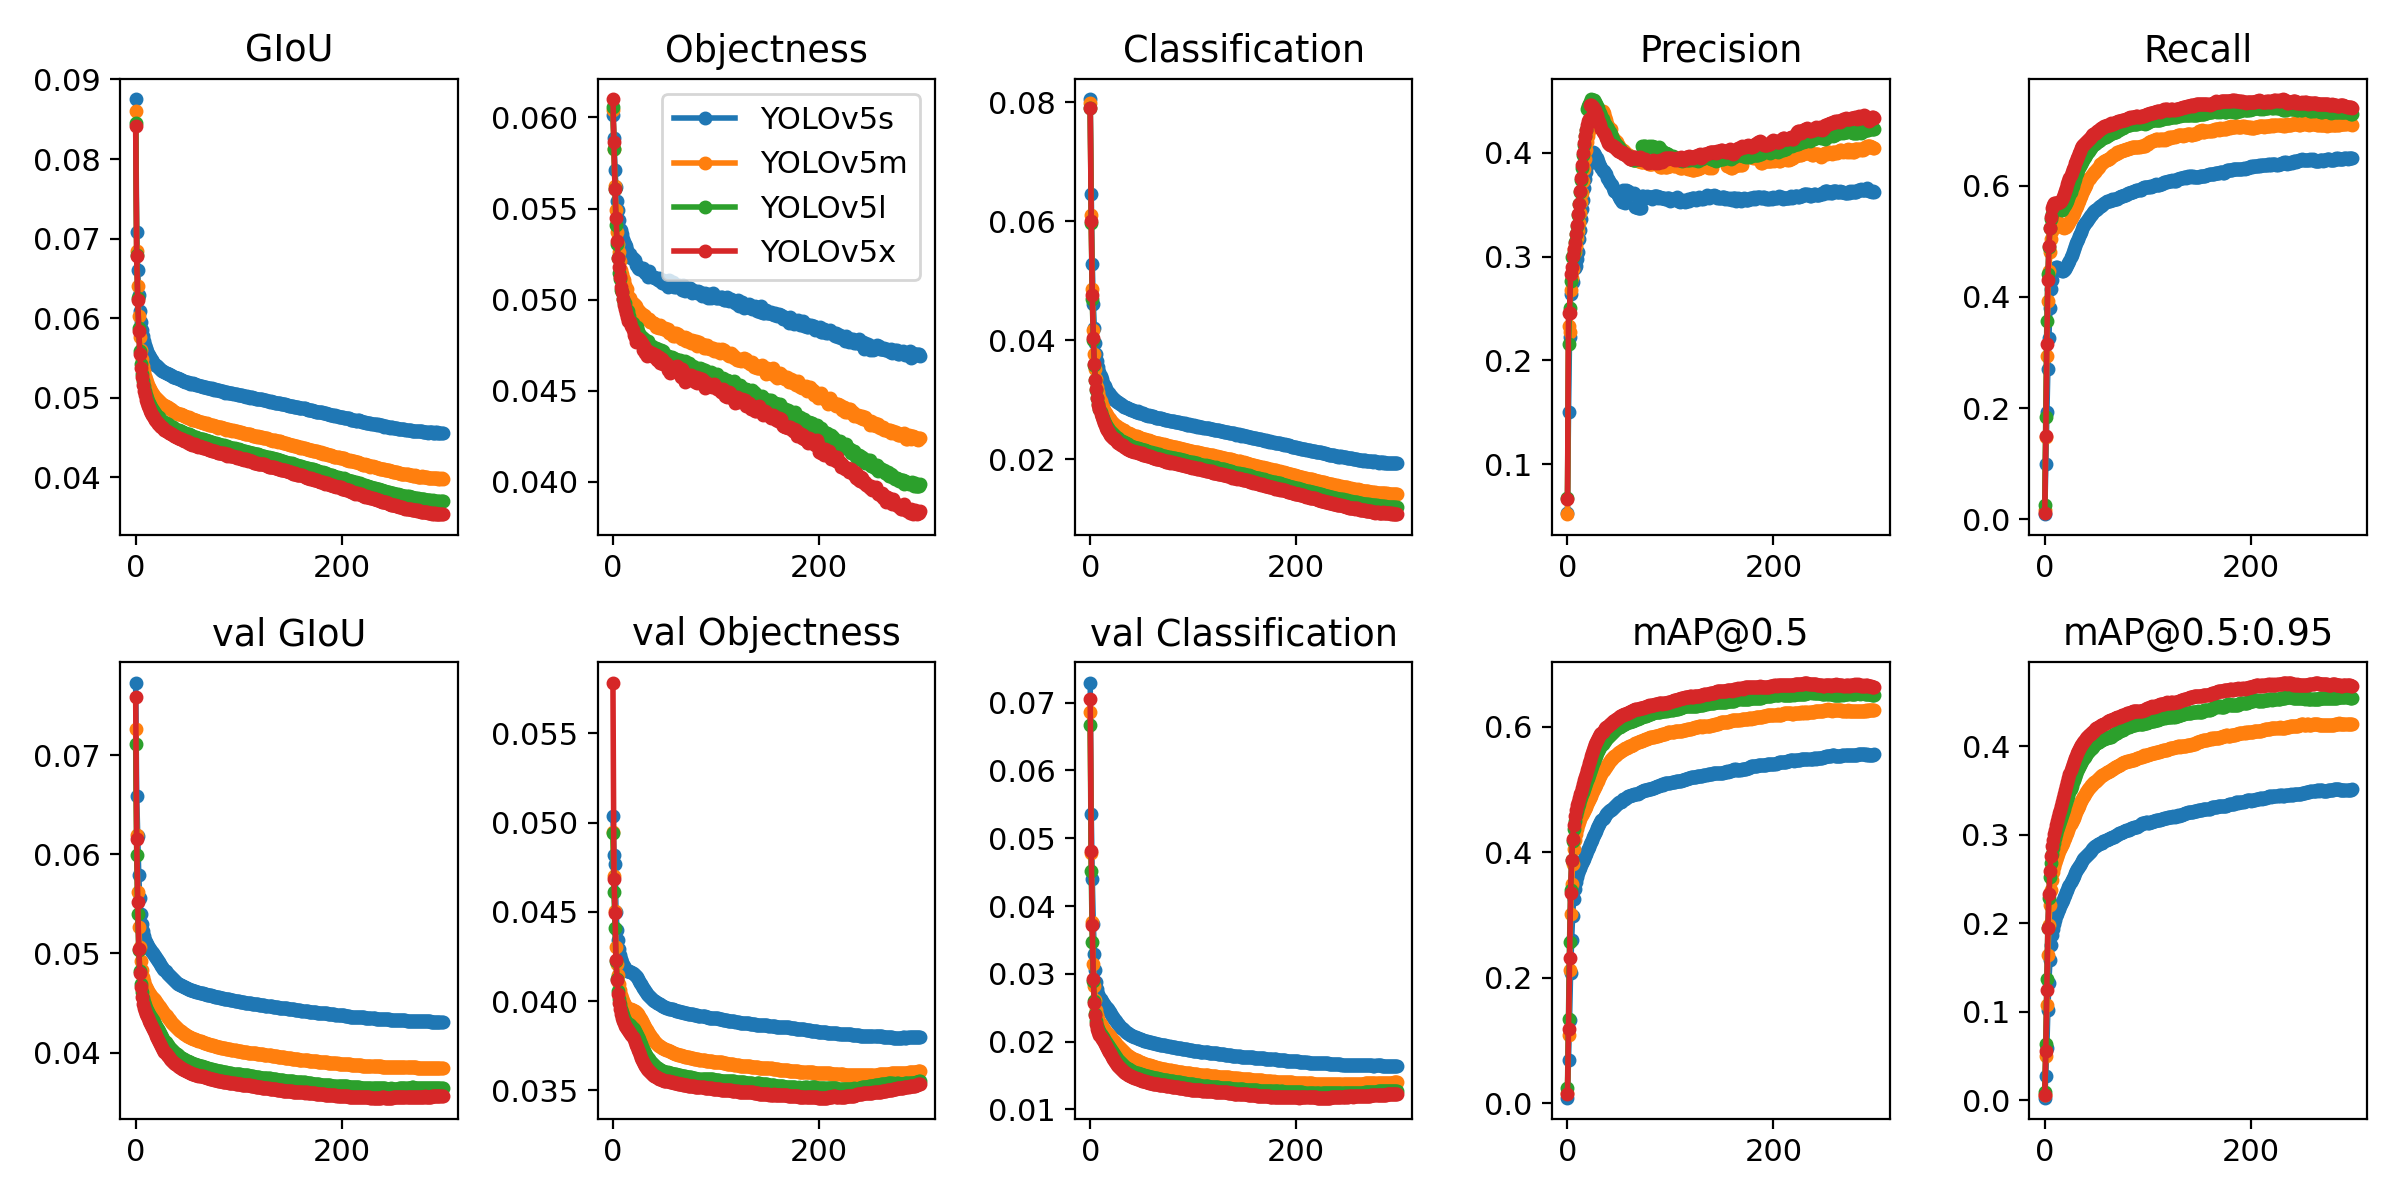
Run commands below to reproduce results on COCO dataset (dataset auto-downloads on first use). Training times for YOLOv5s/m/l/x are 2/4/6/8 days on a single V100 (multi-GPU times faster). Use the largest --batch-size your GPU allows (batch sizes shown for 16 GB devices).
$ python train.py --data coco.yaml --cfg yolov5s.yaml --weights '' --batch-size 64
                                         yolov5m                                40
                                         yolov5l                                24
                                         yolov5x                                16
Citation
About Us
Ultralytics is a U.S.-based particle physics and AI startup with over 6 years of expertise supporting government, academic and business clients. We offer a wide range of vision AI services, spanning from simple expert advice up to delivery of fully customized, end-to-end production solutions, including:
- Cloud-based AI systems operating on hundreds of HD video streams in realtime.
- Edge AI integrated into custom iOS and Android apps for realtime 30 FPS video inference.
- Custom data training, hyperparameter evolution, and model exportation to any destination.
For business inquiries and professional support requests please visit us at https://www.ultralytics.com.
Contact
Issues should be raised directly in the repository. For business inquiries or professional support requests please visit https://www.ultralytics.com or email Glenn Jocher at [email protected].


 90 Dec 13, 2022
 21 Dec 12, 2022
 150 Dec 30, 2022
 183 Jan 9, 2023
 2 May 5, 2022
 439 Dec 22, 2022
 1.5k Jan 5, 2023
 57 Nov 28, 2022
 35 Oct 26, 2022
 32 Sep 21, 2022
 253 Dec 18, 2022
 147 Dec 3, 2022
 181 Dec 30, 2022
 13 Aug 18, 2022
 194 Dec 28, 2022
 62 Dec 5, 2022
 12 Dec 5, 2022
 73 Dec 16, 2022
 148 Dec 21, 2022