Warning. Follow this at your own risk. You could brick your computer.
Read the me_cleaner Wiki pages first.
I'm new to all this and it took quite a while to gather all this information.
So to save anyone else the trouble here's what I learned.
You'll need access to a second computer to flash the BIOS chip of your main computer.
(Or you could buy a second BIOS chip - they are cheap - flash it and then swap them.)
You can flash the BIOS chip from a 64 bit computer using a 32 bit computer (well it worked for the Z170 Pro Gaming anyway.)
The Asus Z170 Pro Gaming is a great motherboard for flashing the BIOS as the chip is easily removed.
It just plugs in and out of a socket. That makes flashing easier.
The location of the chip is shown on page 1-2 of the Asus User Guide. Its located below the Z170 chip.
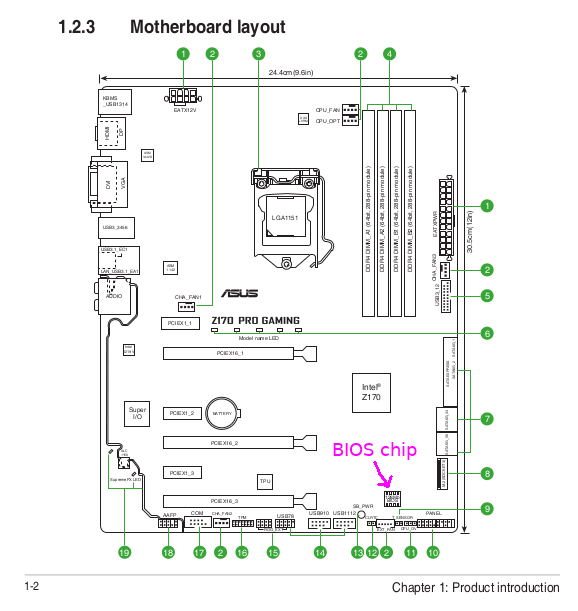
Its best to flash the BIOS chip 'externally' as some regions of the chip might be locked or inaccessible if you try flashing 'internally'.
(I tried the internal method using various versions of FreeDOS and various DOS flashing tools and ALL were a waste of time.)
The tool to flash the chip externally (the USB 'Programmer') is very inexpensive. Mine was ~$5.
Search ebay for "CH341A USB bios board programmer 24 25 series"
UPDATE It's probably best to get a green one like this:
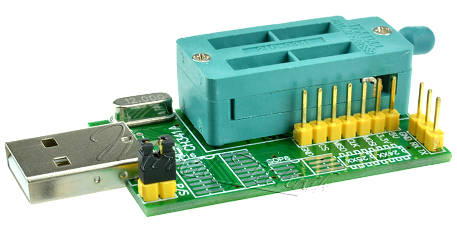 The black ones have a voltage issue. I used a black one and it worked fine - but its better to be safe. See mooms06's comment below.
Make note of any changes you have made to your BIOS setup as they will be lost after flashing.
You can run a couple of commands before and after the flash that will confirm Intel ME is disabled.
Before:
$ ls /dev | grep mei
mei0

$ lspci | grep -i communi
00:16.0 Communication controller: Intel Corporation Sunrise Point-H CSME HECI #1

$ cat /proc/bus/pci/devices | grep a13a
(It returned a couple lines of numbers and spaces and 'mei' was at the end.)
They all confirm that Intel ME is on my system.
(1) Extract the BIOS .ROM from the Ausus .CAP with UEFITool
UPDATE As mooms06 points out you can avoid having to use UEFITool by using the BIOS rom you extract from the chip in step (4) below then go back to step (2) to disable Intel ME on the extracted rom.
In fact, it's a better method as it will also preserve your LAN MAC address, S/N and UUIDs. If you use a 'vanilla' Asus BIOS you'll have to use another app to restore them manually.
OR
For security/privacy you may prefer not to have any S/N or UUID on your motherboard. I only found out about this after I flashed mine and my MAC, S/N and UUID were cleared. But the system (Ubuntu 17.10) works fine without them! The system (or BIOS?) generated a generic MAC address (you should be able to change it via software in the OS anyway.)
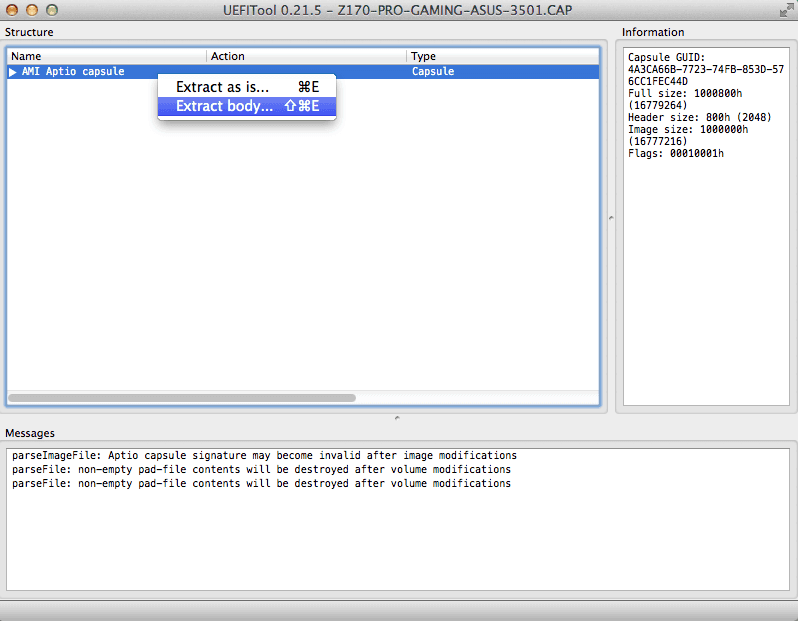
This example explains that you need UEFITool to extract the BIOS rom from the .CAP file that Asus uses. me-cleaner can't work with .CAP files. There are Windows and OS X apps ready to use but on Linux you have to compile your own version. I don't know how to do that but I had access to a mac so I used the OS X version. I used ver 0.21.5 as in the example.
And I used it on Asus' current BIOS ver 3501.
Open the Asus .CAP file with UEFITool and highlight the top line "AMI Aptio Capsule". Right click on it and select "Extract body". Save it with .rom extension.
(2) Disable Intel ME
This may be obvious to some but it took me a while to find it.
There is a built in help in the me_cleaner script:
$ python me_cleaner.py --help
User mooms06 says the -S option (--soft-disable) is best for the Pro Gaming as it prevents a 15 sec delay on startup ~~that -s (--soft-disable-only) causes.~~
To disabled Intel ME I used:
$ python me_cleaner.py -O modified.rom -S Z170-PRO-GAMING-ASUS-3501.rom
(3) Remove the BIOS chip
Power off your system fully and unplug it from the mains.
Its a good precaution to discharge and staic from your body by touching something metal.
Locate the BIOS chip and remove it.
Take note of the direction the indent on the chip's top is facing, thats important.
Be VERY CAREFUL removing it. I jerked removing mine and bent the pins!
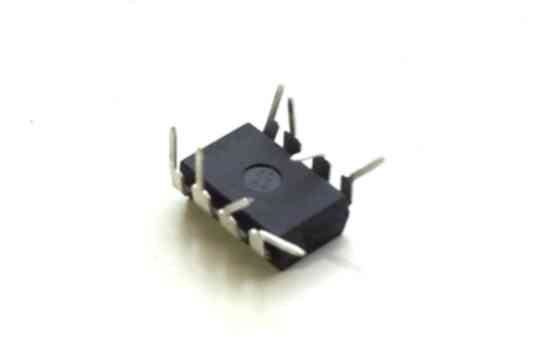
Thankfully none were broken and I was able to straighten them.
I have a sore arm so it was more difficult for me.
With a bit of care it shouldn't be an issue.
Plug the chip into the USB programmer tool.
Again, take note to the chip orientation.
It should be like this (note the notch on the chip top):


(4) Check the USB programmer is working
On the second computer install flashrom if its not already installed.
Plug in the USB programmer tool.
I loosely followed this guide's flashrom process.
First I read (extracted) the chip's existing BIOS.
$ sudo flashrom -p ch341a_spi -r extracted1.rom

flashrom v0.9.9-r1954 on Linux 4.9.0-4-686-pae (i686)
flashrom is free software, get the source code at https://flashrom.org

Calibrating delay loop... OK.
Found Winbond flash chip "W25Q128.V" (16384 kB, SPI) on ch341a_spi.
Reading flash... done.
That took 3 mins 20sec.
Read a second copy of the current BIOS
$ sudo flashrom -p ch341a_spi -r extracted2.rom

flashrom v0.9.9-r1954 on Linux 4.9.0-4-686-pae (i686)
flashrom is free software, get the source code at https://flashrom.org

Calibrating delay loop... OK.
Found Winbond flash chip "W25Q128.V" (16384 kB, SPI) on ch341a_spi.
Reading flash... done.
Now compare the two extracted BIOSes with 'diff'
$ diff extracted1.rom extracted2.rom
There should be no result if both are the same.
If there is a difference stop and read this and follow his recommendations.
I don't have 'ifdtool' tool to confirm the extracted .roms are BIOSes (and not just junk data). Instead I took a look at extracted1.rom in UEFITool and I could see it seemed ok.
That confirms the UBS Programmer and BIOS chip setup is working.
(5) Flash the BIOS
Here we go:
$ sudo flashrom -p ch341a_spi -w 'modified.rom'

flashrom v0.9.9-r1954 on Linux 4.9.0-4-686-pae (i686)
flashrom is free software, get the source code at https://flashrom.org

Calibrating delay loop... OK.
Found Winbond flash chip "W25Q128.V" (16384 kB, SPI) on ch341a_spi.
Reading old flash chip contents... done.
Erasing and writing flash chip... Erase/write done.
Verifying flash... VERIFIED.
That took about 7mins.
(UPDATE: It takes about 13mins using a green USB programmer.)
Unplug the USB programmer, remove the BIOS chip and return it carefully to your motherboard.
(6) Reboot your system
The moment of truth.
Start up your PC and go into the BIOS setup by pressing DEL at boot.
You can confirm Intel ME is gone by going into 'Advanced Mode' and under the 'Main' tab the 'ME Firmware Version' should read 0.0.0.0.
Before it would have read something like 11.6.11.1092
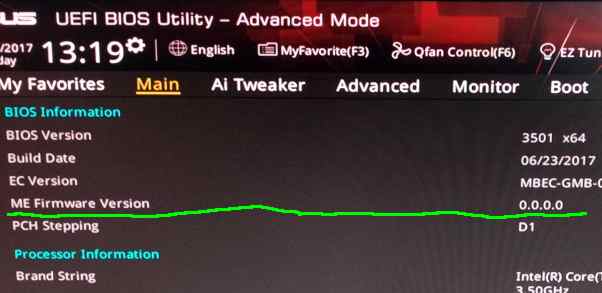
Don't forget to re-apply any modifications you had previously made to your BIOS.
Exit the BIOS and continue into Ubuntu.
You can run the same commands you ran before the flash for comparison:
$ ls /dev | grep mei
[nothing]
$ lspci | grep -i communi
[nothing]
$ cat /proc/bus/pci/devices | grep a13a
[nothing]
The fact they returned nothing shows Intel ME has been disabled.
I'd run 'intelmetool' but you need to compile it yourself and I'm not able to do that.
But the checks we've run are pretty clear that Intel ME is gone.
Finally confirm the computer stays on for more than 30 mins and your are done.
Your computer is Intel ME free.
Thanks to corna and contributors for me_cleaner and thanks to mooms06 for his help. His answers might help you further.
And don't forget to donate to corna if you can.


 The black ones have a voltage issue. I used a black one and it worked fine - but its better to be safe. See mooms06's comment below.


