Turns your machine learning code into microservices with web API, interactive GUI, and more.

Overview

Opyrator

Turns your Python functions into microservices with web API, interactive GUI, and more.

Getting StartedFeaturesExamplesSupportReport a BugContributionChangelog

Instantly turn your Python functions into production-ready microservices. Deploy and access your services via HTTP API or interactive UI. Seamlessly export your services into portable, shareable, and executable files or Docker images. Opyrator builds on open standards - OpenAPI, JSON Schema, and Python type hints - and is powered by FastAPI, Streamlit, and Pydantic. It cuts out all the pain for productizing and sharing your Python code - or anything you can wrap into a single Python function.

Alpha Version: Only suggested for experimental usage.


Try out and explore various examples in our playground here.


Highlights

  • 🪄  Turn functions into production-ready services within seconds.
  • 🔌   Auto-generated HTTP API based on FastAPI.
  • 🌅   Auto-generated Web UI based on Streamlit.
  • 📦   Save and share as self-contained executable file or Docker image.
  • 🧩   Reuse pre-defined components & combine with existing Opyrators.
  • 📈   Instantly deploy and scale for production usage.

Getting Started

Installation

Requirements: Python 3.6+.

pip install opyrator

Usage

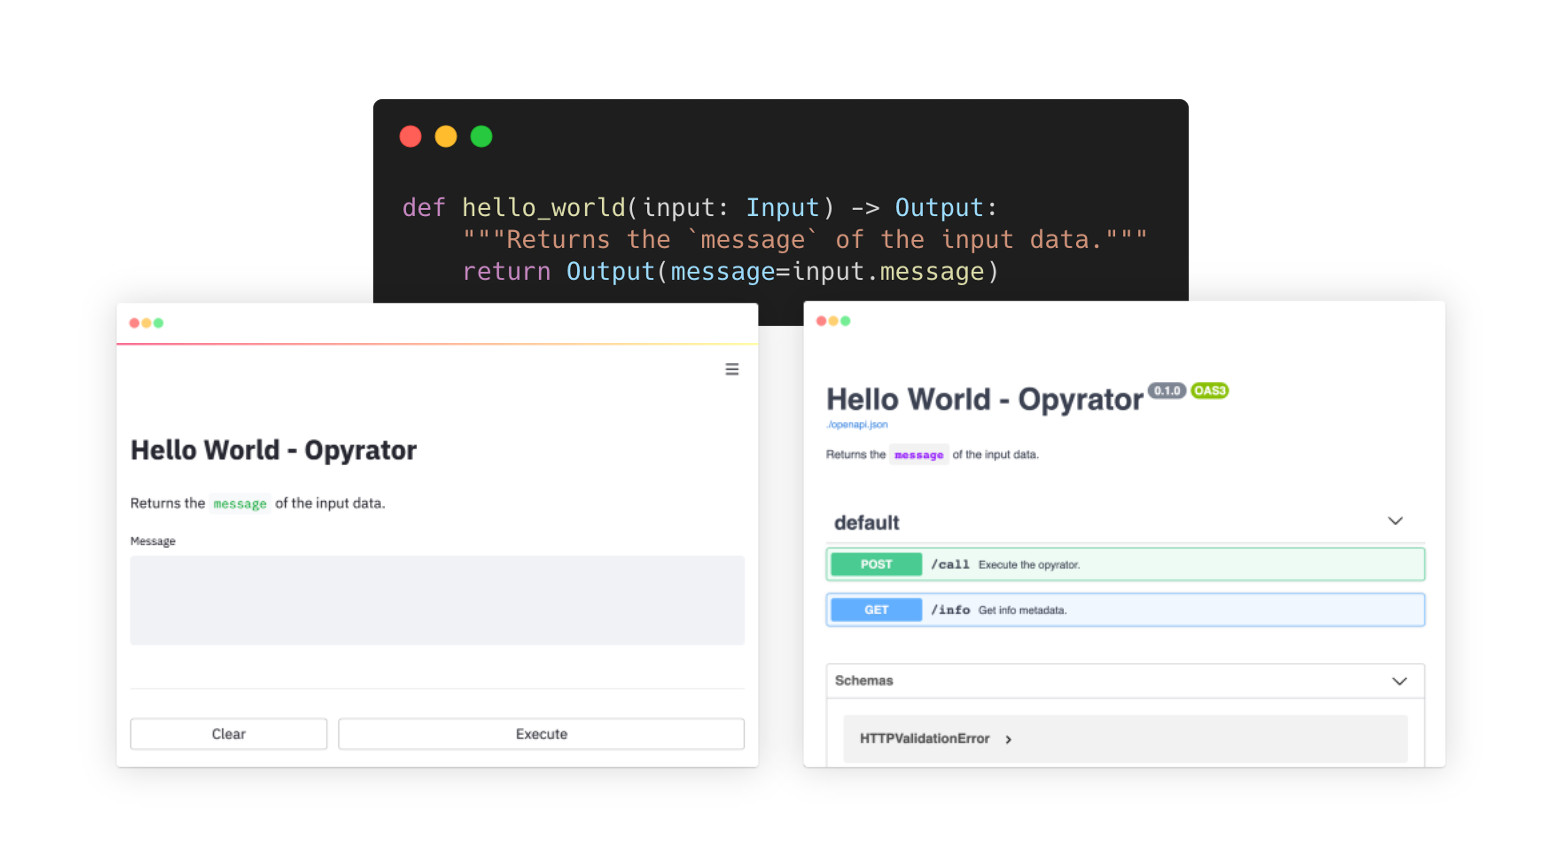
  1. A simple Opyrator-compatible function could look like this:

    from pydantic import BaseModel
    
    class Input(BaseModel):
        message: str
    
    class Output(BaseModel):
        message: str
    
    def hello_world(input: Input) -> Output:
        """Returns the `message` of the input data."""
        return Output(message=input.message)

    💡 An Opyrator-compatible function is required to have an input parameter and return value based on Pydantic models. The input and output models are specified via type hints.

  2. Copy this code to a file, e.g. my_opyrator.py

  3. Run the UI server from command-line:

    opyrator launch-ui my_opyrator:hello_world

    In the output, there's a line that shows where your web app is being served, on your local machine.
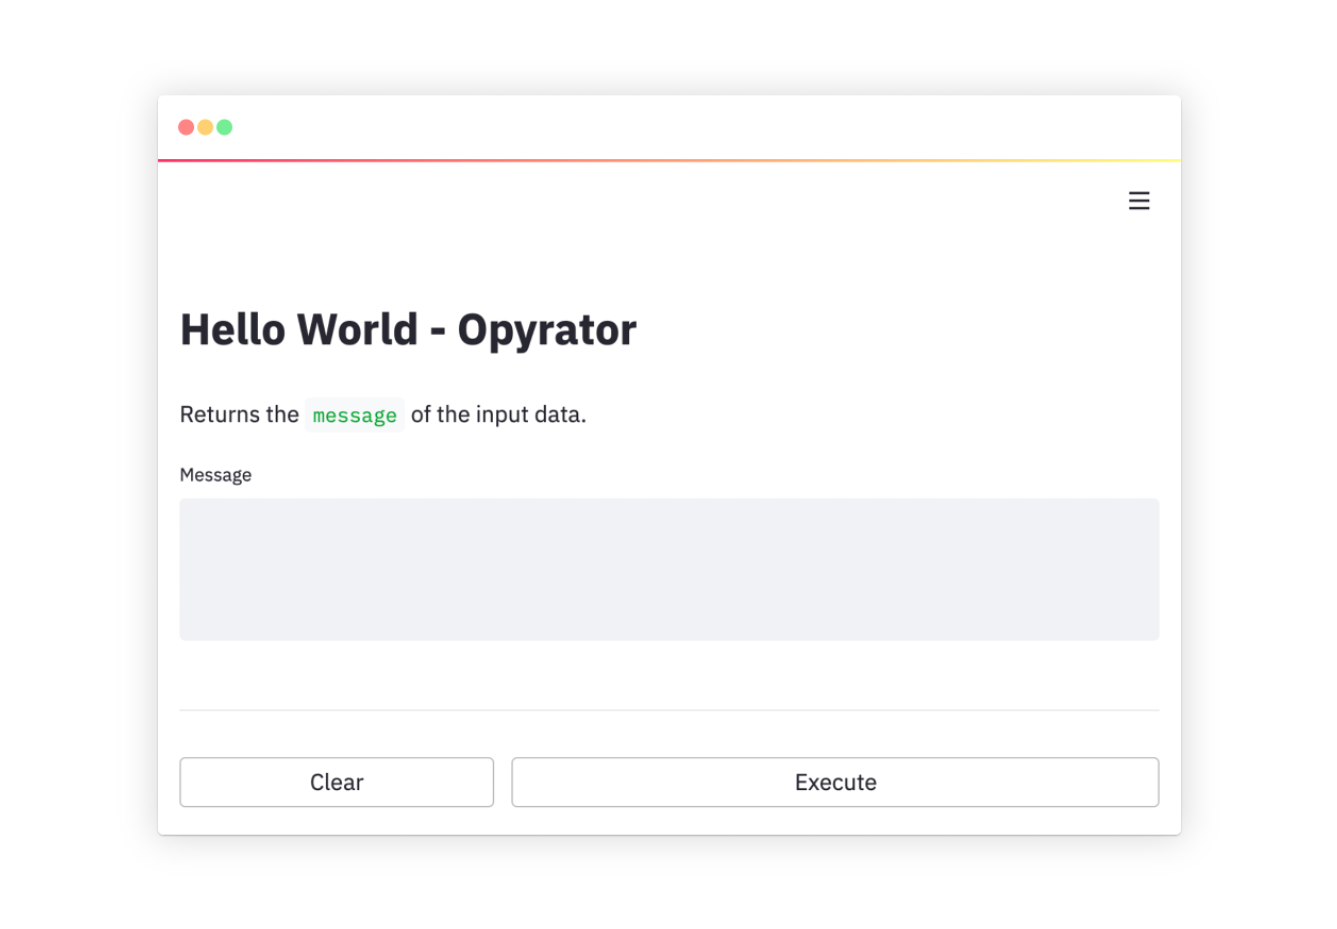
  4. Run the HTTP API server from command-line:

    opyrator launch-api my_opyrator:hello_world

    In the output, there's a line that shows where your web service is being served, on your local machine.
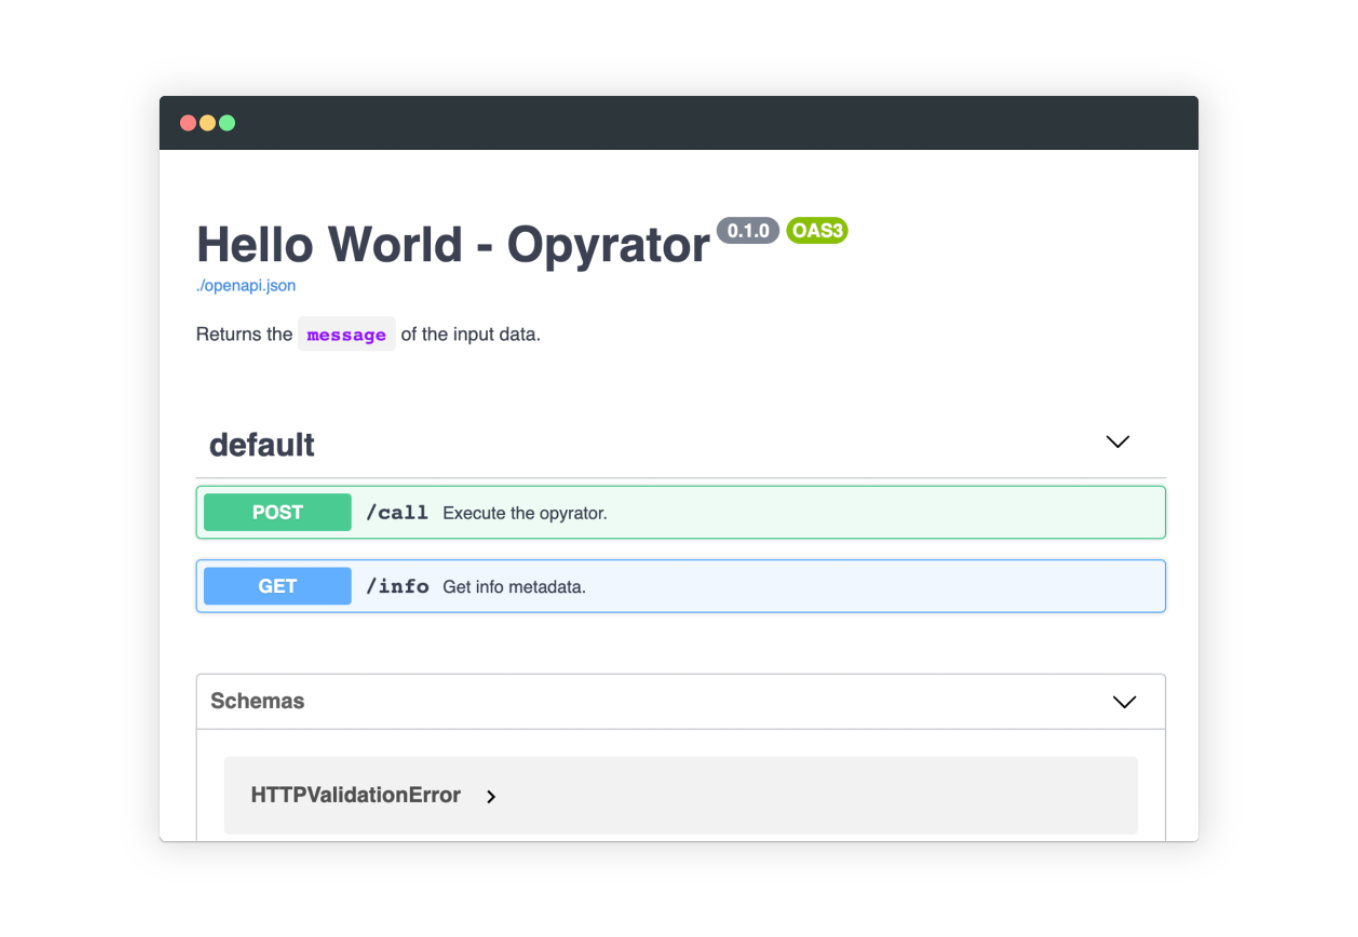
  5. Find out more usage information in the Features section or get inspired by our examples.

Examples


👉   Try out and explore these examples in our playground here


The following collection of examples demonstrate how Opyrator can support a variety of different tasks and use-cases. All these examples are bundled into a demo playground which you can also deploy on your own machine via Docker:

docker run -p 8080:8080 mltooling/opyrator-playground:latest

Text Generation

Run this demo on your machine (click to expand...)

To run the demo on your local machine just execute the following commands:

git clone https://github.com/ml-tooling/opyrator
cd ./opyrator/examples/generate_text/
pip install -r requirements.txt
opyrator launch-ui app:generate_text --port 8051

Visit http://localhost:8051 in your browser to access the UI of the demo. Use launch-api instead of launch-ui to launch the HTTP API server.

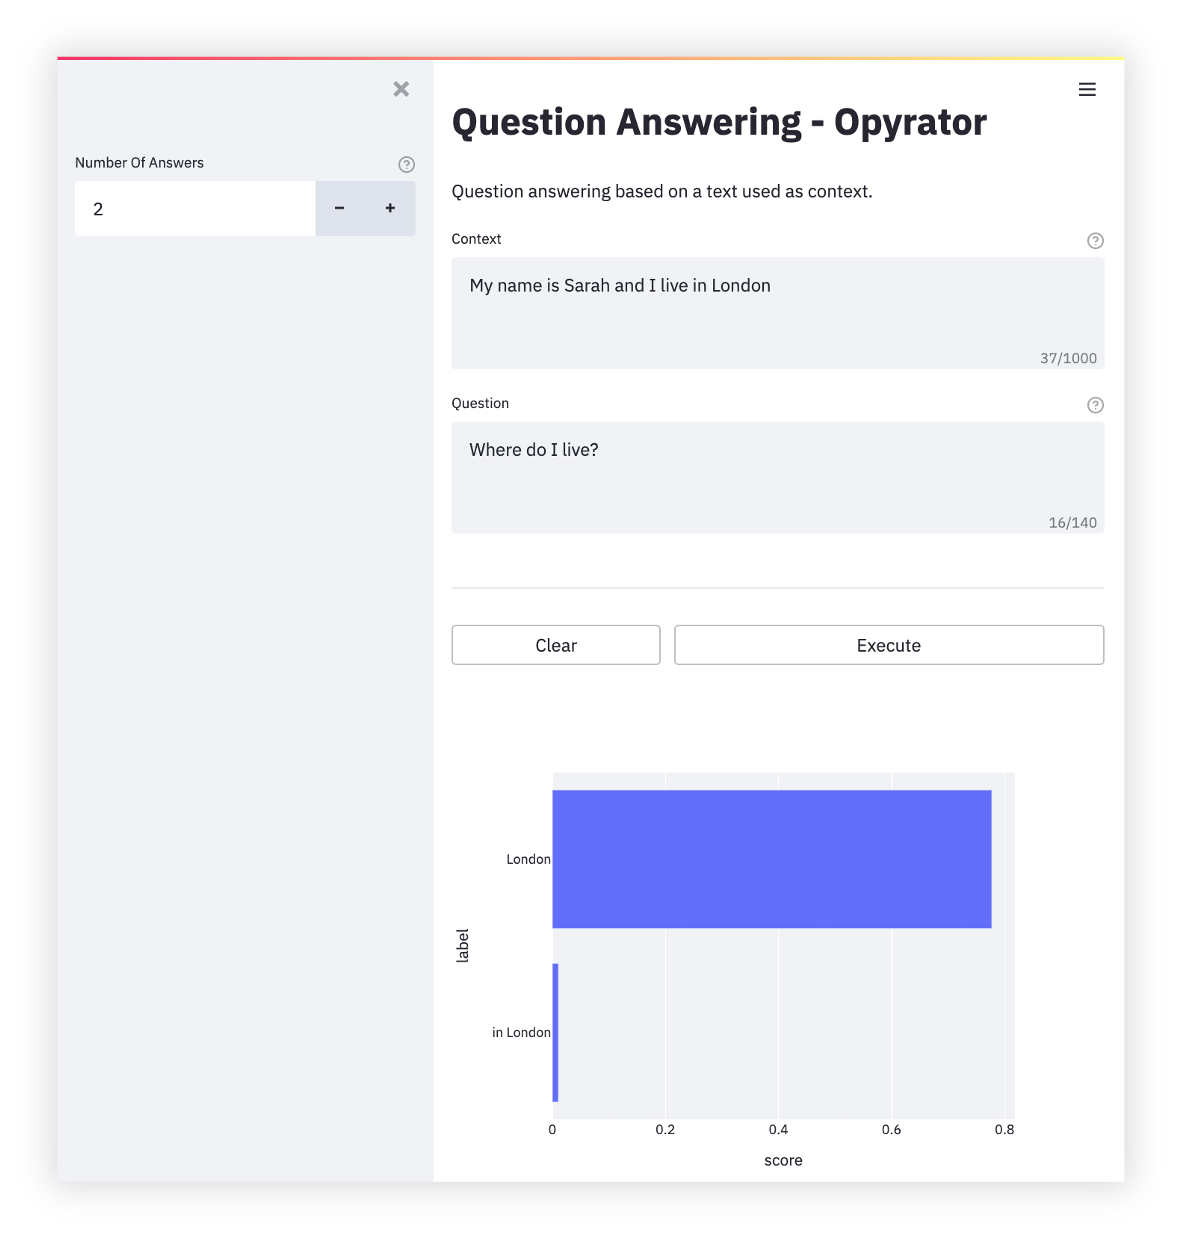
Question Answering

Run this demo on your machine (click to expand...)

To run the demo on your local machine just execute the following commands:

git clone https://github.com/ml-tooling/opyrator
cd ./opyrator/examples/question_answering/
pip install -r requirements.txt
opyrator launch-ui app:question_answering --port 8051

Visit http://localhost:8051 in your browser to access the UI of the demo. Use launch-api instead of launch-ui to launch the HTTP API server.

Image Super Resolution

Run this demo on your machine (click to expand...)

To run the demo on your local machine just execute the following commands:

git clone https://github.com/ml-tooling/opyrator
cd ./opyrator/examples/image_super_resolution/
pip install -r requirements.txt
opyrator launch-ui app:image_super_resolution --port 8051

Visit http://localhost:8051 in your browser to access the UI of the demo. Use launch-api instead of launch-ui to launch the HTTP API server.

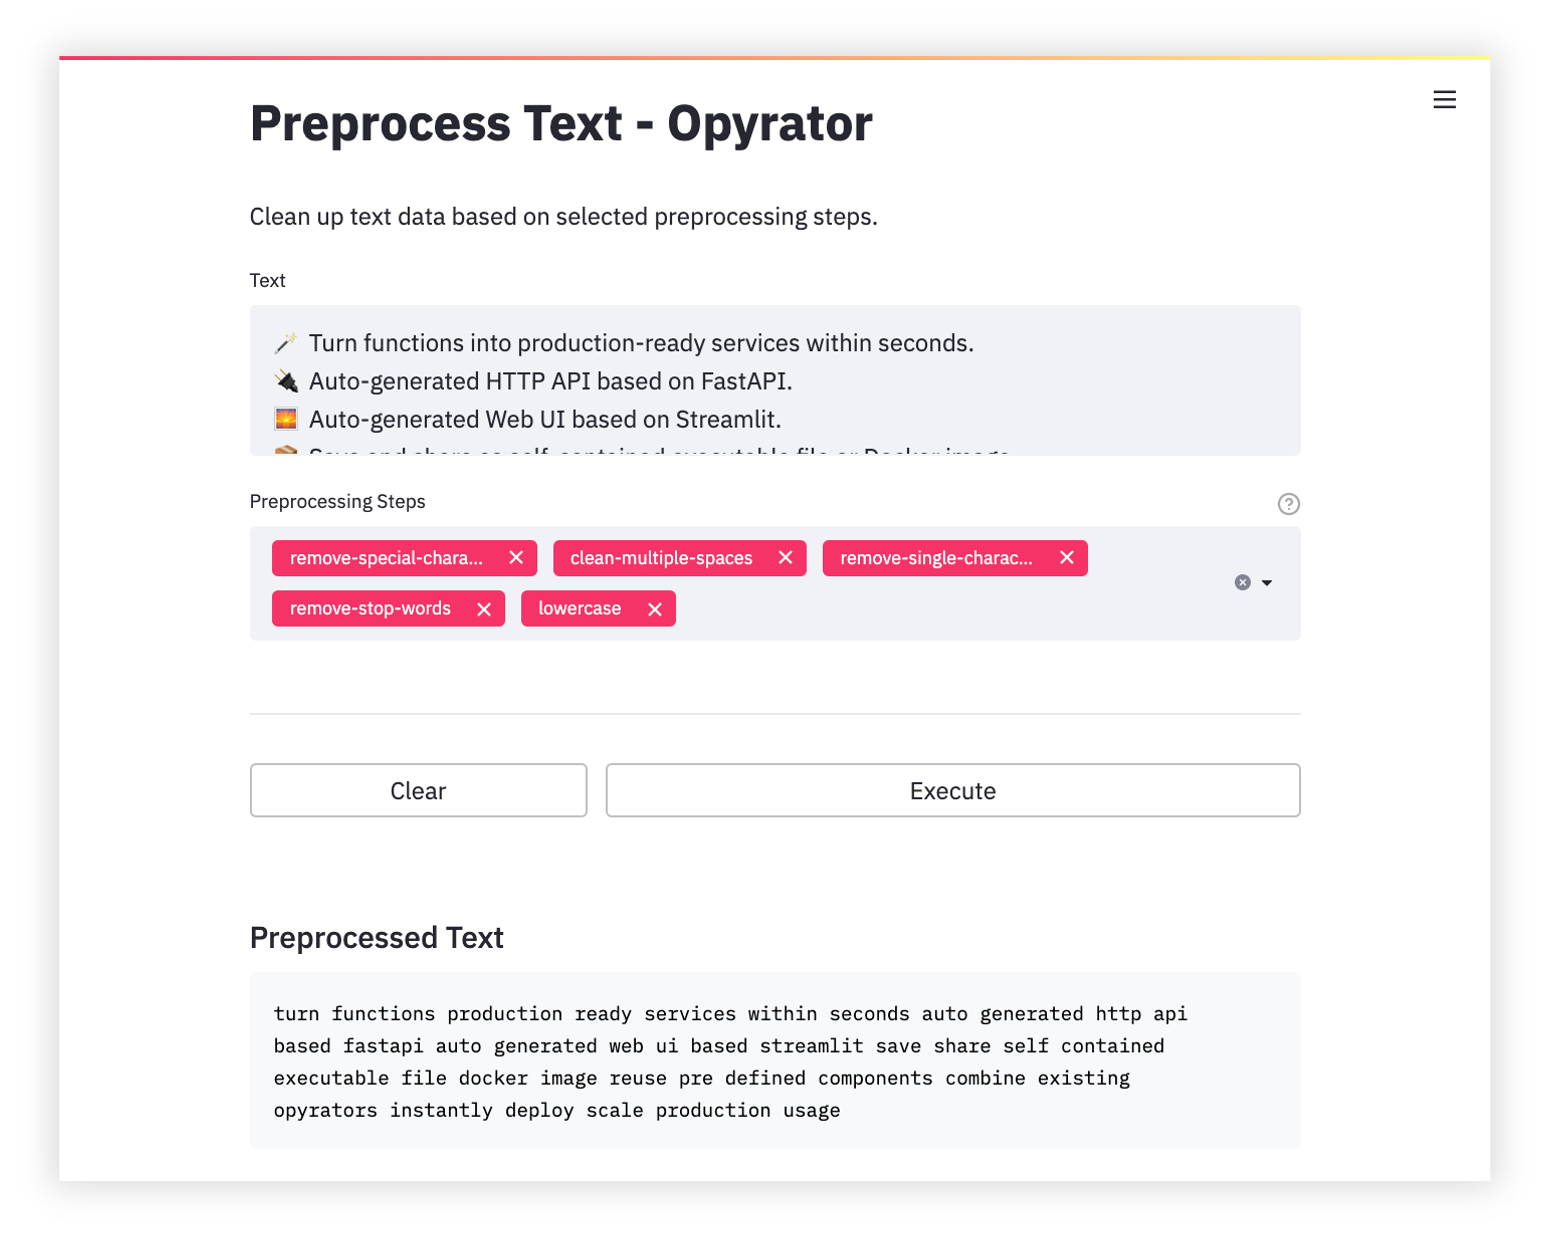
Text Preprocessing

Run this demo on your machine (click to expand...)

To run the demo on your local machine just execute the following commands:

git clone https://github.com/ml-tooling/opyrator
cd ./opyrator/examples/preprocess_text/
pip install -r requirements.txt
opyrator launch-ui app:preprocess_text --port 8051

Visit http://localhost:8051 in your browser to access the UI of the demo. Use launch-api instead of launch-ui to launch the HTTP API server.

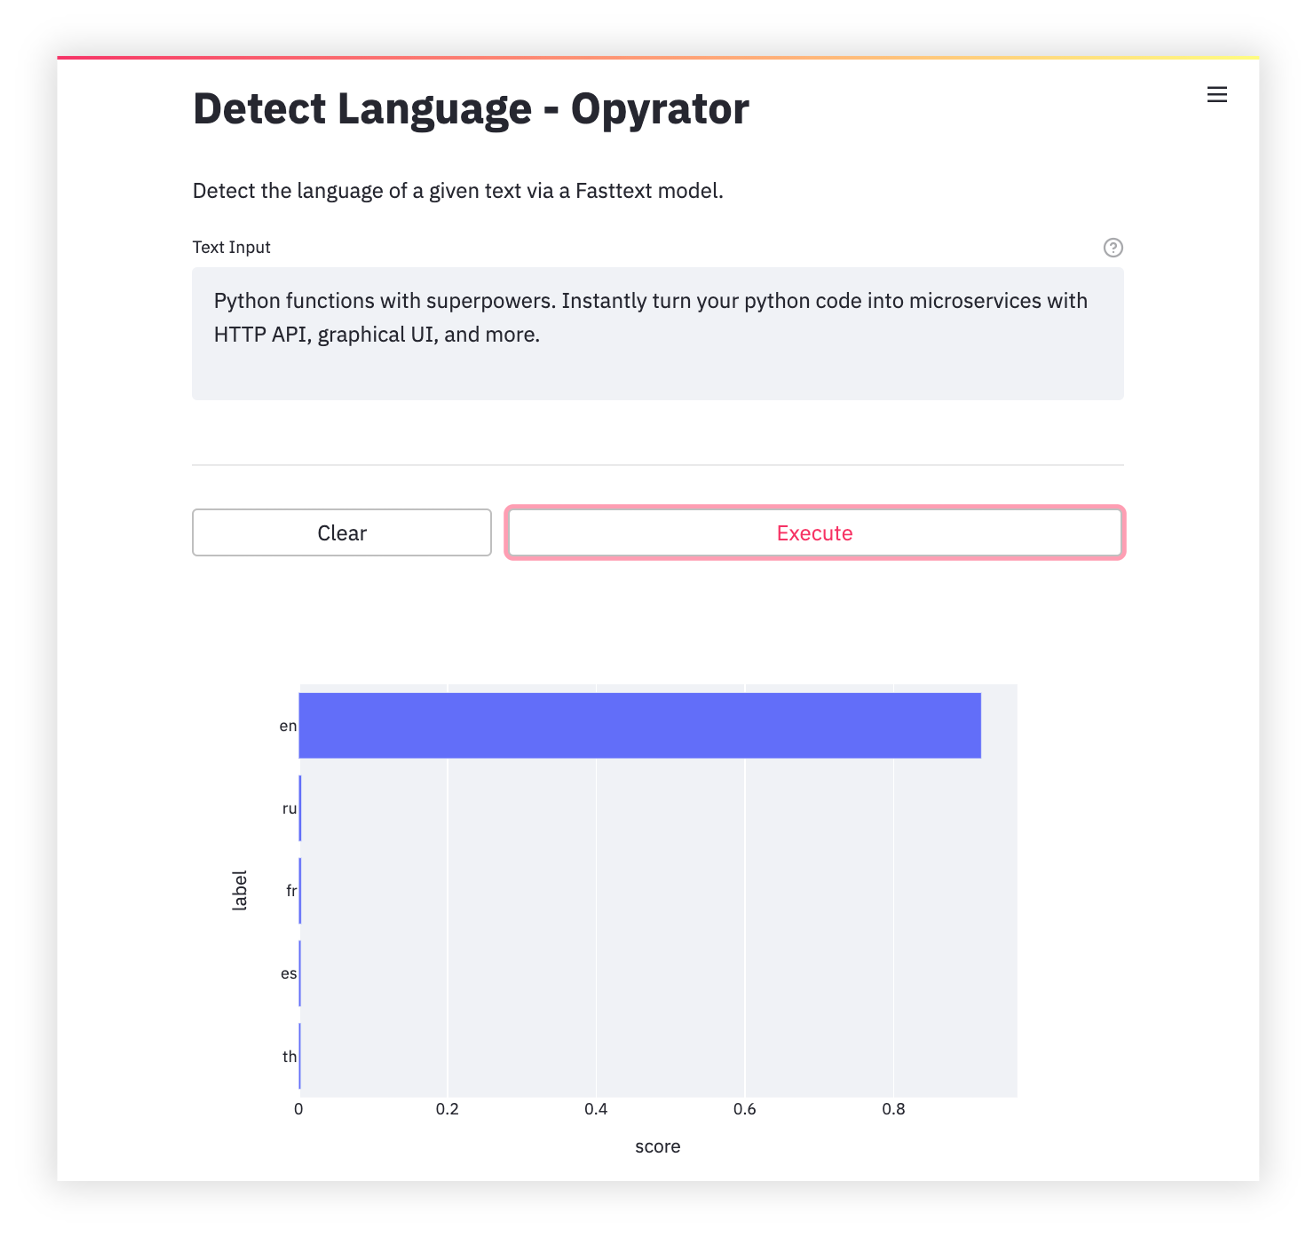
Language Detection

Run this demo on your machine (click to expand...)

To run the demo on your local machine just execute the following commands:

git clone https://github.com/ml-tooling/opyrator
cd ./opyrator/examples/detect_language/
pip install -r requirements.txt
opyrator launch-ui app:detect_language --port 8051

Visit http://localhost:8051 in your browser to access the UI of the demo. Use launch-api instead of launch-ui to launch the HTTP API server.

Audio Separation

Run this demo on your machine (click to expand...)

To run the demo on your local machine just execute the following commands:

git clone https://github.com/ml-tooling/opyrator
cd ./opyrator/examples/separate_audio/
pip install -r requirements.txt
opyrator launch-ui app:separate_audio --port 8051

Visit http://localhost:8051 in your browser to access the UI of the demo. Use launch-api instead of launch-ui to launch the HTTP API server.

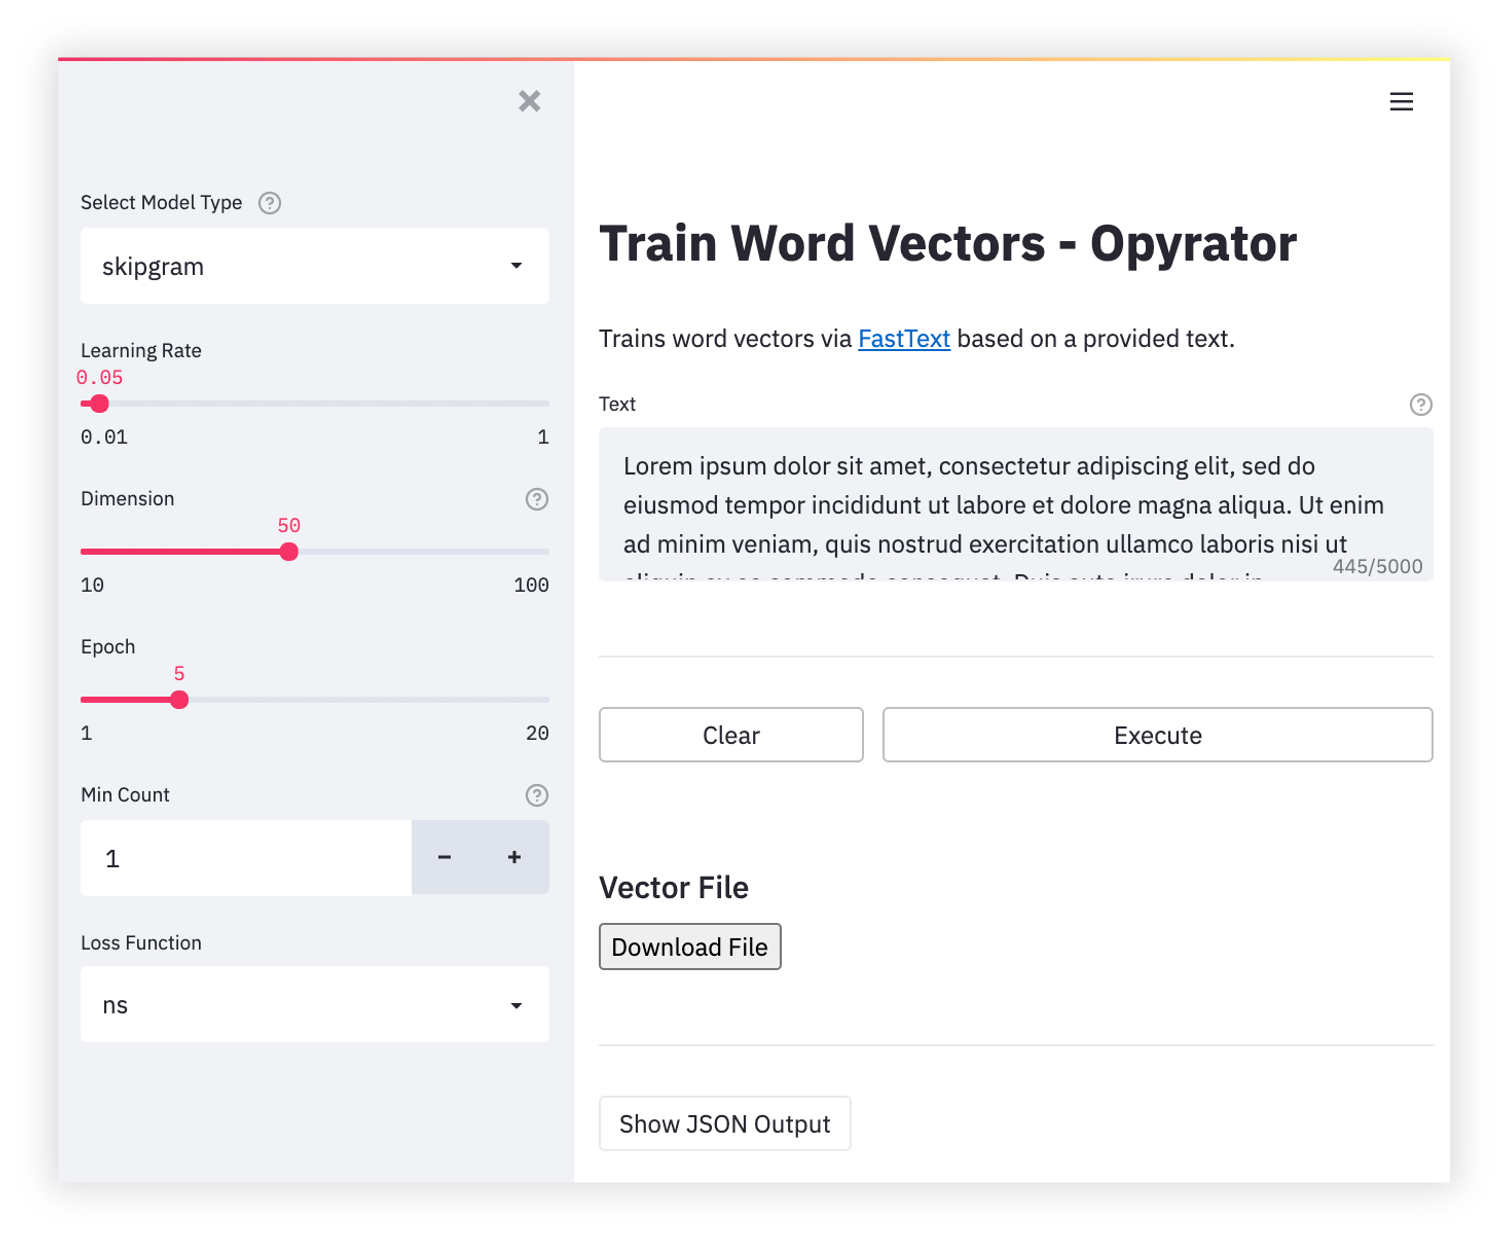
Word Vectors Training

Run this demo on your machine (click to expand...)

To run the demo on your local machine just execute the following commands:

git clone https://github.com/ml-tooling/opyrator
cd ./opyrator/examples/train_word_vectors/
pip install -r requirements.txt
opyrator launch-ui app:train_word_vectors --port 8051

Visit http://localhost:8051 in your browser to access the UI of the demo. Use launch-api instead of launch-ui to launch the HTTP API server.

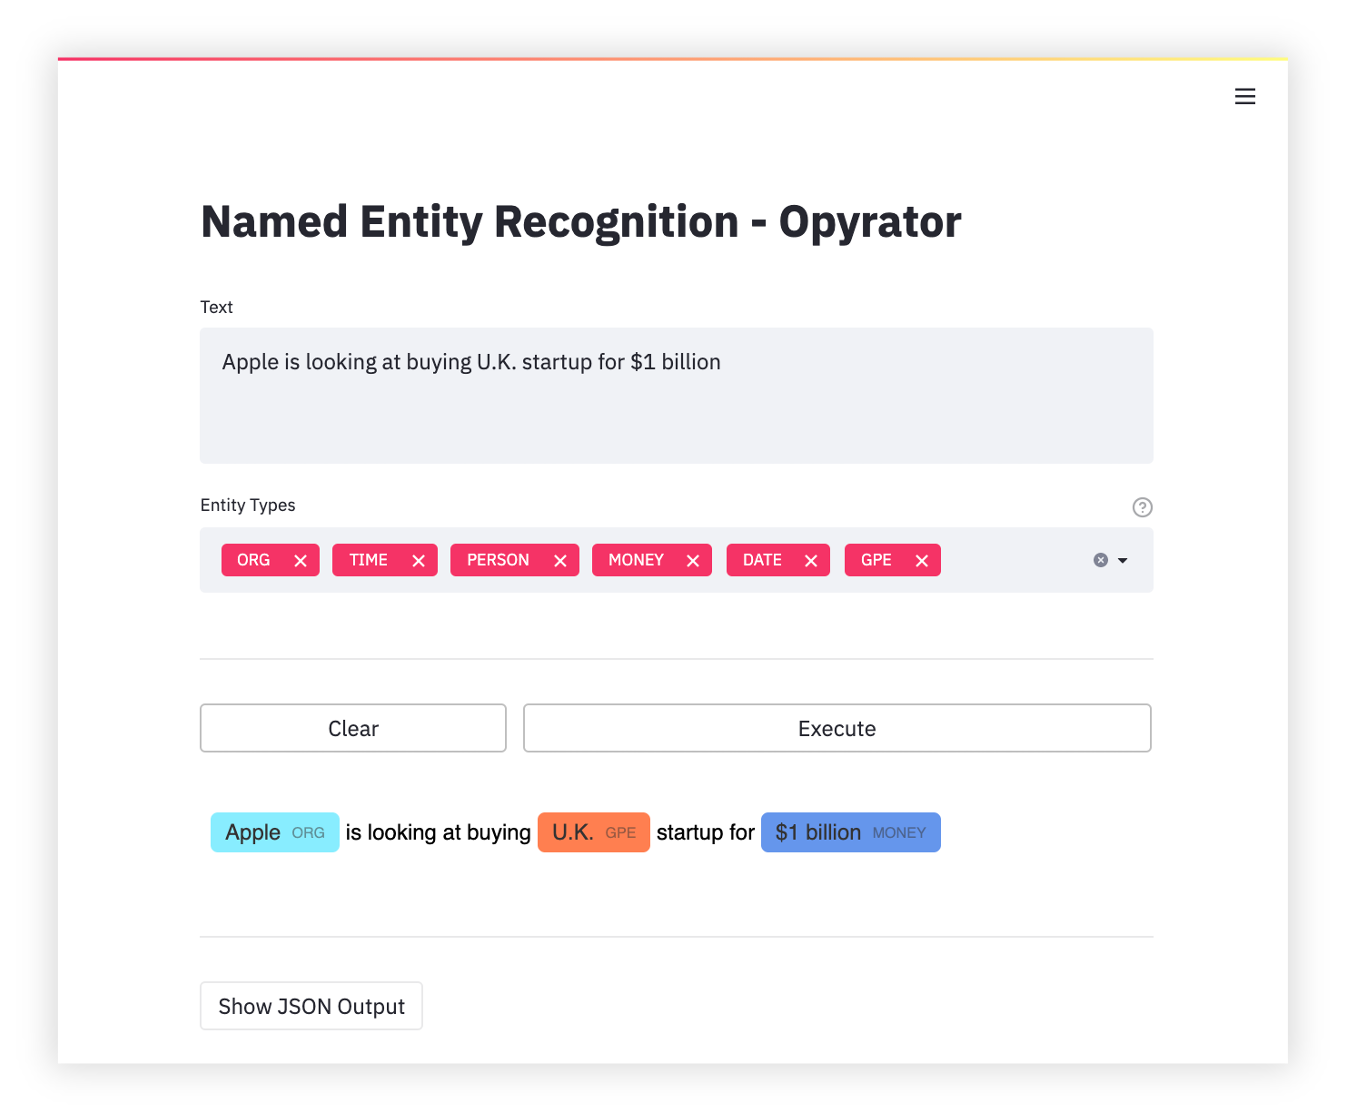
Named Entity Recognition

Run this demo on your machine (click to expand...)

To run the demo on your local machine just execute the following commands:

git clone https://github.com/ml-tooling/opyrator
cd ./opyrator/examples/named_entity_recognition/
pip install -r requirements.txt
opyrator launch-ui app:named_entity_recognition --port 8051

Visit http://localhost:8051 in your browser to access the UI of the demo. Use launch-api instead of launch-ui to launch the HTTP API server.

Components Showcase

Run this demo on your machine (click to expand...)

To run the demo on your local machine just execute the following commands:

git clone https://github.com/ml-tooling/opyrator
cd ./opyrator/examples/showcase_components/
pip install -r requirements.txt
opyrator launch-ui app:showcase_components --port 8051

Visit http://localhost:8051 in your browser to access the UI of the demo. Use launch-api instead of launch-ui to launch the HTTP API server.

Support & Feedback

This project is maintained by Benjamin Räthlein, Lukas Masuch, and Jan Kalkan. Please understand that we won't be able to provide individual support via email. We also believe that help is much more valuable if it's shared publicly so that more people can benefit from it.

Type Channel
🚨   Bug Reports
🎁   Feature Requests
👩‍💻   Usage Questions
📢   Announcements
  Other Requests

Features

HTTP APIGraphical UICLIZip ExportDocker ExportPre-defined ComponentsProduction Deployment

HTTP API

With Opyrator, you can instantly launch a local HTTP (REST) API server for any compatible function:

opyrator launch-api my_opyrator:hello_world

This will launch a FastAPI server based on the OpenAPI standard and with an automatic interactive documentation.

💡 Make sure that all requirements of your script are installed in the active Python enviornment.

The port used by the API server can be provided via CLI arguments:

opyrator launch-api my_opyrator:hello_world --port 8080

The API server can also be started via the exported zip-file format (see zip export section below).

opyrator launch-api my-opyrator.zip

Graphical UI

You can launch a graphical user interface - powered by Streamlit - for your compatible function. The UI is auto-generated from the input- and output-schema of the given function.

opyrator launch-ui my_opyrator:hello_world

💡 Make sure that all requirements of your script are installed in the active Python environment.

You can influence most aspects of the UI just by changing and improving the input- and output-schema of your function. Furthermore, it is also possible to define custom UIs for the function's input and output. For more details, refer to the input- and output-schema section.

The port used by the UI server can be provided via CLI arguments:

opyrator launch-ui my_opyrator:hello_world --port 8080

The UI server can also be started via the exported zip-file format (see zip export section below).

opyrator launch-ui my-opyrator.zip

In addition, the UI server can be started by using an already running Opyrator API endpoint:

opyrator launch-ui http://my-opyrator:8080 

Thereby, all Opyrator calls from the UI will be executed via the configured HTTP endpoint instead of the Python function running inside the UI server.

Command-line Interface

An Opyrator can also be executed via command-line:

opyrator call my_opyrator:hello_world '{"message": "hello"}'

The CLI interface also works using the zip export format:

opyrator call my-opyrator.zip '{"message": "hello"}'

Or, by using an already running Opyrator API endpoint:

opyrator call http://my-opyrator:8080 '{"message": "hello"}'

Thereby, the function call is executed by the Opyrator API server, instead of locally using the Python function.

Zip Export

Opyrator allows you to package and export a compatible function into a self-contained zip-file:

opyrator export my_opyrator:hello_world my-opyrator.zip

This exported zip-file packages relevant source code and data artifacts into a single file which can be shared, stored, and used for launching the API or UI as shown above.

External requirements are automatically discovered from the working directory based on the following files: Pipfile (Pipenv environment), environment.yml (Conda environment), pyproject.toml (Poetry dependencies), requirements.txt (pip-requirements), setup.py (Python project requirements), packages.txt (apt-get packages), or discovered via pipreqs as fallback. However, external requirements are only included as instructions and are not packaged into the zip-file. If you want to export your Opyrator fully self-contained including all requirements or even the Python interpreter itself, please refer to the Docker or pex export options.

As a side note, Opyrators exported as zip-files are (mini) Python libraries that can be pip-installed, imported, and used from other Python code:

pip install my-opyrator.zip

WIP: This feature is not finalized yet. You can track the progress and vote for the feature here

Docker Export

In addition to the ZIP export, Opyrator also provides the capability to export to a Docker image:

opyrator export my_opyrator:hello_world --format=docker my-opyrator-image:latest

💡 The Docker export requires that Docker is installed on your machine.

After the successful export, the Docker image can be run as shown below:

docker run -p 8080:8080 my-opyrator-image:latest

Running your Opyrator within this Docker image has the advantage that only a single port is required to be exposed. The separation between UI and API is done via URL paths: http://localhost:8080/api (API); http://localhost:8080/ui (UI). The UI is automatically configured to use the API for all function calls.

WIP: This feature is not finalized yet. You can track the progress and vote for the feature here.

Pex Export

Opyrator also provides the capability to export to a pex-file. Pex is a tool to create self-contained executable Python environments that contain all relevant python dependencies.

opyrator export my_opyrator:hello_world --format=pex my-opyrator.pex

WIP: This feature is not finalized yet. You can track the progress and vote for the feature here.

Python Client

Every deployed Opyrator provides a Python client library via an endpoint method which can be installed with pip:

pip install http://my-opyrator:8080/client

And used in your code, as shown below:

from my_opyrator import Client, Input
opyrator_client = Client("http://my-opyrator:8080")
result = opyrator_client.call(Input(text="hello", wait=1))

WIP: This feature is not finalized yet. You can track the progress and vote for the feature here.

Pre-defined Components

Opyrator provides a growing collection of pre-defined components (input- and output models) for common tasks. Some of these components also provide more advanced UIs and Visualizations. You can reuse these components to speed up your development and, thereby, keep your Opyrators compatible with other functionality improvements or other Opyrators.

You can find some of the available interfaces in the examples section or in this source code package.

WIP: This feature is not finalized yet. You can track the progress and vote for the feature here.

Production Deployment

Rolling out your Opyrators for production usage might require additional features such as SSL, authentication, API tokens, unlimited scalability, load balancing, and monitoring. Therefore, we provide capabilities to easily deploy your Opyrators directly on scalable and secure cloud platforms without any major overhead:

opyrator deploy my_opyrator:hello_world <deployment-provider> <deployment-provider-options>

WIP: This feature is not finalized yet. You can track the progress and vote for the feature here.

Documentation

Compatible Functions

A function is compatible with Opyrator if it fulfills the following requirements:

  • A single parameter called input which MUST be a subclass of the Pydantic BaseModel.
  • A single return value that MUST be a subclass of the Pydantic BaseModel.
  • The input parameter and return value MUST be annotated with Python typing hints.

Input- and Output-Schema

WIP

Command-line Interface

WIP

Contribution

Development

Refer to our contribution guides for information on our build scripts and development process.


Licensed MIT. Created and maintained with ❤️   by developers from Berlin.

Comments
  • Trying to make the output download an excel file or display a dataframe

    Trying to make the output download an excel file or display a dataframe

    Hi, I have been doodling with opyrator, I think it is awesome. I got stuck in trying to make the output for the user is to download an excel file generated following the model you have in upscaling the image and spleeter example ` class HelixPredictOutput(BaseModel): upscaled_image_file: FileContent = Field( ..., mime_type="application/excel", description="excel file download", )

    def image_super_resolution( input: HelixPredictInput, ) -> HelixPredictOutput:

    with open("aa.xlsx", "rb") as f:
                excel_outfile = f.read()
    
    return HelixPredictOutput(
                upscaled_image_file=excel_outfile)
    

    ` But that gave me a weird zip file when I press on the download button that was unsupported. Is there anyway to make it download the excel file?

    support 
    opened by batman984 5
  • Can't get hello_world to work

    Can't get hello_world to work

    Hello World no go:

    Technical details: I have followed the instructions on the Getting Started page, no go https://github.com/ml-tooling/opyrator#getting-started

    Created the file and run as instructed but I get this... 2021-05-01 10:16:31.675 An update to the [server] config option section was detected. To have these changes be reflected, please restart streamlit. image

    I ran "streamlit hello"and that is working fine image

    • Host Machine OS : Windows 10
    • python : 3.9.4

    I wonder if it is the very new version of python?

    I am open to being stupid, that's OK, but this looks pretty cool and I want it to work.

    support 
    opened by Bandit253 5
  • Finalize docker export capabilities

    Finalize docker export capabilities

    Feature description:

    Finalize capabilities to export an opyrator to a Docker image.

    The export can be executed via command line:

    opyrator export my_opyrator:hello_world --format=docker my-opyrator-image:latest
    

    💡 The Docker export requires that Docker is installed on your machine.

    After the successful export, the Docker image can be run as shown below:

    docker run -p 8080:8080 my-opyrator-image:latest
    

    Running your Opyrator within this Docker image has the advantage that only a single port is required to be exposed. The separation between UI and API is done via URL paths: http://localhost:8080/api (API); http://localhost:8080/ui (UI). The UI is automatically configured to use the API for all function calls.

    feature stale 
    opened by LukasMasuch 5
  • Opyrator launch-ui and launch-api throwing errors

    Opyrator launch-ui and launch-api throwing errors

    In the fresh environment, using Python 3.9.7 on macOS Monterey 12.2.1 (x86) (tested on M1 chip, same issues) No extra packages were installed, only Opyrator and its dependencies

    The code I'm trying to run:

    from pydantic import BaseModel
    
    class Input(BaseModel):
        message: str
    
    class Output(BaseModel):
        message: str
    
    def hello_world(input: Input) -> Output:
        """Returns the `message` of the input data."""
        return Output(message=input.message)
    

    Issue #1

    $ opyrator launch-ui my_opyrator:hello_world

    ModuleNotFoundError: No module named 'streamlit.report_thread'

    Issue #2

    $ opyrator launch-api my_opyrator:hello_world

    ImportError: cannot import name 'graphql' from 'starlette' (/Users/sean/python_envs/opyrator-env/lib/python3.9/site-packages/starlette/init.py)

    Problem with streamlit (streamlit==1.6.0)

    Some folks on the internet suggest downgrading streamlit, but it seems like the issue still persists. I've looked into the package itself and didn't find either report_thread.py or "report_thread" in the python files

    bug stale 
    opened by arseniyturin 4
  • Fix typo: seperate -> separate

    Fix typo: seperate -> separate

    What kind of change does this PR introduce?

    • [ ] Bugfix
    • [ ] New Feature
    • [ ] Feature Improvement
    • [X] Refactoring
    • [X] Documentation
    • [ ] Other, please describe:

    Description:

    Fix typo "seperation" -> "separation". See #19

    Checklist:

    • [X] I have read the CONTRIBUTING document.
    • [X] My changes don't require a change to the documentation, or if they do, I've added all required information.
    documentation 
    opened by raethlein 3
  • Starting the server

    Starting the server

    Hello,

    I tried to run the basic function,

      from pydantic import BaseModel
      
      class Input(BaseModel):
          message: str
      
      class Output(BaseModel):
          message: str
      
      def hello_world(input: Input) -> Output:
          """Returns the `message` of the input data."""
          return Output(message=input.message)
    

    and got this error: 'PYTHONPATH' is not recognized as an internal command or external, an executable program or a batch file.

    support 
    opened by 17341 3
  • features for production

    features for production

    This looks great and my first thought was, wow, this looks like a great alternative to Flask! but how would i implement things like authentication & connections to a database -- things that would likely be needed for any real "production" implementation?

    feature stale 
    opened by fredzannarbor 3
  • Finalize production deployment capabilities

    Finalize production deployment capabilities

    Feature description:

    Finalize capabilities to deploy an Opyrator to a cloud platform.

    Rolling out your Opyrators for production usage might require additional features such as SSL, authentication, API tokens, unlimited scalability, load balancing, and monitoring. Therefore, we provide capabilities to easily deploy your Opyrators directly on scalable and secure cloud platforms without any major overhead.

    The deployment can be executed via command line:

    opyrator deploy my_opyrator:hello_world <deployment-provider> <deployment-provider-options>
    
    feature stale 
    opened by LukasMasuch 3
  • Bump protobuf from 3.15.8 to 3.18.3

    Bump protobuf from 3.15.8 to 3.18.3

    Bumps protobuf from 3.15.8 to 3.18.3.

    Release notes

    Sourced from protobuf's releases.

    Protocol Buffers v3.18.3

    C++

    Protocol Buffers v3.16.1

    Java

    • Improve performance characteristics of UnknownFieldSet parsing (#9371)

    Protocol Buffers v3.18.2

    Java

    • Improve performance characteristics of UnknownFieldSet parsing (#9371)

    Protocol Buffers v3.18.1

    Python

    • Update setup.py to reflect that we now require at least Python 3.5 (#8989)
    • Performance fix for DynamicMessage: force GetRaw() to be inlined (#9023)

    Ruby

    • Update ruby_generator.cc to allow proto2 imports in proto3 (#9003)

    Protocol Buffers v3.18.0

    C++

    • Fix warnings raised by clang 11 (#8664)
    • Make StringPiece constructible from std::string_view (#8707)
    • Add missing capability attributes for LLVM 12 (#8714)
    • Stop using std::iterator (deprecated in C++17). (#8741)
    • Move field_access_listener from libprotobuf-lite to libprotobuf (#8775)
    • Fix #7047 Safely handle setlocale (#8735)
    • Remove deprecated version of SetTotalBytesLimit() (#8794)
    • Support arena allocation of google::protobuf::AnyMetadata (#8758)
    • Fix undefined symbol error around SharedCtor() (#8827)
    • Fix default value of enum(int) in json_util with proto2 (#8835)
    • Better Smaller ByteSizeLong
    • Introduce event filters for inject_field_listener_events
    • Reduce memory usage of DescriptorPool
    • For lazy fields copy serialized form when allowed.
    • Re-introduce the InlinedStringField class
    • v2 access listener
    • Reduce padding in the proto's ExtensionRegistry map.
    • GetExtension performance optimizations
    • Make tracker a static variable rather than call static functions
    • Support extensions in field access listener
    • Annotate MergeFrom for field access listener
    • Fix incomplete types for field access listener
    • Add map_entry/new_map_entry to SpecificField in MessageDifferencer. They record the map items which are different in MessageDifferencer's reporter.
    • Reduce binary size due to fieldless proto messages
    • TextFormat: ParseInfoTree supports getting field end location in addition to start.

    ... (truncated)

    Commits

    Dependabot compatibility score

    Dependabot will resolve any conflicts with this PR as long as you don't alter it yourself. You can also trigger a rebase manually by commenting @dependabot rebase.


    Dependabot commands and options

    You can trigger Dependabot actions by commenting on this PR:

    • @dependabot rebase will rebase this PR
    • @dependabot recreate will recreate this PR, overwriting any edits that have been made to it
    • @dependabot merge will merge this PR after your CI passes on it
    • @dependabot squash and merge will squash and merge this PR after your CI passes on it
    • @dependabot cancel merge will cancel a previously requested merge and block automerging
    • @dependabot reopen will reopen this PR if it is closed
    • @dependabot close will close this PR and stop Dependabot recreating it. You can achieve the same result by closing it manually
    • @dependabot ignore this major version will close this PR and stop Dependabot creating any more for this major version (unless you reopen the PR or upgrade to it yourself)
    • @dependabot ignore this minor version will close this PR and stop Dependabot creating any more for this minor version (unless you reopen the PR or upgrade to it yourself)
    • @dependabot ignore this dependency will close this PR and stop Dependabot creating any more for this dependency (unless you reopen the PR or upgrade to it yourself)
    • @dependabot use these labels will set the current labels as the default for future PRs for this repo and language
    • @dependabot use these reviewers will set the current reviewers as the default for future PRs for this repo and language
    • @dependabot use these assignees will set the current assignees as the default for future PRs for this repo and language
    • @dependabot use this milestone will set the current milestone as the default for future PRs for this repo and language

    You can disable automated security fix PRs for this repo from the Security Alerts page.

    dependencies stale 
    opened by dependabot[bot] 2
  • Bump nbconvert from 6.0.7 to 6.5.1

    Bump nbconvert from 6.0.7 to 6.5.1

    Bumps nbconvert from 6.0.7 to 6.5.1.

    Release notes

    Sourced from nbconvert's releases.

    Release 6.5.1

    No release notes provided.

    6.5.0

    What's Changed

    New Contributors

    Full Changelog: https://github.com/jupyter/nbconvert/compare/6.4.5...6.5

    6.4.3

    What's Changed

    New Contributors

    Full Changelog: https://github.com/jupyter/nbconvert/compare/6.4.2...6.4.3

    6.4.0

    What's Changed

    New Contributors

    ... (truncated)

    Commits

    Dependabot compatibility score

    Dependabot will resolve any conflicts with this PR as long as you don't alter it yourself. You can also trigger a rebase manually by commenting @dependabot rebase.


    Dependabot commands and options

    You can trigger Dependabot actions by commenting on this PR:

    • @dependabot rebase will rebase this PR
    • @dependabot recreate will recreate this PR, overwriting any edits that have been made to it
    • @dependabot merge will merge this PR after your CI passes on it
    • @dependabot squash and merge will squash and merge this PR after your CI passes on it
    • @dependabot cancel merge will cancel a previously requested merge and block automerging
    • @dependabot reopen will reopen this PR if it is closed
    • @dependabot close will close this PR and stop Dependabot recreating it. You can achieve the same result by closing it manually
    • @dependabot ignore this major version will close this PR and stop Dependabot creating any more for this major version (unless you reopen the PR or upgrade to it yourself)
    • @dependabot ignore this minor version will close this PR and stop Dependabot creating any more for this minor version (unless you reopen the PR or upgrade to it yourself)
    • @dependabot ignore this dependency will close this PR and stop Dependabot creating any more for this dependency (unless you reopen the PR or upgrade to it yourself)
    • @dependabot use these labels will set the current labels as the default for future PRs for this repo and language
    • @dependabot use these reviewers will set the current reviewers as the default for future PRs for this repo and language
    • @dependabot use these assignees will set the current assignees as the default for future PRs for this repo and language
    • @dependabot use this milestone will set the current milestone as the default for future PRs for this repo and language

    You can disable automated security fix PRs for this repo from the Security Alerts page.

    dependencies stale 
    opened by dependabot[bot] 2
  • Bump mistune from 0.8.4 to 2.0.3

    Bump mistune from 0.8.4 to 2.0.3

    Bumps mistune from 0.8.4 to 2.0.3.

    Release notes

    Sourced from mistune's releases.

    Version 2.0.2

    Fix escape_url via lepture/mistune#295

    Version 2.0.1

    Fix XSS for image link syntax.

    Version 2.0.0

    First release of Mistune v2.

    Version 2.0.0 RC1

    In this release, we have a Security Fix for harmful links.

    Version 2.0.0 Alpha 1

    This is the first release of v2. An alpha version for users to have a preview of the new mistune.

    Changelog

    Sourced from mistune's changelog.

    Changelog

    Here is the full history of mistune v2.

    Version 2.0.4

    
    Released on Jul 15, 2022
    
    • Fix url plugin in &lt;a&gt; tag
    • Fix * formatting

    Version 2.0.3

    Released on Jun 27, 2022

    • Fix table plugin
    • Security fix for CVE-2022-34749

    Version 2.0.2

    
    Released on Jan 14, 2022
    

    Fix escape_url

    Version 2.0.1

    Released on Dec 30, 2021

    XSS fix for image link syntax.

    Version 2.0.0

    
    Released on Dec 5, 2021
    

    This is the first non-alpha release of mistune v2.

    Version 2.0.0rc1

    Released on Feb 16, 2021

    Version 2.0.0a6

    
    </tr></table> 
    

    ... (truncated)

    Commits
    • 3f422f1 Version bump 2.0.3
    • a6d4321 Fix asteris emphasis regex CVE-2022-34749
    • 5638e46 Merge pull request #307 from jieter/patch-1
    • 0eba471 Fix typo in guide.rst
    • 61e9337 Fix table plugin
    • 76dec68 Add documentation for renderer heading when TOC enabled
    • 799cd11 Version bump 2.0.2
    • babb0cf Merge pull request #295 from dairiki/bug.escape_url
    • fc2cd53 Make mistune.util.escape_url less aggressive
    • 3e8d352 Version bump 2.0.1
    • Additional commits viewable in compare view

    Dependabot compatibility score

    Dependabot will resolve any conflicts with this PR as long as you don't alter it yourself. You can also trigger a rebase manually by commenting @dependabot rebase.


    Dependabot commands and options

    You can trigger Dependabot actions by commenting on this PR:

    • @dependabot rebase will rebase this PR
    • @dependabot recreate will recreate this PR, overwriting any edits that have been made to it
    • @dependabot merge will merge this PR after your CI passes on it
    • @dependabot squash and merge will squash and merge this PR after your CI passes on it
    • @dependabot cancel merge will cancel a previously requested merge and block automerging
    • @dependabot reopen will reopen this PR if it is closed
    • @dependabot close will close this PR and stop Dependabot recreating it. You can achieve the same result by closing it manually
    • @dependabot ignore this major version will close this PR and stop Dependabot creating any more for this major version (unless you reopen the PR or upgrade to it yourself)
    • @dependabot ignore this minor version will close this PR and stop Dependabot creating any more for this minor version (unless you reopen the PR or upgrade to it yourself)
    • @dependabot ignore this dependency will close this PR and stop Dependabot creating any more for this dependency (unless you reopen the PR or upgrade to it yourself)
    • @dependabot use these labels will set the current labels as the default for future PRs for this repo and language
    • @dependabot use these reviewers will set the current reviewers as the default for future PRs for this repo and language
    • @dependabot use these assignees will set the current assignees as the default for future PRs for this repo and language
    • @dependabot use this milestone will set the current milestone as the default for future PRs for this repo and language

    You can disable automated security fix PRs for this repo from the Security Alerts page.

    dependencies stale 
    opened by dependabot[bot] 2
  • Bump certifi from 2020.12.5 to 2022.12.7

    Bump certifi from 2020.12.5 to 2022.12.7

    Bumps certifi from 2020.12.5 to 2022.12.7.

    Commits

    Dependabot compatibility score

    Dependabot will resolve any conflicts with this PR as long as you don't alter it yourself. You can also trigger a rebase manually by commenting @dependabot rebase.


    Dependabot commands and options

    You can trigger Dependabot actions by commenting on this PR:

    • @dependabot rebase will rebase this PR
    • @dependabot recreate will recreate this PR, overwriting any edits that have been made to it
    • @dependabot merge will merge this PR after your CI passes on it
    • @dependabot squash and merge will squash and merge this PR after your CI passes on it
    • @dependabot cancel merge will cancel a previously requested merge and block automerging
    • @dependabot reopen will reopen this PR if it is closed
    • @dependabot close will close this PR and stop Dependabot recreating it. You can achieve the same result by closing it manually
    • @dependabot ignore this major version will close this PR and stop Dependabot creating any more for this major version (unless you reopen the PR or upgrade to it yourself)
    • @dependabot ignore this minor version will close this PR and stop Dependabot creating any more for this minor version (unless you reopen the PR or upgrade to it yourself)
    • @dependabot ignore this dependency will close this PR and stop Dependabot creating any more for this dependency (unless you reopen the PR or upgrade to it yourself)
    • @dependabot use these labels will set the current labels as the default for future PRs for this repo and language
    • @dependabot use these reviewers will set the current reviewers as the default for future PRs for this repo and language
    • @dependabot use these assignees will set the current assignees as the default for future PRs for this repo and language
    • @dependabot use this milestone will set the current milestone as the default for future PRs for this repo and language

    You can disable automated security fix PRs for this repo from the Security Alerts page.

    dependencies 
    opened by dependabot[bot] 0
  • Add CodeQL workflow for GitHub code scanning

    Add CodeQL workflow for GitHub code scanning

    Hi ml-tooling/opyrator!

    This is a one-off automatically generated pull request from LGTM.com :robot:. You might have heard that we’ve integrated LGTM’s underlying CodeQL analysis engine natively into GitHub. The result is GitHub code scanning!

    With LGTM fully integrated into code scanning, we are focused on improving CodeQL within the native GitHub code scanning experience. In order to take advantage of current and future improvements to our analysis capabilities, we suggest you enable code scanning on your repository. Please take a look at our blog post for more information.

    This pull request enables code scanning by adding an auto-generated codeql.yml workflow file for GitHub Actions to your repository — take a look! We tested it before opening this pull request, so all should be working :heavy_check_mark:. In fact, you might already have seen some alerts appear on this pull request!

    Where needed and if possible, we’ve adjusted the configuration to the needs of your particular repository. But of course, you should feel free to tweak it further! Check this page for detailed documentation.

    Questions? Check out the FAQ below!

    FAQ

    Click here to expand the FAQ section

    How often will the code scanning analysis run?

    By default, code scanning will trigger a scan with the CodeQL engine on the following events:

    • On every pull request — to flag up potential security problems for you to investigate before merging a PR.
    • On every push to your default branch and other protected branches — this keeps the analysis results on your repository’s Security tab up to date.
    • Once a week at a fixed time — to make sure you benefit from the latest updated security analysis even when no code was committed or PRs were opened.

    What will this cost?

    Nothing! The CodeQL engine will run inside GitHub Actions, making use of your unlimited free compute minutes for public repositories.

    What types of problems does CodeQL find?

    The CodeQL engine that powers GitHub code scanning is the exact same engine that powers LGTM.com. The exact set of rules has been tweaked slightly, but you should see almost exactly the same types of alerts as you were used to on LGTM.com: we’ve enabled the security-and-quality query suite for you.

    How do I upgrade my CodeQL engine?

    No need! New versions of the CodeQL analysis are constantly deployed on GitHub.com; your repository will automatically benefit from the most recently released version.

    The analysis doesn’t seem to be working

    If you get an error in GitHub Actions that indicates that CodeQL wasn’t able to analyze your code, please follow the instructions here to debug the analysis.

    How do I disable LGTM.com?

    If you have LGTM’s automatic pull request analysis enabled, then you can follow these steps to disable the LGTM pull request analysis. You don’t actually need to remove your repository from LGTM.com; it will automatically be removed in the next few months as part of the deprecation of LGTM.com (more info here).

    Which source code hosting platforms does code scanning support?

    GitHub code scanning is deeply integrated within GitHub itself. If you’d like to scan source code that is hosted elsewhere, we suggest that you create a mirror of that code on GitHub.

    How do I know this PR is legitimate?

    This PR is filed by the official LGTM.com GitHub App, in line with the deprecation timeline that was announced on the official GitHub Blog. The proposed GitHub Action workflow uses the official open source GitHub CodeQL Action. If you have any other questions or concerns, please join the discussion here in the official GitHub community!

    I have another question / how do I get in touch?

    Please join the discussion here to ask further questions and send us suggestions!

    maintenance 
    opened by lgtm-com[bot] 0
Releases(v0.0.11)
  • v0.0.11(May 1, 2021)

    🚨 Bug Fixes

    • Changed subprocess.run command in launch_ui function (#26) by @JopaXd

    📝 Documentation

    • Fix typo: seperate -> separate (#20) by @raethlein

    👥 Contributors

    Thanks to @JopaXd, @LukasMasuch and @raethlein for the contributions.

    Source code(tar.gz)
    Source code(zip)
  • v0.0.10(May 1, 2021)

    🚨 Bug Fixes

    • Make opyrator work on Windows with streamlit-ui (#18) by @raethlein

    📝 Documentation

    • Fix typo in README.md (#21) by @adriangb

    👥 Contributors

    Thanks to @LukasMasuch, @adriangb and @raethlein for the contributions.

    Source code(tar.gz)
    Source code(zip)
Owner
Machine Learning Tooling
Open-source machine learning tooling to boost your productivity.
Machine Learning Tooling
MLflow App Using React, Hooks, RabbitMQ, FastAPI Server, Celery, Microservices

Katana ML Skipper This is a simple and flexible ML workflow engine. It helps to orchestrate events across a set of microservices and create executable

Tom Xu 8 Nov 17, 2022
A collection of interactive machine-learning experiments: 🏋️models training + 🎨models demo

?? Interactive Machine Learning experiments: ??️models training + ??models demo

Oleksii Trekhleb 1.4k Jan 6, 2023
Interactive Web App with Streamlit and Scikit-learn that applies different Classification algorithms to popular datasets

Interactive Web App with Streamlit and Scikit-learn that applies different Classification algorithms to popular datasets Datasets Used: Iris dataset,

Samrat Mitra 2 Nov 18, 2021
ml4h is a toolkit for machine learning on clinical data of all kinds including genetics, labs, imaging, clinical notes, and more

ml4h is a toolkit for machine learning on clinical data of all kinds including genetics, labs, imaging, clinical notes, and more

Broad Institute 65 Dec 20, 2022
Traingenerator 🧙 A web app to generate template code for machine learning ✨

Traingenerator ?? A web app to generate template code for machine learning ✨ ?? Traingenerator is now live! ??

Johannes Rieke 1.2k Jan 7, 2023
Scalable, Portable and Distributed Gradient Boosting (GBDT, GBRT or GBM) Library, for Python, R, Java, Scala, C++ and more. Runs on single machine, Hadoop, Spark, Dask, Flink and DataFlow

eXtreme Gradient Boosting Community | Documentation | Resources | Contributors | Release Notes XGBoost is an optimized distributed gradient boosting l

Distributed (Deep) Machine Learning Community 23.6k Jan 3, 2023
The easy way to combine mlflow, hydra and optuna into one machine learning pipeline.

mlflow_hydra_optuna_the_easy_way The easy way to combine mlflow, hydra and optuna into one machine learning pipeline. Objective TODO Usage 1. build do

shibuiwilliam 9 Sep 9, 2022
Iris-Heroku - Putting a Machine Learning Model into Production with Flask and Heroku

Puesta en Producción de un modelo de aprendizaje automático con Flask y Heroku L

Jesùs Guillen 1 Jun 3, 2022
A Python Automated Machine Learning tool that optimizes machine learning pipelines using genetic programming.

Master status: Development status: Package information: TPOT stands for Tree-based Pipeline Optimization Tool. Consider TPOT your Data Science Assista

Epistasis Lab at UPenn 8.9k Jan 9, 2023
Python Extreme Learning Machine (ELM) is a machine learning technique used for classification/regression tasks.

Python Extreme Learning Machine (ELM) Python Extreme Learning Machine (ELM) is a machine learning technique used for classification/regression tasks.

Augusto Almeida 84 Nov 25, 2022
Vowpal Wabbit is a machine learning system which pushes the frontier of machine learning with techniques

Vowpal Wabbit is a machine learning system which pushes the frontier of machine learning with techniques such as online, hashing, allreduce, reductions, learning2search, active, and interactive learning.

Vowpal Wabbit 8.1k Dec 30, 2022
CD) in machine learning projectsImplementing continuous integration & delivery (CI/CD) in machine learning projects

CML with cloud compute This repository contains a sample project using CML with Terraform (via the cml-runner function) to launch an AWS EC2 instance

Iterative 19 Oct 3, 2022
machine learning model deployment project of Iris classification model in a minimal UI using flask web framework and deployed it in Azure cloud using Azure app service

This is a machine learning model deployment project of Iris classification model in a minimal UI using flask web framework and deployed it in Azure cloud using Azure app service. We initially made this project as a requirement for an internship at Indian Servers. We are now making it open to contribution.

Krishna Priyatham Potluri 73 Dec 1, 2022
A machine learning web application for binary classification using streamlit

Machine Learning web App This is a machine learning web application for binary classification using streamlit options this application contains 3 clas

abdelhak mokri 1 Dec 20, 2021
MLReef is an open source ML-Ops platform that helps you collaborate, reproduce and share your Machine Learning work with thousands of other users.

The collaboration platform for Machine Learning MLReef is an open source ML-Ops platform that helps you collaborate, reproduce and share your Machine

MLReef 1.4k Dec 27, 2022
Crunchdao - Python API for the Crunchdao machine learning tournament

Python API for the Crunchdao machine learning tournament Interact with the Crunc

null 3 Jan 19, 2022
Uber Open Source 1.6k Dec 31, 2022
AutoTabular automates machine learning tasks enabling you to easily achieve strong predictive performance in your applications.

AutoTabular automates machine learning tasks enabling you to easily achieve strong predictive performance in your applications. With just a few lines of code, you can train and deploy high-accuracy machine learning and deep learning models tabular data.

Robin 55 Dec 27, 2022
A Python library for choreographing your machine learning research.

A Python library for choreographing your machine learning research.

AI2 270 Jan 6, 2023