Ipylivebash - Run shell script in Jupyter with live output

Overview

ipylivebash

ipylivebash is a library to run shell script in Jupyter with live output.

Example

%%livebash --save log.txt --save-timestamp

find .

Run find . and show the output in the Jupyter notebook and also save to log-${current_timestamp}.txt

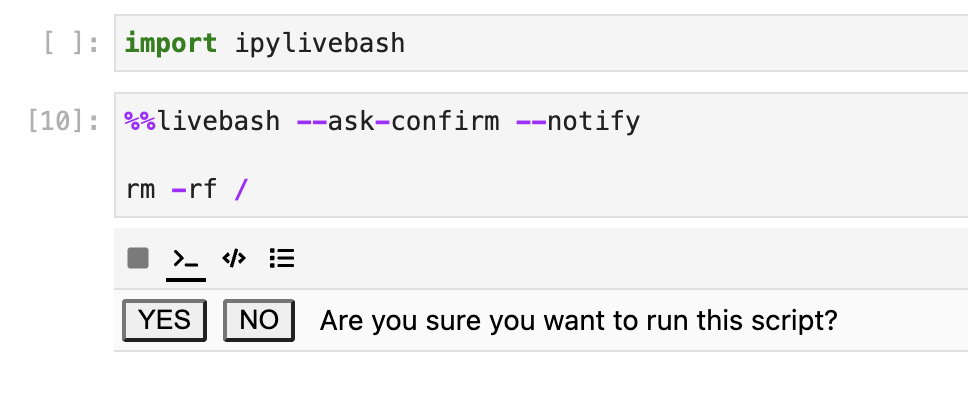
%%livebash --ask-confirm --notify
set -e
deploy_script

Before running the deploy_script show a panel to ask for confirmation. Once it is finished, show a notification.

Features

  1. Run shell script in Jupyter with live output
  2. The output in the notebook cell is not saved in the notebook by default
  3. Support to save the output to a file. If the file already exists, it will pick another name automatically.
  4. Support to show a confirmation UI before executing the script
  5. Support to send a notification when the script finishes.

Usage

usage: livebash [-h] [--save OUTPUT_FILE] [--save-timestamp]
                [--line-limit LINE_LIMIT] [--height HEIGHT] [--ask-confirm]
                [--notify] [--keep-cell-output]

optional arguments:
  -h, --help
  --save OUTPUT_FILE    Save output to a file
  --save-timestamp      Add timestamp to the output file name
  --line-limit LINE_LIMIT
                        Restrict the no. of lines to be shown
  --height HEIGHT       Set the height of the output cell
  --ask-confirm         Ask for confirmation before execution
  --notify              Send a notification when the script finished
  --keep-cell-output    Keep the cell output

Options

--save OUTPUT_FILE

Save the output to a file.

If the file name already exists, it will add a suffix to avoid overriding the original file.

--save-timestamp

Add timestamp to the output file name.

--line-limit LINE_LIMIT

If the no. of line output exceed the limit, it may be truncated. It will show the last 5 lines only.

--height HEIGHT

Set the height of the output cell

--ask-confirm

Ask for confirmation before execution

ask_confirm.png (392×80)

--notify

Send a notification when the script finished

--keep-cell-output

Keep the cell output such that it could be saved together with the notebook. It can't be used with other options like --line-limit.

Installation

You can install using pip:

pip install ipylivebash

If you are using Jupyter Notebook 5.2 or earlier, you may also need to enable the nbextension:

jupyter nbextension enable --py [--sys-prefix|--user|--system] ipylivebash

Development Installation

Create a dev environment:

conda create -n ipylivebash-dev -c conda-forge nodejs yarn python jupyterlab
conda activate ipylivebash-dev

Install the python. This will also build the TS package.

pip install -e ".[test, examples]"

When developing your extensions, you need to manually enable your extensions with the notebook / lab frontend. For lab, this is done by the command:

jupyter labextension develop --overwrite .
yarn run build

For classic notebook, you need to run:

jupyter nbextension install --sys-prefix --symlink --overwrite --py ipylivebash
jupyter nbextension enable --sys-prefix --py ipylivebash

Note that the --symlink flag doesn't work on Windows, so you will here have to run the install command every time that you rebuild your extension. For certain installations you might also need another flag instead of --sys-prefix, but we won't cover the meaning of those flags here.

How to see your changes

Typescript:

If you use JupyterLab to develop then you can watch the source directory and run JupyterLab at the same time in different terminals to watch for changes in the extension's source and automatically rebuild the widget.

# Watch the source directory in one terminal, automatically rebuilding when needed
yarn run watch
# Run JupyterLab in another terminal
jupyter lab

After a change wait for the build to finish and then refresh your browser and the changes should take effect.

Python:

If you make a change to the python code then you will need to restart the notebook kernel to have it take effect.

You might also like...
Output Analyzer for you terminal commands

Output analyzer (OZER) You can specify a few words inside config.yaml file and specify the color you want to be used. installing: Install command usin

Python Processing Tool for Vasp Ipnut/Output

PivotPy A Python Processing Tool for Vasp Input/Output. A CLI is available in Powershell, see Vasp2Visual. stylea{text-decoration: none !important;c

Runs a command in P4wnP1 and displays the output on OLED screen (SH1106)

p4wnp1-oled-terminal Runs a command in P4wnP1 and displays the output on OLED screen (SH1106) Works on Raspberry Pi Zero 2 W Tested successfully on RP

Tablicate - Python library for easy table creation and output to terminal

Tablicate Tablicate - Python library for easy table creation and output to terminal Features Column-wise justification alignment (left, right, center)

Format click help output nicely with rich.

rich-click Format click help output nicely with Rich. Click is a "Python package for creating beautiful command line interfaces". Rich is a "Python li

xonsh is a Python-powered, cross-platform, Unix-gazing shell

xonsh is a Python-powered, cross-platform, Unix-gazing shell language and command prompt.

adds flavor of interactive filtering to the traditional pipe concept of UNIX shell

percol __ ____ ___ ______________ / / / __ \/ _ \/ ___/ ___/ __ \/ / / /_/ / __/ / / /__/ /_/ / / / .__

xonsh is a Python-powered, cross-platform, Unix-gazing shell language and command prompt.

xonsh xonsh is a Python-powered, cross-platform, Unix-gazing shell language and command prompt. The language is a superset of Python 3.6+ with additio

Fetch is use to get information about anything on the shell using Wikipedia.

Fetch Search wikipedia article on command line [Why This?] [Support the Project] [Installation] [Configuration] Why this? Fetch helps you to quickly l

Comments
  • Problem in kubectl outputs

    Problem in kubectl outputs

    HI,

    first of all: thanks for this extesion, it helps a lot.

    But there seems to be an issue if the output comes too fast or something. It might be the debouncing? The output is only printed after I terminate the line or a new pod is created.

    %%livebash
    kubectl get pods -w
    

    It works if I use the following code:

    import subprocess
    import shlex
    def run_command(command):
        process = subprocess.Popen(shlex.split(command), stdout=subprocess.PIPE)
        while True:
            output = process.stdout.readline()
            if output == '' and process.poll() is not None:
                break
            if output:
                print(output.strip().decode("utf-8") )
        rc = process.poll()
        return rc
    
    run_command("kubectl get pods -w")
    
    opened by smerschjohann 2
Releases(release/0.1.2)
Owner
Ben Lau
Full Stack Developer
Ben Lau
Kubernetes shell: An integrated shell for working with the Kubernetes

kube-shell Kube-shell: An integrated shell for working with the Kubernetes CLI Under the hood kube-shell still calls kubectl. Kube-shell aims to provi

CloudNative Labs 2.2k Jan 8, 2023
(BionicLambda Universal SHell) A simple shell made in Python. Docs and possible C port incoming.

blush ?? (BionicLambda Universal SHell) A simple shell made in Python. Docs and possible C port incoming. Note: The Linux executables were made on Ubu

null 3 Jun 30, 2021
Bear-Shell is a shell based in the terminal or command prompt.

Bear-Shell is a shell based in the terminal or command prompt. You can navigate files, run python files, create files via the BearUtils text editor, and a lot more coming up!

MichaelBear 6 Dec 25, 2021
Bear-Shell is a shell based in the terminal or command prompt.

Bear-Shell is a shell based in the terminal or command prompt. You can navigate files, run python files, create files via the BearUtils text editor, and a lot more coming up!

MichaelBear 6 Dec 25, 2021
ICMP Reverse Shell written in Python 3 and with Scapy (backdoor/rev shell)

icmpdoor - ICMP Reverse Shell icmpdoor is an ICMP rev shell written in Python3 and scapy. Tested on Ubuntu 20.04, Debian 10 (Kali Linux), and Windows

Jeroen van Kessel 206 Dec 29, 2022
iTerm2 Shell integration for Xonsh shell.

iTerm2 Shell Integration iTerm2 Shell integration for Xonsh shell. Installation To install use pip: xpip install xontrib-iterm2 # or: xpip install -U

Noorhteen Raja NJ 6 Dec 29, 2022
The Pythone Script will generate a (.)sh file with reverse shell codes then you can execute the script on the target

Pythone Script will generate a (.)sh file with reverse shell codes then you can execute the script on the targetPythone Script will generate a (.)sh file with reverse shell codes then you can execute the script on the target

Boy From Future 15 Sep 16, 2022
Standalone script written in Python 3 for generating Reverse Shell one liner snippets and handles the communication between target and client using custom Netcat binaries

Standalone script written in Python 3 for generating Reverse Shell one liner snippets and handles the communication between target and client using custom Netcat binaries. It automates the boring stuff like URL encoding the command and setting up a listener.

Yash Bhardwaj 3 Sep 27, 2022