Molecular Nodes
🧬
🔬
💻
Buy Me a Coffee to Keep Development Going!
Join a Community of Blender SciVis People!
What is Molecular Nodes?
Molecular Nodes provides a convenient method for importing structural biology files into Blender, and several nodes for working with atomic data inside of Blender's Geometry Nodes.
Blender's Geometry Nodes provides a powerful interface for procedural modelling and animation. Currently it is limited in its ability to read any kind of structured data file as input, that isn't a 3D mesh. Molecular Nodes bridges this gap by providing an interface for converting .pdb and other file types into meshes that are usable by Geometry Nodes.
Acknowledgements
This addon is built crucially around the python library atomium, which provides a great lightweight and pure-python way to to parse a variety of structural biology files, that interface nicely with the built-in python interpreter that is bundled with Blender.
This addon is built using the excellent plugin for creating addons Serpens, which made the process of compiling a clear and concise addon, significantly reducing development time an creating a better addon overall.
Importantly none of this would be possible without the Blender and the Blender Foundation and the fantastic work of all the developers, from the community and the foundation itself.
This documentation is currently not complete for all of the nodes, but there should be enough to get you started. More complete documentation is in the works.
Installation
This addon is built with Blender v. 3.1.2, some of the nodes may break in earlier versions.
To install Molecular Nodes, download the latest release and install the addon through the preferences panel inside of Blender, and select the MolecularNodes_0.3.8.zip file
If the addon isn't highlighted, search for it and click the tick box to enable the addon. 
Installing Atomium
Windows: You must run Blender as Administrator to be able to install Atomium successfully.
While still in the preferences panel, click the Install Atomium button to download and install the Atomium python library. This should only need to be done the first time you install Molecular Nodes. You will need to complete this step again if you reinstall Blender or upgrade the version.
The addon should now be enabled and available for use.
Loading Structures
You can load structures using the Molecular Nodes panel, which should be available at the top-right of the 3D viewport. You can press N to show & hide the side panels. Click on the Molecular Nodes tab to reveal the panel.
Molecular Nodes provides two ways to open files. You can fetch directly from the PDB by inputting the 4-character code into the top box and pressing the download button. This will download the file and open it inside of Blender.
You can also open a file saved on your local computer. Click the folder icon to navigate to your .pdb file, select it and press OK. Then press Open on the Molecular Nodes panel to read the file and load the model into Blender.
Using the Nodes
Atomic Properties
With Molecular Nodes enabled, create a geometry nodes node tree, and inside the add menu (Shift + A) there will be an additional category for Molecular Nodes. 
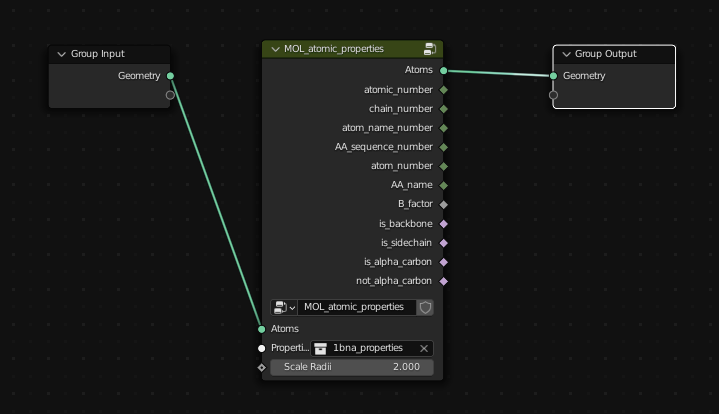
To access the atomic properties that are associated with the model, add the "Atomic Properties" node from Properties -> Atomic Properties and in the node, select the *_properties collection. This will scale the points according to their Atomic Radii, and make all of the atomic properties associated with the atoms (atomic number, is_backbone / is_sidechain) available for use inside of the node tree.
Styling
To quickly colour the structure, add the "Style Colour" node from Styling -> Style Colour, select a material for the atoms, and connect the atomic_number from the Properties node to the atomic_number of the style node. The outputted colour becomes an output for the node tree.
Name the output for the node tree in the modifier tab: 
And add an attribute node to the shader, inputting the name for the colour output fromt the GN node tree, in this case colour. 
Voila!
By default, the atoms are 'point clouds' and only visible inside of Cycles.
The atoms should now be visible, inside of the Cycles render engine: 
To make the atoms visible inside of EEVEE, use the Styling -> Atoms EEVEE node. You will need to create and assign a material for each element individually.
Animating Frames
To animate between frames of a .pdb file, add the Animate Frames node from Animation -> Animate Frames and choose the *_frames collection to give the model the infomation of the different structures. You can now animate between the frames by using the Animate 0...1 slider which will animate between the first frame (0) and the last frame (1). Attach the Animate Node from Animation -> Animate to automatically play through the frames.
You can now play back the animation!
In the example below, I create the .pdb frames from this tweet and imported them with the steps above, and added a Random Vector based on the chain number, to colour the carbons of the different chains different colours.
Want to support the development of this addon? Buy me a coffee! (it took a lot of them to make it)


 .
.
 Blender version: 2.93.4, add-on version: 0.4.0


