Raspberry Pi Pico as a Rubber Ducky

Overview

Raspberry-Pi-Pico-as-a-Rubber-Ducky

2022-02-09-16-58-32_Trim

Kurulum

  1. Raspberry Pi Pico cihazınız için CircuitPython'u indirin.
  2. Boot düğmesine basılı tutarken cihazı bir USB bağlantı noktasına takın ve cihazı taktıktan sonra boot tuşundan elinizi çekin. Bunun sonucunda "RPI-RP2" adlı çıkarılabilir bir medya aygıtı karşınıza çıkacaktır.
  3. İndirdiğiniz .uf2 dosyasını Pico'nun (RPI-RP2) ana dizinine kopyalayın. Bir süre sonra cihaz yeniden başlayacak ve 1-2 saniye sonra CIRCUITPY adında çıkarılabilir bir medya aygıtı olarak karşınıza çıkacaktır.
  4. Ardından adafruit-circuitpython-bundle-7.x-mpy-YYYYMMDD.zip dosyasını indirin ve cihazın dışına çıkarın.
  5. adafruit-circuitpython-bundle-7.x-mpy-YYYYMMDD klasörü altındaki "lib" klasörüne gidin ve "adafruit_hid'i" Raspberry Pi Pico'nuzdaki lib klasörüne kopyalayın.
  6. Buradaki sayfaya giderek CTRL + S tuşlarına basın ve dosyayı Pico'nun içerisinde bulunan code.py dosyasının üzerine yazarak Raspberry Pi Pico'nun ana dizinine "code.py" olarak kaydedin.
  7. Buradaki linkten bir script bulun veya kendi Rubber Ducky scriptinizi oluşturun ve "payload.dd" olarak kaydedin.
  8. Dikkat edin, son işlemden sonra cihaz yeniden başlatılacak ve yarım saniye sonra komut dosyası (payload.dd) çalışacaktır.

USB Etkinleştirme/Devre Dışı Bırakma

Pico'nun gizlilik amacıyla bir USB depolama aygıtı gibi görünmemesine istiyorsanız;

  1. Cihazı USB bağlantı noktasına takın.
  2. "boot.py" dosyasını Pico'nun (RPI-RP2) ana dizinine kopyalayın.
  3. payload.dd dosyanızı da Pico'ya (RPI-RP2) kopyalayın.
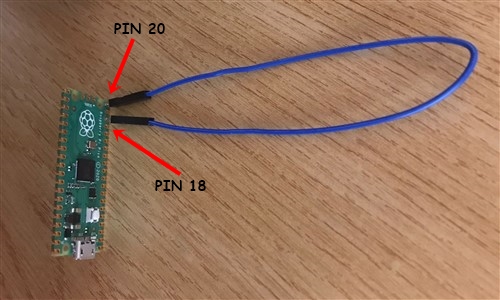
  4. Pico'yu bilgisayarınızdan çıkarın. Pin 18 ve pin 20 arasına bir jumper kablosu bağlayın. Bu durum Pico üzerinde bir kısa devre yaratacaktır ve hedef bilgisayara takıldığında Pico'nun bir USB sürücüsü olarak görünmesini engelleyecek.
  5. Tekrar programlamak için (Payload'ınızı güncellemek için) jumper kabloyu çıkarın ve PC'nize yeniden bağlayın. Varsayılan modda, USB depolama aygıtı aktif durumda olacaktır.

1

Klavye Düzenlerini Değiştirme

Varsayılan modda klavye düzeni İngilizce'dir. Bunu değiştirmek isterseniz;

  1. https://kbdlayout.info/ sayfasından istediğiniz klavye düzenini bularak üzerine tıklayın ve linki kopyalayıp https://www.neradoc.me/layouts/ sayfasındaki kutucuğa yapıştırın. Ardından "Make Zip Bundle Links" butonuna tıklayın.
  2. Ardından "Download the zip file (.py)" butonuna tıklayın.
  3. İndirilen dosyanın içerisinden kendize uygun olan klavye düzeninin dosyalarını Pico'nuzun içerisindeki lib klasörü altına kopyalayın (ben Türkçe Q klavye düzenini tercih ediyorum);
  • keyboard_layout.mpy
  • keyboard_layout_win_tuq.mpy
  • keycode_win_tuq.mpy

2

Dil Dosyanızı Kullanmak için Pico Kodunuzu Değiştirin

Pico içerisindeki "code.py" dosyasını açın ve içerisindeki şu kodu;

from adafruit_hid.keyboard_layout_us import KeyboardLayoutUS as KeyboardLayout
from adafruit_hid.keycode import Keycode

aşağıdaki kod ile değiştirin;

from keyboard_layout_win_tuq import KeyboardLayout
from keycode_win_tuq import Keycode
You might also like...
An open source operating system designed primarily for the Raspberry Pi Pico, written entirely in MicroPython

PycOS An open source operating system designed primarily for the Raspberry Pi Pico, written entirely in MicroPython. "PycOS" is an combination of the

New armachat based on Raspberry Pi PICO an Circuitpython code

Armachat-circuitpython New Armachat based on Raspberry Pi PICO an Circuitpython code Software working features: send message with header and store to

Play music on Raspberry Pi Pico Without CPU involvement

MicroPython_PIO_Music_DMA Play music on Raspberry Pi Pico Without CPU involvement This is based on PIOBeep (https://github.com/benevpi/pico_pio_buzz)

A simple portable USB MIDI controller based on Raspberry-PI Pico and a 16-button keypad, written in Circuit Python

RPI-Pico-16-BTn-MIDI-Controller-using-CircuitPython A simple portable USB MIDI controller based on Raspberry-PI Pico, written in Circuit Python. Link

A rubiks cube timer using a distance sensor and a raspberry pi 4, and possibly the pi pico to reduce size and cost.

distance sensor cube timer A rubiks cube timer using a distance sensor and a raspberry pi 4, and possibly the pi pico to reduce size and cost. How to

Hourglass on the pi pico using circuitpython

hourglass-on-pico "Hourglass" on the raspberry pi pico using circuitpython circuitpython version 7.0.0 Components used: Raspberry Pi Pico ADXL345 acce

A modular sequencer based on Pi Pico & EuroPi

PicoSequencer A modular sequencer based on Pi Pico & EuroPi by Zeno Van Moerkerke / Keurslager Kurt For now it is 'only' a trigger sequencer, but I si

Micro Displays for Raspberry Pi

micro-displays Micro Displays for Raspberry Pi Why? I'm super bored in lockdown. Add a Raspberry Pi 400 and a few tiny displays... The top half of the

Create a low powered, renewable generation forecast  display with a Raspberry Pi Zero & Inky wHAT.
Create a low powered, renewable generation forecast display with a Raspberry Pi Zero & Inky wHAT.

GB Renewable Forecast Display This Raspberry Pi powered eInk display aims to give you a quick way to time your home energy usage to help balance the g

Owner
Furkan Enes POLATOĞLU
Cyber Security Researcher, SOC Analyst, CENG, YnVsbGV0cHJvb2Y=
Furkan Enes POLATOĞLU
USB Rubber Ducky with the Rasberry Pi pico microcontroller

pico-ducky Install Install and have your USB Rubber Ducky working in less than 5 minutes. Download CircuitPython for the Raspberry Pi Pico. Plug the d

AnOnYmOus001100 3 Oct 8, 2022
a library for using WS2812b leds (aka neopixels) with Raspberry Pi Pico

pico_ws2812b a library for using WS2812b leds (aka neopixels) with Raspberry Pi Pico You'll first need to save the ws2812b.py file to your device (for

null 76 Nov 25, 2022
A Python class for controlling the Pimoroni RGB Keypad for Raspberry Pi Pico

rgbkeypad A Python class for controlling the Pimoroni RGB Keypad for the Raspberry Pi Pico. Compatible with MicroPython and CircuitPython. keypad = RG

Martin O'Hanlon 43 Nov 11, 2022
Raspberry Pi Pico development platform for PlatformIO

Raspberry Pi Pico development platform for PlatformIO A few words in the beginning Before experimental please Reinstall the platform Version: 1.0.0 Th

Georgi Angelov 160 Dec 23, 2022
Raspberry Pi Pico support for VS Code

Pico-Go VS Code Extension Pico-Go provides code auto-completion and allows you to communicate with your Raspberry Pi Pico board using the built-in REP

Chris Wood 114 Dec 28, 2022
A Raspberry Pi Pico powered Macro board, like a Streamdeck but cheaper and simpler.

Env-MCRO A Raspberry Pi Pico powered Macro board, like a Streamdeck but cheaper and simpler. (btw this image is a bit outdated, some of the silkscreen

EnviousData 68 Oct 14, 2022
A Macropad using the Raspberry Pi Pico, programmed with CircuitPython.

A Macropad using the Raspberry Pi Pico, programmed with CircuitPython.

null 15 Oct 14, 2022
Raspberry Pi Pico and LoRaWAN from CircuitPython

Raspberry Pi Pico and LoRaWAN from CircuitPython Enable LoRaWAN communications on your Raspberry Pi Pico or any RP2040-based board using CircuitPython

Alasdair Allan 15 Oct 8, 2022
A Raspberry Pi Pico plant sensor hub coded in Micropython

plantsensor A Raspberry Pi Pico plant sensor hub coded in Micropython I used: 1x Raspberry Pi Pico - microcontroller 1x Waveshare Pico OLED 1.3 - scre

null 78 Sep 20, 2022
Raspberry Pi Pico Escape Room game.

Pico Escape Room Raspberry Pi Pico Escape Room game. Parts Raspberry Pi Pico Set of 2 x 20-pin Headers for Raspberry Pi Pico 4PCS Breadboards Kit Incl

Kevin Thomas 5 Feb 2, 2022