PyTorch implementation of DeepDream algorithm

Overview

neural-dream

This is a PyTorch implementation of DeepDream. The code is based on neural-style-pt.

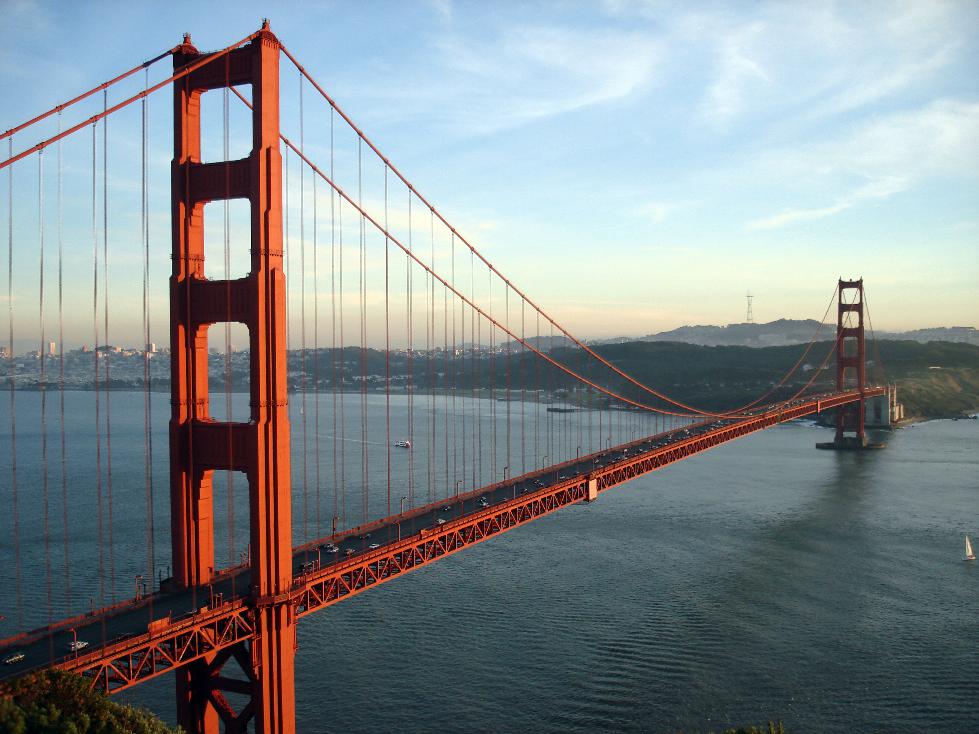
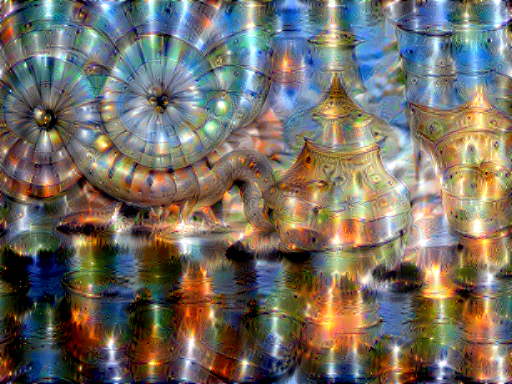
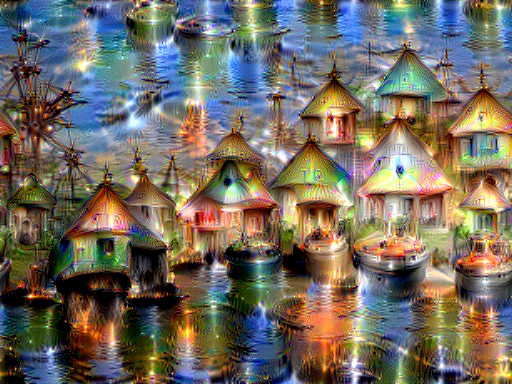
Here we DeepDream a photograph of the Golden Gate Bridge with a variety of settings:

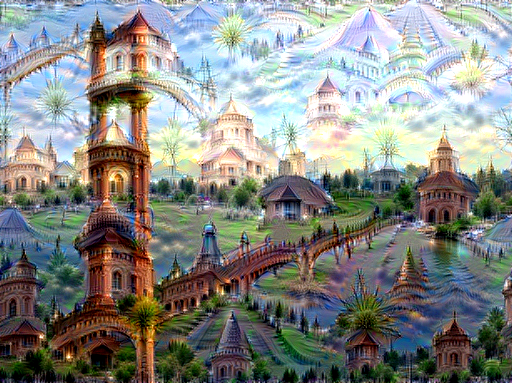
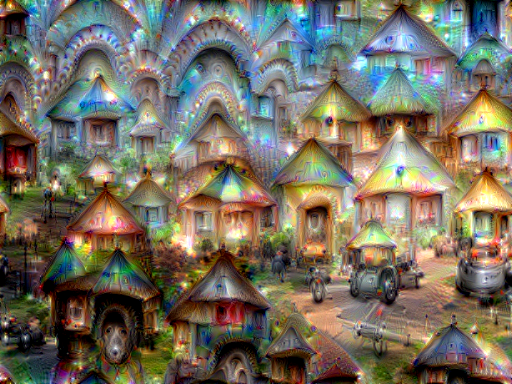
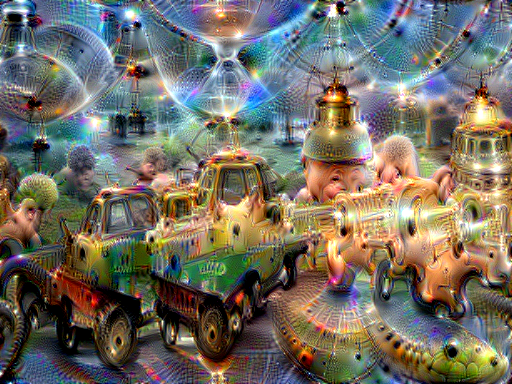
Specific Channel Selection

You can select individual or specific combinations of channels.

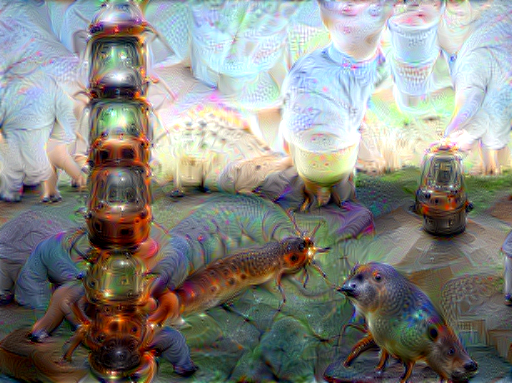
Clockwise from upper left: 119, 1, 29, and all channels of the inception_4d_3x3_reduce layer

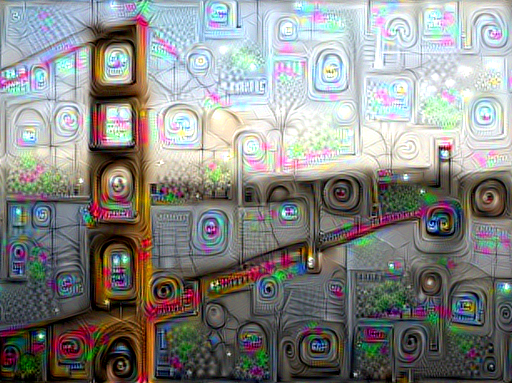
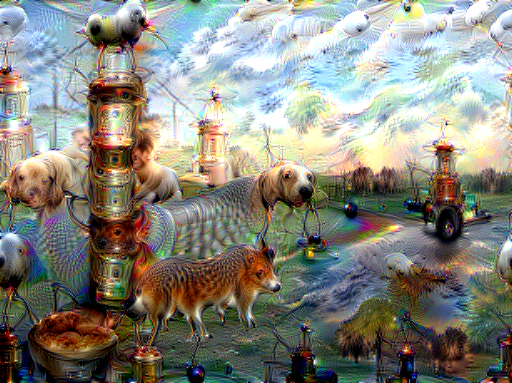
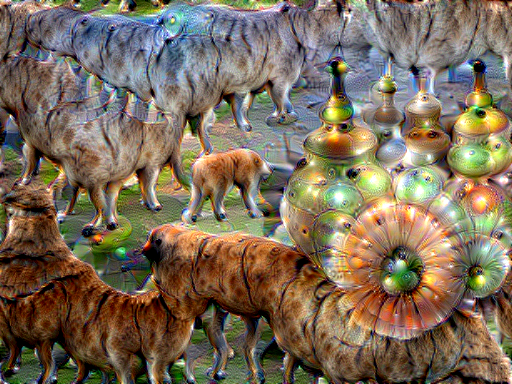
Clockwise from upper left: 25, 108, 25 & 108, and 25 & 119 from the inception_4d_3x3_reduce layer

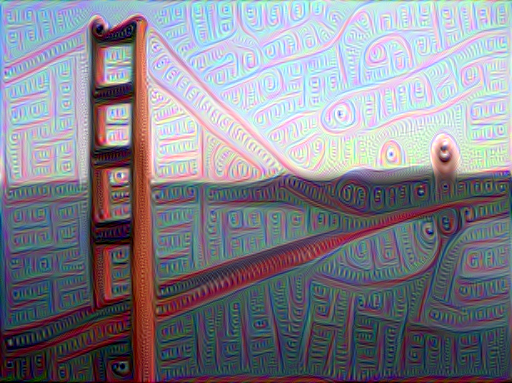
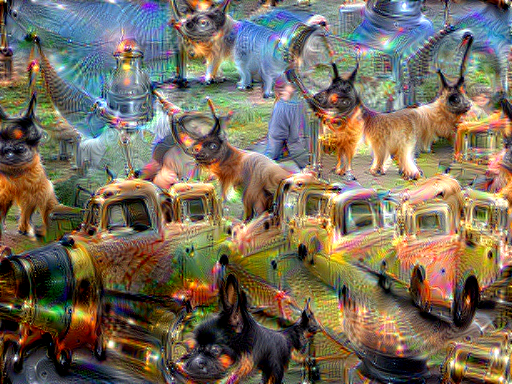
Channel Selection Based On Activation Strength

You can select channels automatically based on their activation strength.

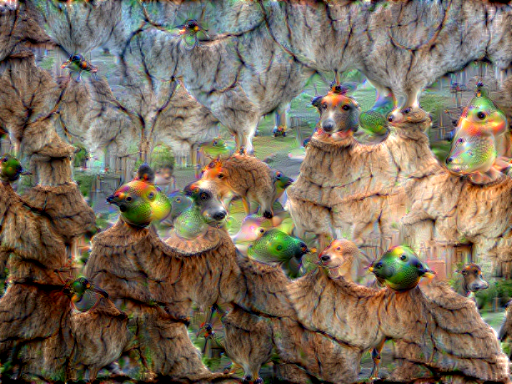
Clockwise from upper left: The top 10 weakest channels, the 10 most average channels, the top 10 strongest channels, and all channels of the inception_4e_3x3_reduce layer

Setup:

Dependencies:

Optional dependencies:

  • For CUDA backend:
    • CUDA 7.5 or above
  • For cuDNN backend:
    • cuDNN v6 or above
  • For ROCm backend:
    • ROCm 2.1 or above
  • For MKL backend:
    • MKL 2019 or above
  • For OpenMP backend:
    • OpenMP 5.0 or above

After installing the dependencies, you'll need to run the following script to download the BVLC GoogleNet model:

python models/download_models.py

This will download the original BVLC GoogleNet model.

If you have a smaller memory GPU then using the NIN Imagenet model could be an alternative to the BVLC GoogleNet model, though it's DeepDream quality is nowhere near that of the other models. You can get the details on the model from BVLC Caffe ModelZoo. The NIN model is downloaded when you run the download_models.py script with default parameters.

To download most of the compatible models, run the download_models.py script with following parameters:

python models/download_models.py -models all

You can find detailed installation instructions for Ubuntu and Windows in the installation guide.

Usage

Basic usage:

python neural_dream.py -content_image <image.jpg>

cuDNN usage with NIN Model:

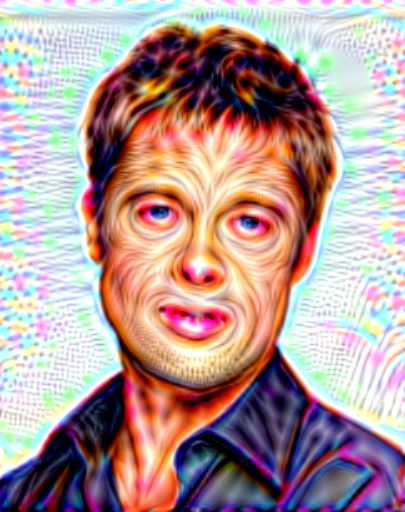
python neural_dream.py -content_image examples/inputs/brad_pitt.jpg -output_image pitt_nin_cudnn.png -model_file models/nin_imagenet.pth -gpu 0 -backend cudnn -num_iterations 10 -seed 876 -dream_layers relu0,relu3,relu7,relu12 -dream_weight 10 -image_size 512 -optimizer adam -learning_rate 0.1

cuDNN NIN Model Picasso Brad Pitt

Note that paths to images should not contain the ~ character to represent your home directory; you should instead use a relative path or a full absolute path.

Options:

  • -image_size: Maximum side length (in pixels) of the generated image. Default is 512.
  • -gpu: Zero-indexed ID of the GPU to use; for CPU mode set -gpu to c.

Optimization options:

  • -dream_weight: How much to weight DeepDream. Default is 1e3.
  • -tv_weight: Weight of total-variation (TV) regularization; this helps to smooth the image. Default is set to 0 to disable total-variation (TV) regularization.
  • -l2_weight: Weight of latent state regularization. Default is set to 0 to disable latent state regularization.
  • -num_iterations: Default is 10.
  • -init: Method for generating the generated image; one of random or image. Default is image which initializes with the content image; random uses random noise to initialize the input image.
  • -jitter: Apply jitter to image. Default is 32. Set to 0 to disable jitter.
  • -layer_sigma: Apply gaussian blur to image. Default is set to 0 to disable the gaussian blur layer.
  • -optimizer: The optimization algorithm to use; either lbfgs or adam; default is adam. Adam tends to perform the best for DeepDream. L-BFGS tends to give worse results and it uses more memory; when using L-BFGS you will probably need to play with other parameters to get good results, especially the learning rate.
  • -learning_rate: Learning rate to use with the ADAM and L-BFGS optimizers. Default is 1.5. On other DeepDream projects this parameter is commonly called 'step size'.
  • -normalize_weights: If this flag is present, dream weights will be divided by the number of channels for each layer. Idea from PytorchNeuralStyleTransfer.
  • -loss_mode: The DeepDream loss mode; bce, mse, mean, norm, or l2; default is l2.

Output options:

  • -output_image: Name of the output image. Default is out.png.
  • -output_start_num: The number to start output image names at. Default is set to 1.
  • -leading_zeros: The number of leading zeros to use for output image names. Default is set to 0 to disable leading zeros.
  • -print_iter: Print progress every print_iter iterations. Set to 0 to disable printing.
  • -print_octave_iter: Print octave progress every print_octave_iter iterations. Default is set to 0 to disable printing. If tiling is enabled, then octave progress will be printed every print_octave_iter octaves.
  • -save_iter: Save the image every save_iter iterations. Set to 0 to disable saving intermediate results.
  • -save_octave_iter: Save the image every save_octave_iter iterations. Default is set to 0 to disable saving intermediate results. If tiling is enabled, then octaves will be saved every save_octave_iter octaves.

Layer options:

  • -dream_layers: Comma-separated list of layer names to use for DeepDream reconstruction.

Channel options:

  • -channels: Comma-separated list of channels to use for DeepDream. If -channel_mode is set to a value other than all or ignore, only the first value in the list will be used.
  • -channel_mode: The DeepDream channel selection mode; all, strong, avg, weak, or ignore; default is all. The strong option will select the strongest channels, while weak will do the same with the weakest channels. The avg option will select the most average channels instead of the strongest or weakest. The number of channels selected by strong, avg, or weak is based on the first value for the -channels parameter. The ignore option will omit any specified channels.
  • -channel_capture: How often to select channels based on activation strength; either once or octave_iter; default is once. The once option will select channels once at the start, while the octave_iter will select potentially new channels every octave iteration. This parameter only comes into play if -channel_mode is not set to all or ignore.

Octave options:

  • -num_octaves: Number of octaves per iteration. Default is 4.
  • -octave_scale: Value for resizing the image by. Default is 0.6.
  • -octave_iter: Number of iterations per octave. Default is 50. On other DeepDream projects this parameter is commonly called 'steps'.
  • -octave_mode: The octave size calculation mode; normal, advanced, manual_max, manual_min, or manual. Default is normal. If set to manual_max or manual_min, then -octave_scale takes a comma separated list of image sizes for the largest or smallest image dimension for num_octaves minus 1 octaves. If set manual then -octave_scale takes a comma separated list of image size pairs for num_octaves minus 1 octaves, in the form of <Height>,<Width>.

Laplacian Pyramid options:

  • -lap_scale: The number of layers in a layer's laplacian pyramid. Default is set to 0 to disable laplacian pyramids.
  • -sigma: The strength of gaussian blur to use in laplacian pyramids. Default is 1. By default, unless a second sigma value is provided with a comma to separate it from the first, the high gaussian layers will use sigma sigma * lap_scale.

Zoom options:

  • -zoom: The amount to zoom in on the image.
  • -zoom_mode: Whether to read the zoom value as a percentage or pixel value; one of percentage or pixel. Default is percentage.

FFT options:

  • -use_fft: Whether to enable Fast Fourier transform (FFT) decorrelation.
  • -fft_block: The size of your FFT frequency filtering block. Default is 25.

Tiling options:

  • -tile_size: The desired tile size to use. Default is set to 0 to disable tiling.
  • -overlap_percent: The percentage of overlap to use for the tiles. Default is 50.
  • -print_tile: Print the current tile being processed every print_tile tiles without any other information. Default is set to 0 to disable printing.
  • -print_tile_iter: Print tile progress every print_tile_iter iterations. Default is set to 0 to disable printing.
  • -image_capture_size: The image size to use for the initial full image capture and optional -classify parameter. Default is set to 512. Set to 0 disable it and image_size is used instead.

GIF options:

  • -create_gif: Whether to create a GIF from the output images after all iterations have been completed.
  • -frame_duration: The duration for each GIF frame in milliseconds. Default is 100.

Help options:

  • -print_layers: Pass this flag to print the names of all usable layers for the selected model.
  • -print_channels: Pass this flag to print all the selected channels.

Other options:

  • -original_colors: If you set this to 1, then the output image will keep the colors of the content image.
  • -model_file: Path to the .pth file for the VGG Caffe model. Default is the original VGG-19 model; you can also try the original VGG-16 model.
  • -model_type: Whether the model was trained using Caffe, PyTorch, or Keras preprocessing; caffe, pytorch, keras, or auto; default is auto.
  • -model_mean: A comma separated list of 3 numbers for the model's mean; default is auto.
  • -pooling: The type of pooling layers to use for VGG and NIN models; one of max or avg. Default is max. VGG models seem to create better results with average pooling.
  • -seed: An integer value that you can specify for repeatable results. By default this value is random for each run.
  • -multidevice_strategy: A comma-separated list of layer indices at which to split the network when using multiple devices. See Multi-GPU scaling for more details. Currently this feature only works for VGG and NIN models.
  • -backend: nn, cudnn, openmp, or mkl. Default is nn. mkl requires Intel's MKL backend.
  • -cudnn_autotune: When using the cuDNN backend, pass this flag to use the built-in cuDNN autotuner to select the best convolution algorithms for your architecture. This will make the first iteration a bit slower and can take a bit more memory, but may significantly speed up the cuDNN backend.
  • -clamp: If this flag is enabled, every iteration will clamp the output image so that it is within the model's input range.
  • -adjust_contrast: A value between 0 and 100.0 for altering the image's contrast (ex: 99.98). Default is set to 0 to disable contrast adjustments.
  • -label_file: Path to the .txt category list file for classification and channel selection.
  • -random_transforms: Whether to use random transforms on the image; either none, rotate, flip, or all; default is none.
  • -classify: Display what the model thinks an image contains. Integer for the number of choices ranked by how likely each is.

Frequently Asked Questions

Problem: The program runs out of memory and dies

Solution: Try reducing the image size: -image_size 512 (or lower). Note that different image sizes will likely require non-default values for -octave_scale and -num_octaves for optimal results. If you are running on a GPU, you can also try running with -backend cudnn to reduce memory usage.

Problem: -backend cudnn is slower than default NN backend

Solution: Add the flag -cudnn_autotune; this will use the built-in cuDNN autotuner to select the best convolution algorithms.

Problem: Get the following error message:

Missing key(s) in state_dict: "classifier.0.bias", "classifier.0.weight", "classifier.3.bias", "classifier.3.weight". Unexpected key(s) in state_dict: "classifier.1.weight", "classifier.1.bias", "classifier.4.weight", "classifier.4.bias".

Solution: Due to a mix up with layer locations, older models require a fix to be compatible with newer versions of PyTorch. The included donwload_models.py script will automatically perform these fixes after downloading the models.

Problem: Get the following error message:

Given input size: (...). Calculated output size: (...). Output size is too small

Solution: Use a larger -image_size value and/or adjust the octave parameters so that the smallest octave size is larger.

Memory Usage

By default, neural-dream uses the nn backend for convolutions and Adam for optimization. These give good results, but can both use a lot of memory. You can reduce memory usage with the following:

  • Use cuDNN: Add the flag -backend cudnn to use the cuDNN backend. This will only work in GPU mode.
  • Reduce image size: You can reduce the size of the generated image to lower memory usage; pass the flag -image_size 256 to generate an image at half the default size.

With the default settings, neural-dream uses about 1.3 GB of GPU memory on my system; switching to cuDNN reduces the GPU memory footprint to about 1 GB.

Multi-GPU scaling

You can use multiple CPU and GPU devices to process images at higher resolutions; different layers of the network will be computed on different devices. You can control which GPU and CPU devices are used with the -gpu flag, and you can control how to split layers across devices using the -multidevice_strategy flag.

For example in a server with four GPUs, you can give the flag -gpu 0,1,2,3 to process on GPUs 0, 1, 2, and 3 in that order; by also giving the flag -multidevice_strategy 3,6,12 you indicate that the first two layers should be computed on GPU 0, layers 3 to 5 should be computed on GPU 1, layers 6 to 11 should be computed on GPU 2, and the remaining layers should be computed on GPU 3. You will need to tune the -multidevice_strategy for your setup in order to achieve maximal resolution.

We can achieve very high quality results at high resolution by combining multi-GPU processing with multiscale generation as described in the paper Controlling Perceptual Factors in Neural Style Transfer by Leon A. Gatys, Alexander S. Ecker, Matthias Bethge, Aaron Hertzmann and Eli Shechtman.

Comments
  • Preventing error

    Preventing error "RuntimeError: CUDA error: out of memory"

    I have GPU, but it has not free memory. I tried run neural_dream on cpu and got error:

    python3 neural_dream.py -content_image 1/0.png -output_image 1/14.png -model_file googlenet2.pth  -disable_check -model_type pytorch -dream_layers maxpool4 -learning_rate 0.001 -gpu c
    GoogLeNet Architecture Detected
    Traceback (most recent call last):
      File "neural_dream.py", line 793, in <module>
        main()
      File "neural_dream.py", line 121, in main
        cnn, layerList = loadCaffemodel(params.model_file, params.pooling, params.gpu, params.disable_check, True)
      File "/home/xxx/neural-dream/neural_dream/CaffeLoader.py", line 412, in loadCaffemodel
        cnn.load_state_dict(torch.load(model_file)['state_dict'], strict=(not disable_check))
      File "/home/xxx/.local/lib/python3.7/site-packages/torch/serialization.py", line 529, in load
        return _legacy_load(opened_file, map_location, pickle_module, **pickle_load_args)
      File "/home/xxx/.local/lib/python3.7/site-packages/torch/serialization.py", line 702, in _legacy_load
        result = unpickler.load()
      File "/home/xxx/.local/lib/python3.7/site-packages/torch/serialization.py", line 665, in persistent_load
        deserialized_objects[root_key] = restore_location(obj, location)
      File "/home/xxx/.local/lib/python3.7/site-packages/torch/serialization.py", line 156, in default_restore_location
        result = fn(storage, location)
      File "/home/xxx/.local/lib/python3.7/site-packages/torch/serialization.py", line 136, in _cuda_deserialize
        return storage_type(obj.size())
      File "/home/xxx/.local/lib/python3.7/site-packages/torch/cuda/__init__.py", line 480, in _lazy_new
        return super(_CudaBase, cls).__new__(cls, *args, **kwargs)
    RuntimeError: CUDA error: out of memory
    

    This patch fix it.

    opened by MichaelMonashev 3
  • AttributeError: 'int' object has no attribute 'to'

    AttributeError: 'int' object has no attribute 'to'

    ~/neural-dream$ python3 neural_dream.py -init random -gpu c -output_image 000.webp -channels 0 -dream_layers inception_3b_5x5 -channel_mode strong
    GoogLeNet Architecture Detected
    Successfully loaded models/bvlc_googlenet.pth
    Setting up dream layer 1: inception_3b_5x5
    Running optimization with ADAM
    
    Selected layer channels:
      inception_3b_5x5:  []
    
    Performing 2 octaves with the following image sizes:
      Octave 1 image size: 230x307
      Octave 2 image size: 384x512
    
    Traceback (most recent call last):
      File "neural_dream.py", line 793, in <module>
        main()
      File "neural_dream.py", line 281, in main
        optimizer.step(feval)
      File "/home/xxxx/.local/lib/python3.6/site-packages/torch/autograd/grad_mode.py", line 15, in decorate_context
        return func(*args, **kwargs)
      File "/home/xxxx/.local/lib/python3.6/site-packages/torch/optim/adam.py", line 62, in step
        loss = closure()
      File "neural_dream.py", line 257, in feval
        loss += -mod.loss.to(backward_device)
    AttributeError: 'int' object has no attribute 'to'
    
    opened by MichaelMonashev 2
  • Keras models loading error

    Keras models loading error

    Try to load efficientnet keras model and get this error:

    $ python3 neural_dream.py -model_file ~/1111/zzz.h5 -model_type keras -print_layers
    Traceback (most recent call last):
      File "neural_dream.py", line 793, in <module>
        main()
      File "neural_dream.py", line 121, in main
        cnn, layerList = loadCaffemodel(params.model_file, params.pooling, params.gpu, params.disable_check, True)
      File "/home/xxxx/1111/neural-dream/neural_dream/CaffeLoader.py", line 410, in loadCaffemodel
        cnn, layerList = modelSelector(str(model_file).lower(), pooling)
      File "/home/xxxx/1111/neural-dream/neural_dream/CaffeLoader.py", line 370, in modelSelector
        raise ValueError("Model architecture not recognized.")
    ValueError: Model architecture not recognized.
    

    How to fix it?

    opened by MichaelMonashev 2
  • AttributeError: 'int' object has no attribute 'item'

    AttributeError: 'int' object has no attribute 'item'

    ~/neural-dream$ python3 neural_dream.py -gpu c -content_image 1/7.jpg -output_image 1/9.jpg -init random -model_file models/nin_imagenet.pth
    NIN Architecture Detected
    Successfully loaded models/nin_imagenet.pth
    conv1: 96 3 11 11
    cccp1: 96 96 1 1
    cccp2: 96 96 1 1
    conv2: 256 96 5 5
    cccp3: 256 256 1 1
    cccp4: 256 256 1 1
    conv3: 384 256 3 3
    cccp5: 384 384 1 1
    cccp6: 384 384 1 1
    conv4-1024: 1024 384 3 3
    cccp7-1024: 1024 1024 1 1
    cccp8-1024: 1000 1024 1 1
    nn.Sequential (
      [input -> (1) -> (2) -> (3) -> (4) -> (5) -> (6) -> (7) -> (8) -> (9) -> (10) -> (11) -> (12) -> (13) -> (14) -> (15) -> (16) -> (17) -> (18) -> (19) -> (20
    ) -> (21) -> (22) -> (23) -> (24) -> (25) -> (26) -> (27) -> (28) -> (29) -> (30) -> output]
      (1): nn.Jitter
      (2): nn.Conv2d(3 -> 96, 11x11, 4,4, 0,0)
      (3): nn.ReLU
      (4): nn.Conv2d(96 -> 96, 1x1, 1,1, 0,0)
      (5): nn.ReLU
      (6): nn.Conv2d(96 -> 96, 1x1, 1,1, 0,0)
      (7): nn.ReLU
      (8): nn.MaxPool2d(3x3,3,3,2,2,2,2)
      (9): nn.Conv2d(96 -> 256, 5x5, 1,1, 2,2)
      (10): nn.ReLU
      (11): nn.Conv2d(256 -> 256, 1x1, 1,1, 0,0)
      (12): nn.ReLU
      (13): nn.Conv2d(256 -> 256, 1x1, 1,1, 0,0)
      (14): nn.ReLU
      (15): nn.MaxPool2d(3x3,3,3,2,2,2,2)
      (16): nn.Conv2d(256 -> 384, 3x3, 1,1, 1,1)
      (17): nn.ReLU
      (18): nn.Conv2d(384 -> 384, 1x1, 1,1, 0,0)
      (19): nn.ReLU
      (20): nn.Conv2d(384 -> 384, 1x1, 1,1, 0,0)
      (21): nn.ReLU
      (22): nn.MaxPool2d(3x3,3,3,2,2,2,2)
      (23): nn.Dropout
      (24): nn.Conv2d(384 -> 1024, 3x3, 1,1, 1,1)
      (25): nn.ReLU
      (26): nn.Conv2d(1024 -> 1024, 1x1, 1,1, 0,0)
      (27): nn.ReLU
      (28): nn.Conv2d(1024 -> 1000, 1x1, 1,1, 0,0)
      (29): nn.ReLU
      (30): nn.AvgPool2d(6x6,6,6,1,1,1,1)
    )
    Running optimization with ADAM
    
    Performing 2 octaves with the following image sizes:
      Octave 1 image size: 307x230
      Octave 2 image size: 512x384
    
    Traceback (most recent call last):
      File "neural_dream.py", line 793, in <module>
        main()
      File "neural_dream.py", line 281, in main
        optimizer.step(feval)
      File "/home/xxx/.local/lib/python3.6/site-packages/torch/autograd/grad_mode.py", line 15, in decorate_context
        return func(*args, **kwargs)
      File "/home/xxx/.local/lib/python3.6/site-packages/torch/optim/adam.py", line 62, in step
        loss = closure()
      File "neural_dream.py", line 270, in feval
        total_loss[0] += loss.item()
    AttributeError: 'int' object has no attribute 'item'
    
    opened by MichaelMonashev 2
  • How to use neural_dream.py with own DeepDream model trained on a custom image datasets.

    How to use neural_dream.py with own DeepDream model trained on a custom image datasets.

    Hi, I'm wanting to:

    1. use a DeepDream model created with your dream-creater process as seen here: https://github.com/ProGamerGov/dream-creator
    2. and then mount/load this model and use is with the process in neural-dream as seen here: https://github.com/ProGamerGov/neural-dream

    As a guess do I need to add the model I created with the dream creator process to the CaffeeLoader.py https://github.com/ProGamerGov/neural-dream/blob/master/neural_dream/CaffeLoader.py

    What I'm wanting to do is build models from my own image sets and then manipulate photos with the models I've created. Your neural_dream.py is full of great features that I'm wanting to use but with my own DeepDream model trained on my custom image datasets.

    Thx!

    opened by Bird-NZ 0
  • This occur while using pytorch-vgg16

    This occur while using pytorch-vgg16

    Traceback (most recent call last): File "neural_dream.py", line 795, in <module> main() File "neural_dream.py", line 282, in main optimizer.step(feval) File "/usr/local/lib/python3.6/dist-packages/torch/autograd/grad_mode.py", line 26, in decorate_context return func(*args, **kwargs) File "/usr/local/lib/python3.6/dist-packages/torch/optim/lbfgs.py", line 311, in step orig_loss = closure() File "/usr/local/lib/python3.6/dist-packages/torch/autograd/grad_mode.py", line 26, in decorate_context return func(*args, **kwargs) File "neural_dream.py", line 271, in feval total_loss[0] += loss.item() AttributeError: 'int' object has no attribute 'item'

    opened by aertist 0
  • import more than one pic?

    import more than one pic?

    what its the way to import more than one pic with the same config (models and layers)

    like this -content_image examples/inputs/ "all picture on folder".jpg -output_image ex/ou/"1...2...3....png"

    -num_iterations 5 -optimizer adam -learning_rate 1 -num_octaves 2 -octave_iter 15 -lap_scale 2 -save_iter 0 -channel_mode all -channels 75 -model_file models/googlenet_places205.pth -dream_layers inception_4b_pool_proj

    opened by vixound 0
  • Using -model_file pt_inception5h.pth

    Using -model_file pt_inception5h.pth

    Hi, I'm building a model based on pt_inception5h.pth with the help of the arg "-model_file" but when I run this in "https://github.com/ProGamerGov/neural-dream/tree/dream-creator-support" I get:

    `Successfully loaded Dream-Creator model: models/1model5h_v1120.pth
    Setting up dream layer 1: inception_4d_3x3_reduce
    Traceback (most recent call last):
      File "neural_dream.py", line 803, in <module>
        main()
      File "neural_dream.py", line 162, in main
        has_inception, layerList, params.classify, start_params, primary_params, secondary_params)
      File "D:\OneDrive\GitHub\neural-dream-dream-creator-support\neural_dream\dream_model.py", line 139, in build_net
        loss_module, sn = add_to_incept(net_base, n, sn, loss_module, module_loc)
      File "D:\OneDrive\GitHub\neural-dream-dream-creator-support\neural_dream\dream_model.py", line 14, in add_to_incept
        getattr(net, layer_name[0]).register_forward_hook(loss_module)
      File "C:\Users\OEM\Anaconda3\envs\tf-gpu\lib\site-packages\torch\nn\modules\module.py", line 772, in __getattr__
        type(self).__name__, name))
    torch.nn.modules.module.ModuleAttributeError: 'InceptionV1_Caffe' object has no attribute 'inception_4d_3x3_reduce'`
    
    opened by Bird-NZ 0
  • Add Docker environment & web demo

    Add Docker environment & web demo

    Hey @ProGamerGov! 👋

    I really like your implementation! It works so well ant the results are impressive!

    This pull request makes it possible to run your model inside a Docker environment, which makes it easier for other people to run it. We're using an open source tool called Cog to make this process easier.

    This also means we can make a web page where other people can try out your model! View it here: https://replicate.ai/progamergov/neural-dream

    Claim your page here so you can edit it, and we'll feature it on our website and tweet about it too.

    In case you're wondering who I am, I'm from Replicate, where we're trying to make machine learning reproducible. We got frustrated that we couldn't run all the really interesting ML work being done. So, we're going round implementing models we like. 😊

    opened by ericguizzo 0
  • Dreaming over dream-creator fine-tuned model

    Dreaming over dream-creator fine-tuned model

    Hi, I would like to dream over a model created by finetuning pretrained BVLC with your other repo 'dream-creator' but I get this error "ValueError: Model architecture not recognized." Any quick advise about how to solve it? By the way these repoes are amazing

    opened by flaclad 1
  • What exactly is -use_fft doing ?

    What exactly is -use_fft doing ?

    Hi @ProGamerGov, I've been digging around quite a lot lately to understand the significance of -use_fft. I'm trying to implement it myself on my own feature visualization library.

    What I got to know from your README.md is that it enables Fast Fourier transform (FFT) decorrelation. After cloning your repo and adding in some print statements, I'm guessing that it is being used on a tensor that has the shape corresponding to the number of channels of the layer selected by the user.

    But I'm yet to understand what it exactly does.

    Any help is welcome :)

    opened by Mayukhdeb 2
Owner
null
Pytorch implementation of convolutional neural network visualization techniques

Convolutional Neural Network Visualizations This repository contains a number of convolutional neural network visualization techniques implemented in

Utku Ozbulak 7k Jan 3, 2023
pytorch implementation of "Distilling a Neural Network Into a Soft Decision Tree"

Soft-Decision-Tree Soft-Decision-Tree is the pytorch implementation of Distilling a Neural Network Into a Soft Decision Tree, paper recently published

Kim Heecheol 262 Dec 4, 2022
tensorboard for pytorch (and chainer, mxnet, numpy, ...)

tensorboardX Write TensorBoard events with simple function call. The current release (v2.1) is tested on anaconda3, with PyTorch 1.5.1 / torchvision 0

Tzu-Wei Huang 7.5k Jan 7, 2023
Many Class Activation Map methods implemented in Pytorch for CNNs and Vision Transformers. Including Grad-CAM, Grad-CAM++, Score-CAM, Ablation-CAM and XGrad-CAM

Class Activation Map methods implemented in Pytorch pip install grad-cam ⭐ Comprehensive collection of Pixel Attribution methods for Computer Vision.

Jacob Gildenblat 6.5k Jan 1, 2023
Visualization toolkit for neural networks in PyTorch! Demo -->

FlashTorch A Python visualization toolkit, built with PyTorch, for neural networks in PyTorch. Neural networks are often described as "black box". The

Misa Ogura 692 Dec 29, 2022
Lucid library adapted for PyTorch

Lucent PyTorch + Lucid = Lucent The wonderful Lucid library adapted for the wonderful PyTorch! Lucent is not affiliated with Lucid or OpenAI's Clarity

Lim Swee Kiat 520 Dec 26, 2022
Pytorch Feature Map Extractor

MapExtrackt Convolutional Neural Networks Are Beautiful We all take our eyes for granted, we glance at an object for an instant and our brains can ide

Lewis Morris 40 Dec 7, 2022
Convolutional neural network visualization techniques implemented in PyTorch.

This repository contains a number of convolutional neural network visualization techniques implemented in PyTorch.

null 1 Nov 6, 2021
Python implementation of R package breakDown

pyBreakDown Python implementation of breakDown package (https://github.com/pbiecek/breakDown). Docs: https://pybreakdown.readthedocs.io. Requirements

MI^2 DataLab 41 Mar 17, 2022
Implementation of linear CorEx and temporal CorEx.

Correlation Explanation Methods Official implementation of linear correlation explanation (linear CorEx) and temporal correlation explanation (T-CorEx

Hrayr Harutyunyan 34 Nov 15, 2022
Pytorch implementation of the DeepDream computer vision algorithm

deep-dream-in-pytorch Pytorch (https://github.com/pytorch/pytorch) implementation of the deep dream (https://en.wikipedia.org/wiki/DeepDream) computer

null 102 Dec 5, 2022
PyTorch implementation of DeepDream algorithm

neural-dream This is a PyTorch implementation of DeepDream. The code is based on neural-style-pt. Here we DeepDream a photograph of the Golden Gate Br

null 121 Nov 5, 2022
Genetic Algorithm, Particle Swarm Optimization, Simulated Annealing, Ant Colony Optimization Algorithm,Immune Algorithm, Artificial Fish Swarm Algorithm, Differential Evolution and TSP(Traveling salesman)

scikit-opt Swarm Intelligence in Python (Genetic Algorithm, Particle Swarm Optimization, Simulated Annealing, Ant Colony Algorithm, Immune Algorithm,A

郭飞 3.7k Jan 3, 2023
Genetic Algorithm, Particle Swarm Optimization, Simulated Annealing, Ant Colony Optimization Algorithm,Immune Algorithm, Artificial Fish Swarm Algorithm, Differential Evolution and TSP(Traveling salesman)

scikit-opt Swarm Intelligence in Python (Genetic Algorithm, Particle Swarm Optimization, Simulated Annealing, Ant Colony Algorithm, Immune Algorithm,A

郭飞 3.7k Jan 1, 2023
Quickly and easily create / train a custom DeepDream model

Dream-Creator This project aims to simplify the process of creating a custom DeepDream model by using pretrained GoogleNet models and custom image dat

null 55 Dec 27, 2022
Quickly and easily create / train a custom DeepDream model

Dream-Creator This project aims to simplify the process of creating a custom DeepDream model by using pretrained GoogleNet models and custom image dat

null 56 Jan 3, 2023
Traditional deepdream with VQGAN+CLIP and optical flow. Ready to use in Google Colab

VQGAN-CLIP-Video cat.mp4 policeman.mp4 schoolboy.mp4 forsenBOG.mp4

null 23 Oct 26, 2022
RL algorithm PPO and IRL algorithm AIRL written with Tensorflow.

RL algorithm PPO and IRL algorithm AIRL written with Tensorflow. They have a parallel sampling feature in order to increase computation speed (especially in high-performance computing (HPC)).

Fangjian Li 3 Dec 28, 2021
Bpe algorithm can finetune tokenizer - Bpe algorithm can finetune tokenizer

"# bpe_algorithm_can_finetune_tokenizer" this is an implyment for https://github

张博 1 Feb 2, 2022
Using A * search algorithm and GBFS search algorithm to solve the Romanian problem

Romanian-problem-using-Astar-and-GBFS Using A * search algorithm and GBFS search algorithm to solve the Romanian problem Romanian problem: The agent i

Mahdi Hassanzadeh 6 Nov 22, 2022